Blog

Example Error Message

Delivery has failed to these recipients or groups:

[email protected]

A prolem occurred while delivering this message to this email address. Try sending this message again. If the problem continues, please contact your help desk.

The following organization rejected your message: xxxxxx.ess.barracudanetworks.com. 

Overview 

This post is intended to provide a high-level overview of the routing and delivery between two companies who utilize a ZixGateway and the Barracuda Email Security Service to encrypt and scan their messages. In addition, this document will cover a common delivery issue between these same companies. [more]

Prerequisites

  • Both companies have a ZixGateway Email Encryption virtual or physical appliance
  • Both companies use Barracuda Email Security Service for antispam/antimalware scanning
  • The sending company has configured the Barracuda Email Security Service to scan all outbound email

Procedure

When a ZixGateway customer sends an email to another ZixGateway customer, the sending appliance is aware that both customers use Zix encryption and will automatically encrypt the email before delivering it. This is seamless to end users on both sides and makes email delivery between the two automatically secure.

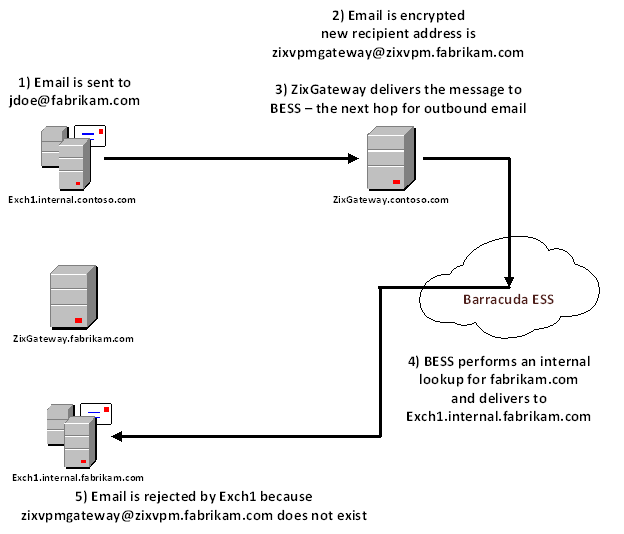
As an email is encrypted, the sending ZixGateway wraps the entire email up as an encrypted attachment and redirects the message to [email protected]. Looking at this email after it has been encryption will only reveal the sender’s email address, the subject line of the message, and the modified recipient’s email address.

At this point, any mail gateway will look up MX records for zixvpm.recipientdomain.com and deliver it normally until the message reaches the destination ZixGateway. This recipient gateway will unwrap the encrypted attachment (i.e. decrypt the email), and deliver it as normal to the original recipient.


Because of this, a significant number of ZixGateway and Barracuda customers may set up two sets of MX records like below:
 
;; ANSWER SELECTION:
fabrikam.com. 3600 IN MX 10 d12345a.ess.barracudanetworks.com.
fabrikam.com. 3600 IN MX 20 d12345b.ess.barracudanetworks.com.
 
;; ANSWER SELECTION:
zixvpm.fabrikam.com. 3600 IN MX 20 Zixgateway.fabrikam.com.
 
This method is acceptable and fairly common from a ZixGateway point of view. From the ZixGateway, the appliance is listening to all IP addresses for incoming email, but if the incoming email is not encrypted, it will be silently dropped. This protects the ZixGateway from being overrun by spam and malicious attempts. Plus, there's no reason to send the encrypted email through a spam filter - Barracuda is unable to see inside the encrypted attachment.
 
The Barracuda Email Security Service utilizes a feature to improve the efficiency of mail routing inside their network. For mail sent between two BESS customers, instead of performing an MX record lookup for every email that passes through their system, they perform an internal lookup inside their customer database and deliver it according to the settings there. In addition, if a subdomain doesn't exist under the account, BESS will look up the root domain for delivery settings.
 
This means that in the case of the example above, mail will bypass the ZixGateway entirely, because BESS will intercept the message and deliver it to the fabrikam.com domain setting. At this point, the internal mail server will reject the message as undeliverable.


Workaround
 
The solution to this problem is a simple workaround for the recipient domain. Inside Barracuda, set up a new domain for the zixvpm.domain.com subdomain that delivers to the ZixGateway and add the [email protected] user to that subdomain.
 
However if outbound email routing does not flow through Barracuda and SPF is enabled on the email domain, you will need to add the Zix hostnames to the SPF exempt list.
 
Despite Barracuda not being able to scan the encrypted email, this ensures that mail delivered between BESS customers reaches its intended destination while not altering mail flow for all other email traffic. 


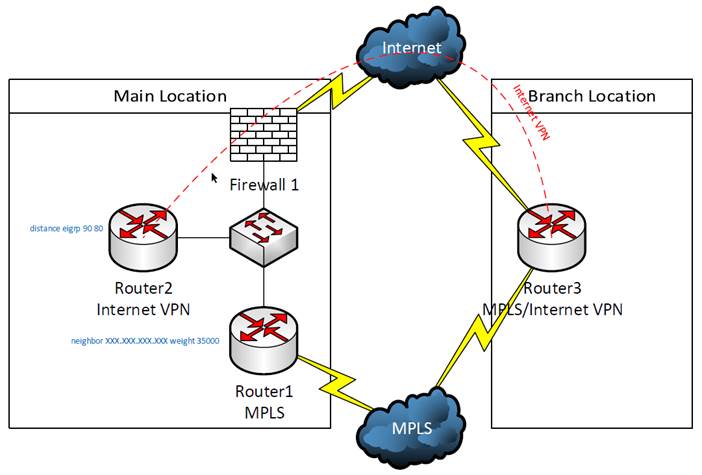
One of our customers is using an MPLS network for their WAN connections. but they have installed backup Internet connections at their branch locations in order to maintain connectivity to the corporate office if one of the MPLS connections was to fail. See the diagram below for reference:

In order to configure the backup VPN, a VPN tunnel must be built between the main location and the branch location, in this case Router2 and Router3, respectively. Also, GRE tunnels were built between these routers so that routes could be dynamically exchanged using EIGRP, which also requires adding static routes for the GRE tunnel interfaces to route this traffic out the Internet connections instead of over the MPLS connection. All routers participate in the same EIGRP process. BGP and EIGRP are redistributed into each other on Router1. The EIGRP routes will not be preferred on the branch router (Router3) because EIGRP has a higher administrative distance (90) than BGP (20) and the BGP routes will be used. On the Internet VPN router (Router2), these routes will be preferred because EIGRP internal has a lower administrative distance (90) than external EIGRP (170). This behavior can be changed by adding the  “distance eigrp DesiredInternalAdminstrativeDistance DesiredExternalAdminitrativeDistance” (“distance eigrp 90 80” in this case) command to the EIGRP configuration.

This setup will work for failover, but will additional configuration is needed for the router to automatically failback to the MPLS connection. If the failure is at Router3, Router3 will return to using BGP routes from MPLS when the connection is restored. By default, Router1 will continue to use the routes obtained via EIGRP because the weight of these injected routes of 32768 is greater than the default weight of 0 for learned routes. This can be resolved by setting the learned routes from the BGP neighbor (ISP) to a higher weight than the injected routes. In this case, “neighbor NeighborIPAddress weight 35000” was added to the BGP configuration on Router1. These higher weight routes overwrite the injected routes. 

 The combination of changing the administrative distance in EIGRP and BGP neighbor weights allows this connection to fail to the Internet VPN and return to the MPLS connection dynamically.


Often times, we come across a physical or virtual machine that has multiple drives on the same disk. It is common that the left partition is the C drive and it has run out of space, or we want the drives separated when we convert the machine from a physical machine to a virtual machine so that we have more flexibility.

Using the VMWare vCenter Converter, we can split the disks to separate VMDK files. This can be achieved when converting the machine from a physical machine to a virtual machine or a virtual machine to a new virtual machine.

  • On the Options page, click Edit in the "Data to copy" section
  • Click Advanced
  • Click Destination Layout
  • Suggest changing the drives to "Thin"
  • Click "Add disk", select the disk you want to split, and click "Move down" until it is listed under the new disk
  • Complete the job wizard and run the conversion job


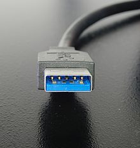
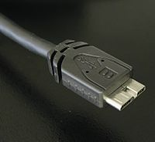
There are three primary connectors for USB3, shown below:

Standard-A

Standard-B

Micro-B


Most everyone knows a USB3 Standard-A cable will work in a USB3 port because they are the same size. But many people may not realize this is also true for the other connectors.

Because the extra pins for USB3 are in a separate part of the connector, you can use a Standard-B USB2 cable in a Standard-B USB3 port, and likewise for the Micro-B cable and port. You won’t get USB3 speeds, but this might be helpful if all you have on hand is a USB2 cable.


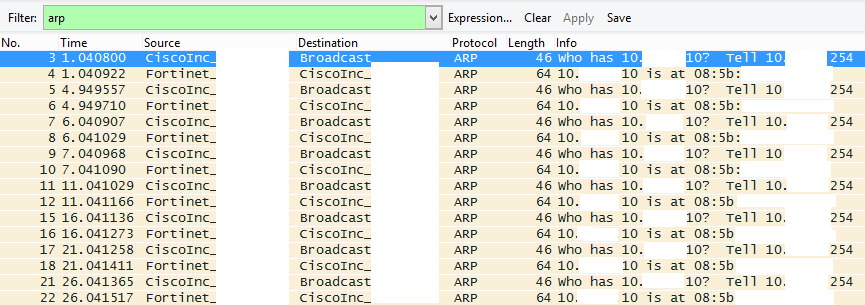
Recently I was troubleshooting an issue with a customer who was having issues with their VPN connection from a Fedline Fortigate appliance through a Cisco ASA firewall. After taking a packet capture I saw that the Fortigate was responding to the ASA’s ARPs, but the ASA was ignoring them:

I turned on ARP debugging on the ASA and saw the following:

arp-in: response at dmz from 10.x.x.10 085b.xxxx.xxxx for 10.x.x.254 885a.xxxx.xxxx having smac 085b.xxxx.xxxx dmac 885a.xxxx.xxxx

arp-in: src ip is same as one of nat mapped address 10.x.x.10 .Consuming the packet


A search led me to an email in the cisco-nsp mailing list email and Cisco Bug ID CSCuc11186 (Cisco login required). If you don't have a Cisco account, the relevant line from the bug report is:

NOTE: The fix for this issue may cause the ASA to not reply to ARP requests if the Source IP in the ARP request overlaps with a NAT rule on the ASA. This may occur when the NAT configuration line is overly broad (such as an all zeros configuration, or any. To workaround this, add the keyword "no-proxy-arp" to the nat config line.


The issue wasn’t due to the bug itself, but due to how the bug was fixed. Similar to the post in teh cisco-nsp group proxy ARP was disabled on the DMZ interface. However, proxy ARP was not turned off on the NAT rule. 


Changing the NAT rule to ‘nat (inside,dmz) source static any unidirectional no-proxy-arp’ fixed the problem.


I recently needed to move several VMDK files from a VMware datastore that had filled up due to an old snapshot. To move the first VMDK I used SSH to connect to the vSphere host, browsed to the datastore, and entered:

"cp –R /source/directory/ /dest/directory/"

to recursively copy the VMDK and snapshots to the new datastore. Because of the size of this VMDK this copy command took just over 24 hours to finish. Once it completed I unfortunately found that not only had the VMDK had been converted from thin provisioned to thick, but the snapshots had also ballooned to the size of the thick base disk.
 
It turns out that vSphere provides a much better way to copy VMDKs that will not only retain thin provisioning, but will also merge snapshots while copying. I used a command similar to the following to clone a VMDK:
 
vmkfstools -i "/vmfs/volumes/Datastore/examplevm/examplevm-000001.vmdk" "/vmfs/volumes/Datastore 2/newexamplevm/newexamplevm.vmdk" -d thin -a buslogic
 
The ‘-i’ flag tells vmkfstools that we want to clone the drive, the ‘-d’ flag specifies the disk type and the ‘-a’ flag specifies the storage adapter type (in this case SCSI with the BusLogic controller).
 
VMware has a KB on cloning VMDKs with vmkfstools, available here.


I was recently working with a customer and they had been prompted to reboot their server mid-day because of Windows updates. I told them to click “Restart Later” and forget about it because it should initiate the restart that night. However when I logged on to the server a few days later I got the notification that the server would reboot in 5 minutes.  I disabled the Windows Update service to prevent the reboot, then followed the steps below to force a reboot after updates are installed regardless if someone is logged into the server or the session is locked.
 
To change the AlwaysAutoRebootAtScheduledTime registry key value to enable automatic Windows Update restarts, follow these steps:

  1. Install Windows Update 2822241
  2. Start Registry Editor. To do this, follow these steps:
    1. Swipe in from the right edge of the screen, and then tap Search. Or, if you are using a mouse, point to the lower-right corner of the screen, and then click Search.
    2. In the search box, type "regedit.exe".
    3. Tap or click the displayed regedit.exe icon.
  3. Locate the following registry subkey:
    HKEY_LOCAL_MACHINE\SOFTWARE\Policies\Microsoft\Windows\WindowsUpdate\AU
  4. Swipe across or right-click AlwaysAutoRebootAtScheduledTime, and then tap or click Modify. Note If the entry does not exist, follow these steps to add it:
    1. On the Edit menu, point to New, and then tap or click DWORD Value.
    2. Type "AlwaysAutoRebootAtScheduledTime" in the Name field, and then press Enter.
  5. In the Value data box for this registry key, enter "1".
  6. Click OK.
  7. Exit the Registry Editor.

https://support.microsoft.com/en-us/kb/2835627


I had a customer that opened Outlook and discovered a public folder had mysteriously disappeared. I could not locate the folder anywhere so I assumed it had been deleted.

The good news is there is a PowerShell script that searches and generates a .txt file listing any public folders that were recently deleted. Once you locate the public folder in the text file, you can run another PowerShell command to restore the public folder with its contents.

Here is the link that has both scripts, along with a step by step process of recovering the folder:
 
http://blogs.technet.com/b/exchange/archive/2013/08/23/recovering-public-folder-information-in-exchange-2013.aspx


After we completed a customer’s upgrade to ESXi 5.5.3, their Veeam jobs started failing, with an error message stating the files for the virtual machines did not exist or were locked. Since the VMs were migrated to a new ESX host as a part of the upgrade, I thought the old hosts may have put a lock on some of the VM files for some reason, so I shut them down. After they were shut down, the jobs still failed but the error message changed saying that the backups failed because a NFC storage connection was not available.

Research of this error led me to an article (https://www.veeam.com/kb1198) which directed me to some backup log files. In these backup log files, I kept entries indicating Veeam was trying to establish a connection with the SSL server, but it failed due to an unsuccessful SSLv3 handshake since ESXi 5.5.3 disables SSLv3 due to vulnerabilities with the protocol.

Some more research led me to another Veeam KB article (https://www.veeam.com/kb2063) stating that this was a known bug with Veeam 7.0. The article says, “Veeam Backup & Replication is designed to use TLS or SSL, however a bug in parsing the list of supported SSL/TLS protocol versions within Veeam Backup & Replication when communicating with VMware causes the job to fail without attempting to use TLS,” and the solution is to upgrade to Veeam 8 update 3. Since this customer’s Veeam renewal was coming up, I went ahead and upgraded them to Veeam 9 and, after doing so, their backups started running without any issues.


HP printers are comonly detected in financial institution audits due to a vulnerable SSL version in use.  Many older models contain multiple vulnerabilities that cannot be fixed with firmware upgrades because the older printers are no longer supported.
 
Customers can use the HP WebJet Admin software to manage these printers through SNMP and disable the web server completely.  However make sure the SNMP community strings have been changed from the default "public" and "private".