Blog: ASA

Beginning with ASA OS v9.7, the 5506-X has a new default configuration that allows the ports to be used as switchports, similar to how the 5505 models worked. The default configuration includes a Bridge Virtual Interface (BVI) that has ports G1/2 - G1/7 (6 ports) as members of the BVI. This will apply to models that ship with 9.7 code. However, if you upgrade a device to 9.7, you will have to manually create the BVI group (the upgrade itself does not do this).

Even though the BVI supports up to 6 ports in the BVI, if you try to configure this via ASDM, it only allows you to add 4 ports as members. This actually is a restriction when running the ASA in transparent mode (we rarely do this) instead of routed mode (typical install), but ASDM seems to ignore the mode and apply this restriction regardless. So for an ASA in routed mode, this seems to be an ASDM bug. To work around this, you must add the member ports via the CLI. In addition, the ports cannot have a name defined before you configure the bridge group. However, they must have the naming convention inside1, inside2, etc. to work as part of the BVI group named inside. The default is to assign the members of BVI1 (G1/2 - G1/8) the names inside1 - inside7. The BVI interface is named inside.

Also, the http and ssh commands don't allow you to assign the BVI named interface (inside). Instead, you must add the member name (ex. inside1, inside2, etc.). The snmp-server command actually does allow you to add the BVI interface name, but it doesn't work when you do (seemingly another bug). So again, you'll need to use the member port name instead.

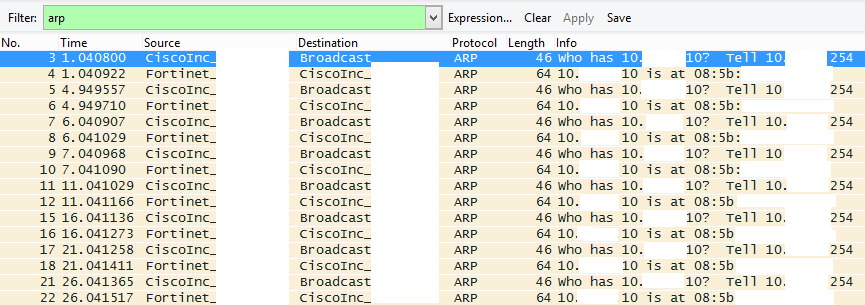


Recently I was troubleshooting an issue with a customer who was having issues with their VPN connection from a Fedline Fortigate appliance through a Cisco ASA firewall. After taking a packet capture I saw that the Fortigate was responding to the ASA’s ARPs, but the ASA was ignoring them:

I turned on ARP debugging on the ASA and saw the following:

arp-in: response at dmz from 10.x.x.10 085b.xxxx.xxxx for 10.x.x.254 885a.xxxx.xxxx having smac 085b.xxxx.xxxx dmac 885a.xxxx.xxxx

arp-in: src ip is same as one of nat mapped address 10.x.x.10 .Consuming the packet


A search led me to an email in the cisco-nsp mailing list email and Cisco Bug ID CSCuc11186 (Cisco login required). If you don't have a Cisco account, the relevant line from the bug report is:

NOTE: The fix for this issue may cause the ASA to not reply to ARP requests if the Source IP in the ARP request overlaps with a NAT rule on the ASA. This may occur when the NAT configuration line is overly broad (such as an all zeros configuration, or any. To workaround this, add the keyword "no-proxy-arp" to the nat config line.


The issue wasn’t due to the bug itself, but due to how the bug was fixed. Similar to the post in teh cisco-nsp group proxy ARP was disabled on the DMZ interface. However, proxy ARP was not turned off on the NAT rule. 


Changing the NAT rule to ‘nat (inside,dmz) source static any unidirectional no-proxy-arp’ fixed the problem.


The control-plane option is used to apply an access-list to traffic destined to the device itself.  Normally, access-Lists applied to interfaces control traffic flowing through the ASA.  When the “control-plane” tag is added, the access-list is used to control traffic that terminates on the ASA.  This can be beneficial if you want to limit the traffic that is permitted to terminate on the ASA (i.e. VPN related traffic). 

access-group device_access_in in inside control-plane [more]

One important thing to note is that access control rules for to-the-box management traffic (defined by such commands as http, ssh, or telnet) have higher precedence than an access list applied with the “control-plane” option. Therefore, such permitted management traffic will be allowed to come in even if explicitly denied by access list with the “control-plane” option.


Recently we had a team change the inside interface of one of our ASA’s to be a trunked port so we could support multiple VLANs.  To do that, we needed to move the “nameif Inside” command and IP address from the physical interface (Eth0/1) to a new subinterface (Eth0/1.4094).  In doing so I came across a few gotchas: [more]

Problem 1:

When you remove the nameif command from an interface, all associated configuration is removed from the running-config. 

Solution:

There isn’t an easy way to migrate the nameif command from one physical interface to a new one.  Once you make the change you have to reenter any configuration that included the interfaces nameif name.  The alternative is to create a new startup-configuration with the changes and reboot to that startup file.

Problem 2:

After moving the nameif command to a new sub-interface I couldn’t SSH to the device via that interface.

Solution:

Basically, the SSH daemon needs to be restarted.  I was remotely making these changes via SSH so my only option was to reboot the ASA. 


During troubleshooting it is often necessary to see what traffic is being passed between two networks or two hosts. The ASA software now features a built-in packet capture tool.

Below are the steps you need to take:

For the sake of this tutorial, let’s assume that we are troubleshooting traffic between a host with the address of 192.168.1.1 and a host with the address of 10.10.10.1.

Step 1. Define the traffic that you are interested in seeing via an ACL named “cap”: [more]

ASA(config)#access-list cap extended permit ip host 192.168.1.1 host 10.10.10.1
ASA(config)#access-list cap extended permit ip host 10.10.10.1 host 192.168.1.1
ASA(config)#access-list cap extended permit icmp host 192.168.1.1 host 10.10.10.1
ASA(config)#access-list cap extended permit icmp host 10.10.10.1 host 192.168.1.1

Step 2. Create and start the packet capture process named “capin”:

ASA(config)#capture capin access-list cap

Step 3. Generate some traffic between the two hosts.

Since our ACL in this case is set to detect all IP and ICMP traffic between the host we can just start a simple ping betweent the hosts.

From the host 192.168.1.1:
ping 10.10.10.1
From the host 10.10.10.1
ping 192.168.1.1

Step 4. Analyze the packet capture.

ASA#show capture capin
*This will output all of the traffic that it captured.

Step 5. Turn off the packet capture and remove the ACL:

ASA(config)#no capture capin
ASA(config)#clear configure access-list cap

Miscellaneous notes/commands:

You can clear the capture log by using this command:
ASA#clear capture capin

You can also use the pipe functionality when viewing the capture output:
ASA#show capture capin | inc 192.168.1.1

This can also be done via the ASDM, but what fun is that?


Recently a user at a customers site was having trouble sending email.  I ran a script that connected to each mail server and specified the sender and recipient to see if any would get errors.  One refused to accept the email because the reverse DNS lookup on the source IP failed.  So the lesson to learn here is this.  If something does not work, try to figure out where it is broken and try to see exactly what is going on in that part that is broken.  But wait - that's not the end of the story because the user was sending email to 27 recipients and none of the messages were being delivered.

Mr. Peabody, set the WABAC machine to February 2004.  Microsoft has just published a paper "The Coordinated Spam Reduction Initiative". [more]

http://old.openspf.org/caller-id/csri.pdf

Section 11 is about Computational Puzzles For Spam Deterrence.  The idea is to have the computer sending email solve a puzzle that require a lot of resources, usually CPU time, but verifying that solution is fast.  The idea was to make it expensive for spammers to send out spam.  I know this sounds silly now with botnets having 1000s of machines sending spam.  But did you know Microsoft actually implemented this in Outlook 2003?  And did you know it is still in Outlook 2007?  And did you know it is still in Outlook 2010?  It's called postmarking now, but it is still the same computational puzzle.  This is only used when it thinks your email might look like spam.

Ok, so the way this works is that Outlook or your Exchange server generates the puzzle solution and adds it to the email headers.  It uses the header "x-cr-hashedpuzzle".  RFC 2821 (Simple Mail Transfer Protocol) states "The maximum total length of a text line including the <CRLF> is 1000 characters".  This x-cr-hashedpuzzle is quite long, so it is broken up into several lines.  The first line is 1000 characters, but the continuation lines have a <tab> inserted at the front, causing them to be 1001 characters long.  If this happens to be going through an ASA with ESMTP inspection enabled, it will send out resets to close the connection because it violates the RFC.

This is why the user I was working with could not send email to a list of 27 recipients. I removed the SMTP inspection on our ASA (which I have been wanting to do anyway) to work around this.


Cisco has a built in tool that allows you to test AAA server connectivity.  It is included in both the CLI and the ASDM.  This tool is useful when you are setting up a AAA server because you don't have to login and out of the device in order to test the connectivity.

The CLI command is:
test aaa-server authentication SERVERNAME [more]

After entering this command you will be prompted to enter the server IP address, and a username and password.

The packet-tracer command is another tool that comes in handy when testing access-lists and VPN configurations.  It simulates a packet that transverses through the ASA and prints out the each step it takes and points out where it is failing.

To trace a HTTP packet from the inside address of 10.1.1.1 to outside address of 4.2.2.2 the command would be:
packet-tracer input inside tcp 10.1.1.1 www 4.2.2.2 www detailed


I was troubleshooting an application called QuickFile which uses FTP to be able to transmit certain Tax data at one of our customer sites. When you launched the application or when you tried to send the data it would give you an error saying that it could not connect to the FTP server. I worked on allowing outbound ftp access from this computer but it was still not working. After watching the logs on the ASA I could see the FTP connection was successfully being established. I then called the vendor and they sent me a breakdown of what the program is trying to do at that point and I found that it had to modify some files in the QuickFile program directory during the process. I then gave the user rights to that directory and it started to work again. So be careful not to completely trust the error messages that applications display as they can sometimes be misleading.


If you use the setup wizard for Cisco ASA appliances to allow SSH access it doesn’t auto-generate a key.  It will create the access-rules, but you still won’t be able to SSH to the firewall until the key is generated.  The quickest way to generate the key is via the command:

generate crypto key rsa modulus-size” [more]

Note: The modulus-size can be 512, 768, 1024, or 2048.  The value of 1024 is recommended.


I was trying to use Cisco’s Adaptive Security Device Manager (ASDM) to connect to our ASA in the office.  I was getting an authentication error but I knew my credentials were correct and it was working for another engineer.  The Java console contained the error “java.io.IOException: Authentication failure”.  I found several references to proxy issues related to this error, so I went to the Network Settings section of the Java app in the control panel and manually specified our proxy server (including the local bypass addresses) and it started working.  The proxy setting was set to “use browser settings” but obviously this wasn’t working.