Blog: Fortigate

When you enable SSLVPN or HTTP/HTTPS for Management on your WAN interface on a Fortigate, the Fortigate creates global system Local-In policies. These are built-in policies that allow all traffic to the ports and services for SSLVPN and management on the WAN interface by default.

When you put in a Geoblocking rule to block traffic to or from certain countries on your Fortigate under IPv4 Policies, that will not affect these system Local-In policies, even if you put in an IPv4 policy to block all inbound traffic from certain countries. There are a couple of ways to fix this.

The first option is the most restrictive and would probably be the best. This option is to specify only the addresses you want to have access to these services when setting them up, which will prevent a global system Local-In policy from being created. When setting up SSLVPN, instead of allowing access to all hosts, you can specify only the IPs or countries you want to have access to the SSLVPN ports from the outside. (You need to have already setup the address objects for the IPs or countries you want to have access).

To restrict management from the outside, under the WAN interface, simply don't enable HTTP or HTTPS. That will prevent the default Local-In policy from being created.

If you do need external management access, you'll then need to create a custom Local-In policy to allow access on those ports from the network from which you'd like to access it. We typically add the entire company external subnet. Just be sure that this network is also added as a trusted host under your system administrator's account (System -> Administrators)
Custom Local-In polices can only be created via CLI. The following CLI commands will create this custom Local-In policy. These commands assume that you've already created address objects for your WAN IP named Wan1_IP and the public subnet named "External", a service object for your web management port named MGMT, and assume that your WAN interface is wan1.

config firewall local-in-policy
edit 1
set intf "wan1"
set srcaddr "External"
set dstaddr "Wan1_IP"
set action accept
set service "MGMT"
set schedule "always"
next
end

The second option is to just leave those default system Local-In policies in place, but then to create custom Local-In polices to block access to SSLVPN and management services from IP addresses or countries that you don't want to have access
Again, since this is a cusom Local-In policy it has to be added via CLI. The following CLI commands also assume that the address and service objects have already been created for your WAN IP, for the countries you want to block, for your SSLVPN and management services, and that the WAN interface is wan1.

config firewall local-in-policy
edit 1
set intf "wan1"
set srcaddr "Blocked Countries"
set dstaddr "Wan1_IP"
set action deny
set service "SSLVPN"
set schedule "always"
next
edit 2
set intf "wan1"
set srcaddr "Blocked Countries"
set dstaddr "Wan1_IP"
set action deny
set service "MGMT"
set schedule "always"
next
end


We had a customer with multiple FortiGates that were reporting they could not get the Internet at multiple sites. In investigating, I found that the FortiGates at these sites did not have a connection to FortiGuard and were therefore unable to assess web traffic. Running the command get webfilter status from the CLI of the FortiGates that were having problems showed that they were unable to connect to the FortiGuard. You can also it in the screenshot below on the System > FortiGuard page:
 
 
The solution in this instance was to change the connection of how they FortiGate connects to FortiGuard from HTTPS to UDP. This setting can be found under System > FortiGuard. It can also be set via the CLI commands below:
        config system fortiguard
                set protocol udp
                set port 8888
                 set update-server-location usa
end
 
It is important to note that all of the Fortinet products connect to FortiGuard to download definitions for licensing, web filtering, anti-spam, etc. If the connection to FortiGuard is down, there may be issues.


When a secondary public IP address is utilized for VPN connections, the configuration of an IPSEC VPN versus an SSL VPN is quite different.  For an IPSEC VPN, it's as easy as turning flipping a switch and selecting the IP address:  

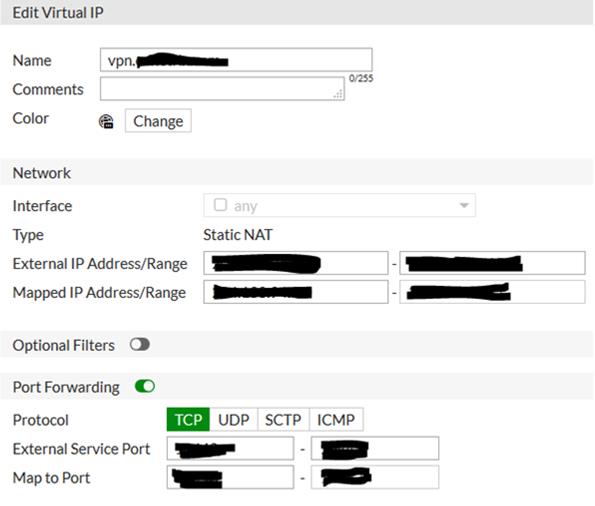
For SSL VPN it takes a couple of steps: First a Virtual IP (VIP) has to be created that points the primary IP at the secondary IP.  Additionally include port forwarding for the SSL port to be utilized:  

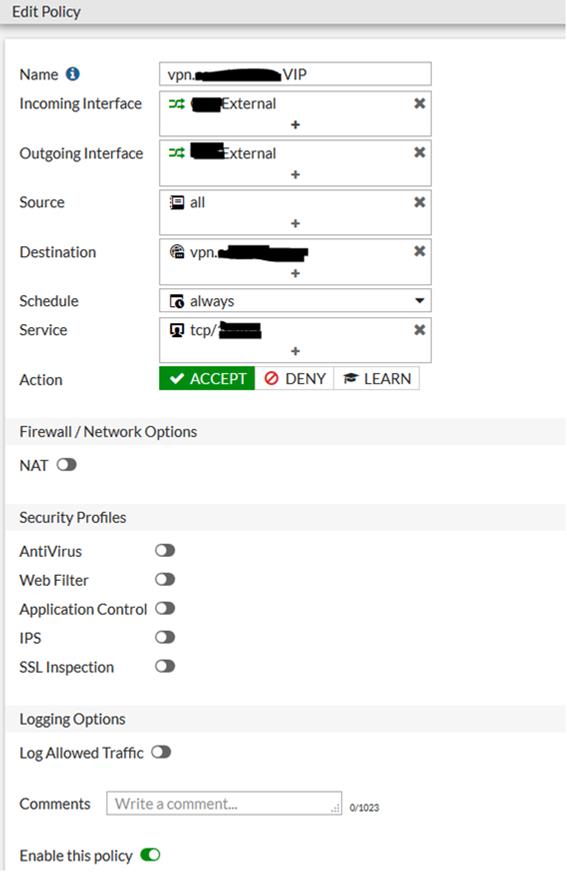
Second, an IPv4 policy needs to be created using the WAN interface for both incoming and outgoing, with the destination being the VIP:


When a FortiGate is managed via FortiManager, administering the FortiGate outside of FortiManager can cause the configuration to become out of sync. While updating an SSL certificate used for VPN access on a FortiGate for a customer, I found that I was unable to create a certificate signing request from FortiManager. After doing some research, I found a Fortinet cookbook article that explains that the certificate must be requested and the certificate request completed from the FortiGate itself, even if the device is managed via FortiManager. To complete this process, do the following:
  • Login to the FortiGate in read-write mode
    • Create a certificate signing request on the FortiGate
    • Download the certificate signing request from the FortiGate
    • Submit the certificate signing request to the certificate authority
    • Download the issued certificate from the certificate authority
    • Import the certificate on the FortiGate to complete the certificate signing request
  • Login to FortiManager
    • Select the FortiGate in Device Manager and go to the "System: Dashboard" page
    • In the "Configuration and Installation Status" pane, click the "Revision History" (four horizontal lines) icon on the "Total Revisions" line
    • Click the "Retrieve Config" button
    • The current configuration, including the new certificate, will be retrieved.
    • The certificate should now be able to be used in configurations managed in FortiManager
If you are deleting the old certificate, you will need to write the config to the FortiGate from FortiManager so that it is no longer using the old certificate. After the old certificate is no longer in use, you can login to the FortiGate in read-write mode and delete the old certificate. After the old certificate is deleted, you will need to repeat the "Retrieve Config" operation.
 
The Fortinet cookbook article explaining this process can be found at https://kb.fortinet.com/kb/documentLink.do?externalID=FD35142


How to initialize a Fortigate UTM appliance for disposal or re-use after it has been replaced by a new Fortigate appliance.

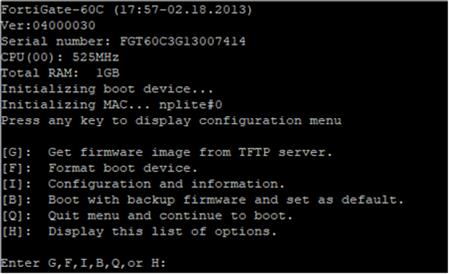
Power up the device. Interrupt boot by pressing a key during boot. A menu will be displayed:

Select "F" to format the boot device, and respond "y" to the next question:

The boot device will be formatted and the appliance is now ready for disposal.


Part 1: When installing the Fortigate Single Sign-On Agent you need to configure the service account as a local admin on the server where it's being installed.  Fortinet support states that the account has to be a domain admin, but I have confirmed that it only needs local admin rights, and not domain admin rights. 

Part 2:  When installing the Duo Authentication agent on a server to use multi-factor authentication with a Fortigate, it uses port 1812 to communicate with the Fortigate for Radius authentication.  If you have already installed the Fortigate SSO Agent on that same server it will already be using port 1812 to communicate with DCs on the network.  This will cause the Duo agent to fail to start each time you attempt to start the service.There are a couple of possible fixes to this:

  1. Change the port on the Fortigate SSO agent to another port (1813).  This will also require that you specify that port on the Fortigate DC Agents installed on your domain controllers.
  2. Change the port used by the Duo agent to another port.  This can be done in the configuration file found in the Duo installation directory.  This will also require that you change the default Radius port on the Fortigate via CLI to match what you specified in the Duo configuration.  This may cause issues if your Fortigate uses multiple Radius clients/agents.


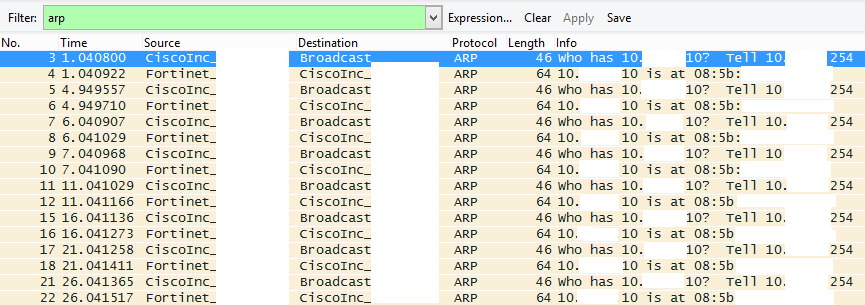
Recently I was troubleshooting an issue with a customer who was having issues with their VPN connection from a Fedline Fortigate appliance through a Cisco ASA firewall. After taking a packet capture I saw that the Fortigate was responding to the ASA’s ARPs, but the ASA was ignoring them:

I turned on ARP debugging on the ASA and saw the following:

arp-in: response at dmz from 10.x.x.10 085b.xxxx.xxxx for 10.x.x.254 885a.xxxx.xxxx having smac 085b.xxxx.xxxx dmac 885a.xxxx.xxxx

arp-in: src ip is same as one of nat mapped address 10.x.x.10 .Consuming the packet


A search led me to an email in the cisco-nsp mailing list email and Cisco Bug ID CSCuc11186 (Cisco login required). If you don't have a Cisco account, the relevant line from the bug report is:

NOTE: The fix for this issue may cause the ASA to not reply to ARP requests if the Source IP in the ARP request overlaps with a NAT rule on the ASA. This may occur when the NAT configuration line is overly broad (such as an all zeros configuration, or any. To workaround this, add the keyword "no-proxy-arp" to the nat config line.


The issue wasn’t due to the bug itself, but due to how the bug was fixed. Similar to the post in teh cisco-nsp group proxy ARP was disabled on the DMZ interface. However, proxy ARP was not turned off on the NAT rule. 


Changing the NAT rule to ‘nat (inside,dmz) source static any unidirectional no-proxy-arp’ fixed the problem.