Blog: printing

HP has a handy new “feature” on some of their newer model home and office printers that allows you to print wirelessly when a wireless network is not available. The printer does this by broadcasting its own SSID with a name something like “DIRECT-B7-HP ENVY 4520 Series”. This seems like a harmless (and pointless) feature, but it can wreak havoc on your wireless network.


The issue with this feature is that the printer appears to only have one wireless radio, which is likely already connected to your wireless network using the channel your wireless access point or router is broadcasting. The printer then starts broadcasting a second SSID (the one mentioned above) on the same channel are your wireless network, essentially causing interference. This occurred at my house and at a customer site recently. My first thought at my house was to change the channels my router was broadcasting. After about 30 seconds, the printer switch to the same channel. You can set a static channel on the printer, but then you are unable to connect to your printer over the wireless network because it is listening on a different channel than you wireless network is broadcasting.


The solution is quite simple, all you need to do it disable Wi-Fi Direct Printing. AirPrint and wireless printing will continue to work with this feature disabled. To disable Wi-Fi Direct Printing do the following:

  1. Open a browser and enter the URL IP of the printer
  2. On the Network tab, Click Edit Settings
  3. Under Wi-Fi Direct, change the status to Off then click Apply

Details on HP Wi-Fi Direct Printing can be found here: http://www8.hp.com/us/en/ads/mobility/wireless-direct-printing.html


HP printers are comonly detected in financial institution audits due to a vulnerable SSL version in use.  Many older models contain multiple vulnerabilities that cannot be fixed with firmware upgrades because the older printers are no longer supported.
 
Customers can use the HP WebJet Admin software to manage these printers through SNMP and disable the web server completely.  However make sure the SNMP community strings have been changed from the default "public" and "private".


There are times when I’m on the road and need to print a document such as a boarding pass on a hotel’s public computer.  I’d rather not take a perfectly healthy flash drive and plug it into a computer that might be infected with something just so I can print a file on the flash drive.

If you have a Dropbox account, you will find a “Public” folder in your Dropbox folder tree.  You can place files in this Public folder and allow others (including you on another computer) to access these files without the need of credentials.  This is quite suitable for things like boarding passes you want to print from a hotel’s business center computer.

You just need to drop the file into your Public Dropbox folder and then get the associated external URL by: [more]

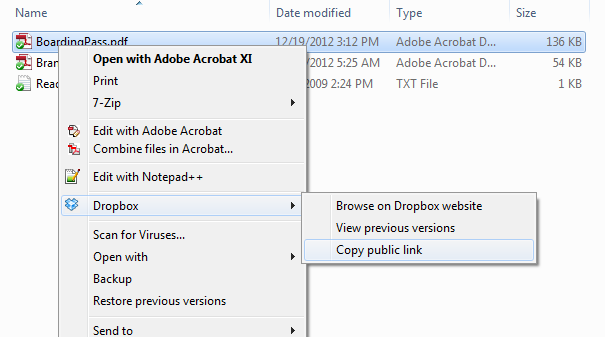
1. Using the Dropbox Windows explorer context menu by right-clicking on the file and selecting Dropbox -> Copy Public link then paste the link into something that will allow you to remember it so you can open a public computer’s Internet browser and type in the URL to get to your file.


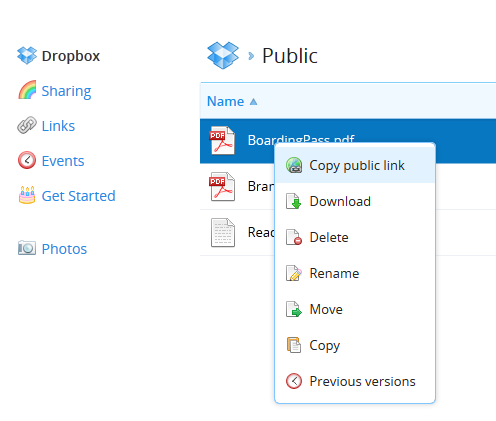
 2. Or – if the Windows explorer context menu isn’t available, you can log into the Dropbox website, navigate to your Public folder and right-click on the file and select Copy public link – and proceed.


 he public link is of the form http://dl.dropbox.com/u/<number unique to your account>/BoardingPass.pdf and just needs to be typed into a browser.


While setting up a new Windows 7 computer for a customer, the user had several programs that were very old. There was one program in particular that was written in the 1980s and was a DOS based program. This was a program that was custom written for this company to calculate the dividends for their partners, so no upgrade existed nor did they want to use another process. The program was very simple, click the appropriate DOS program and the report and checks print.

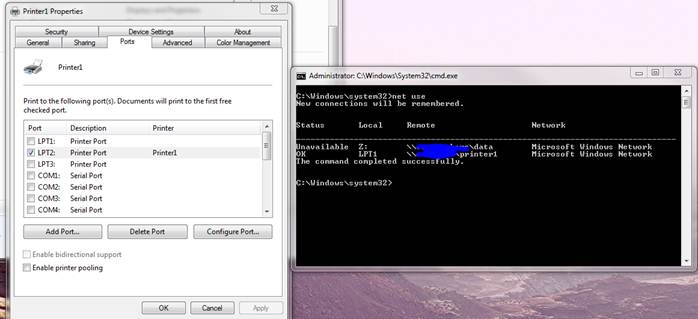
I found that the ports in the printer properties GUI do not correspond to the DOS printers. To print to a printer using DOS, you must use the following command to map the printer: net use port \\server\printer. You can run net use from a command prompt to see what devices are connected via command line. [more]

As you can see in the screenshot below, Printer1 is mapped to LPT2 from the GUI and LPT1 from the command line.


The solution for adding the printer so the DOS program could print was to place a batch file in the startup folder with the net use port \\server\printer command so the printer will be mapped each time the computer starts. This resolve this issue and allowed the DOS program to print to the printer on the new Windows 7 PC.


We were experiencing a problem where, at random times, both HP and Xerox printers have had instances where the pages printed are missing characters. Bolded or special characters and words with double-consonants are the easiest way to reproduce it.

After much troubleshooting, it appeared this was caused due to updated font files as part of the installation of Office 2010, in particular the Calibri font (which is also the default font in Word). Office 2010 updates the Calibri font set to version 5.62. This version is also included as part of the font subsystem on Windows 7 and Windows 2008 R2. However, Windows 2003 and Windows 2008 have version v5. When printing through a print server that is running on Windows 2003 or 2008, the font version mismatch would cause the missing characters. 

In the past, failing the resource group over to the other node fixes the issue. Reinstalling the Universal Print drivers on the physical nodes of the print cluster also seemed to alleviate the issue, but did not fix the problem long term. Finally during one MW, none of these fixes seem to fix the issue whatsoever and the problem was no longer random.

However, we were able to update the fonts by completing the following steps:

1. Copy the Calibri font files from a system with the updated version (4 files – regular, bold, italic, and bold italic) to an accessible location
2. Open the control panel font applet from the system with the outdated font files
3. Delete the four files for the Calibri font
4. Reboot the system.
5. Reopen the font applet from the control panel and verify the files have been removed.
6. From the File menu, select install new font.
7. Browse to the location where the files were copied to in step 1.
8. Select all fonts and choose Install
9. Reboot the system
10. Reopen the font applet from the control panel and verify the files have been added. You can open each font file and verify the version. 


There was a customer that had been migrating printers from Windows 2003 SBS Domain Controller/Print Server to Windows 2008 and somehow in the process accidentally deleted all of the shared printers.  When this happened, all printing at the company came to a halt.  There were almost 20 different printers that had been deleted including all the share names, printer ports, specific settings, etc.  It was going to be next to impossible to try and recreate the printers exactly as they were within a decent amount of time.

The customer had VEEAM backups of the system drive, but we decided that restoring the entire drive would most likely be a BAD idea on a Domain Controller.  Our preferred plan at this point was to try and merge the printer registry keys from a backup into the current registry.  From VEEAM, we restored the C:\Windows\System32\Config folder to an alternate location.  This folder contains the registry files named SYSTEM, SOFTWARE, etc.  TIP: If you do not have backup of the files, you may be able to find copies of registry files in C:\Windows\Repair folder.  Just make sure and look at the timestamps of the modification dates to see if they might be usable. [more]

What we concluded before beginning was that local printers were stored in the registry at HKLM\SYSTEM\CurrentControlSet\Control\Print\Printers.  The actual printer shares and security settings were stored in HKLM\SYSTEM\CurrentControlSet\services\LanmanServer\Shares.  At this point make sure you backup the current registry by doing an export.

Using the LOAD HIVE method in the registry, we mounted our SYSTEM file as SYSTEM_Backup under HKLM.  However, the CurrentControlSet subkey was not there.  Instead it only had CurrentControlSet001 and CurrentControlset003.  Also, the Printers subkey was missing in both CurrentControlSet001 and 003.  The reason CurrentControlSet is not there is because it is simply a pointer to CurrentControlSet001.  You can verify this by looking at the HKLM\SYSTEM\Select subkey. 

The main problem was that we had no idea where the Printers subkey was.  I had a feeling that it was also dynamically linked from somewhere else in the registry, so I created a new printer with a unique name as a test and did a registry search.  I found what appeared to be all of the printer settings in HKLM\SOFTWARE\Microsoft\Windows NT\CurrentVersion\Print.  Now, I went back and loaded the SOFTWARE file as SOFTWARE_Backup under HKLM.  When I looked in the Print subkey, I saw all the missing printers.  It appears that this location is linked with the missing Printers subkey under Control\Print.

Now to get the data we need for all the printers and the shares, I exported HKEY_LOCAL_MACHINE\SOFTWARE_Backup\Microsoft\Windows NT\CurrentVersion\Print and HKEY_LOCAL_MACHINE\SYSTEM_Backup\ControlSet001\Services\lanmanserver from the loaded registry hives.  After that is done, unload the backup hives as they are no longer needed. 

Right click your two exported .reg files and open with notepad.  Do a replace on SOFTWARE_Backup with SOFTWARE and the same for SYSTEM_Backup with SYSTEM in the appropriate files.  After that, the registry files are ready for merging.  Right click the .reg file and select "Merge."

After we merged the registry files, we thought we may have to reboot to get the printers to appear, but simply restarting the Print Spool service made the printers reappear like magic.


I had recently upgraded Adobe Reader to version 10.1.2 and my printer would only print a blank page when I tried to print a PDF document.  The printer lights would blink, and all print jobs after that would not print until I physically rebooted the printer.  I thought there might be something wrong with the PDF that I was trying to print until it happened to me again with another file.

I came across a knowledge base article from Adobe last updated 1/25/2012, http://kb2.adobe.com/cps/928/cpsid_92870.html that gives a link to a patch for being unable to print at all, and it mentions that Duplex is set to “ON” by default after the upgrade. 

Unchecking the Duplex option allowed me to print successfully.  The patch may help others in troubleshooting print problems.  As Adobe Reader updates get installed on our customers’ PCs, we may have an increase in support calls.


I was troubleshooting a printing issue recently for a remote user. She connects to the network over AnyConnect VPN and then RDPs to a terminal server. Her local printers needed to be mapped through to the server so that she could print during the day. The problem was that the printers would show up, but it wouldn’t print. After considerable troubleshooting (including removing and re-adding printers and drivers) I stumbled upon a breakthrough. On the terminal server, the file ntprint.inf in C:\Windows\System32 was missing. Replacing this file from another server 2008 R2 machine allowed her to print successfully.


A user was having problems printing out of Adobe X.  Anytime she would trying printing, Adobe X would crash, and the File ->Print option was greyed out. After doing some research, I found out that if you go to Edit ->General Tab, and uncheck “Enable Protected Mode at startup” it fixed the problem and the user was able to print again.


I had bought a new Wireless HP Laserjet printer and connected it to my wireless router.  Print jobs tested from wireless devices on the same subnet worked flawlessly.

Next, I needed to be able to print from my PCs directly outside of the wireless router.  A brief overview of my network at home is:

Cable Modem -> Cisco 851 Router (hardwired PCs, IP Phone, VPN) -> Linksys E4200 Wireless Router (Laptops, Printer).

I configured port forwarding on the wireless router to forward port 9100 to the printer’s IP address.  I setup a new network printer and told it to use the IP address of the outside interface on the wireless router.  The printer started printing, but then it would not stop.  The PC kept sending the job over and over, and it would never clear out of the print queue. [more]

Within the ports tab of the printer properties on my PC, I had to uncheck “Enable Bi-Directional Support”.  Bi-Directional printing can allow the printer to communicate back to the PC to tell it that the print job has completed.  Turning this off tells the PC to send the job to the printer and then remove it from queue