Blog

I have run into this issue recently with updates on several Windows 7 embedded thin clients.  The error code translates to a corruption in the Windows component store.

Running "sfc /scannow" on the systems indicated that it did find errors, but could not fix them.

The System Update Readiness tool (KB947821) was successful in repairing component store problems in all cases for me.  The download link is https://support.microsoft.com/en-us/kb/947821.

After installing the patch, running Windows Update again to install patches was successful.


There has been a lot of discussion about whether a BitLocker pre-boot PIN increases security or not. The primary argument we have had is related to the PIN providing a layer of security between an attacker with physical access and the Windows credentials.

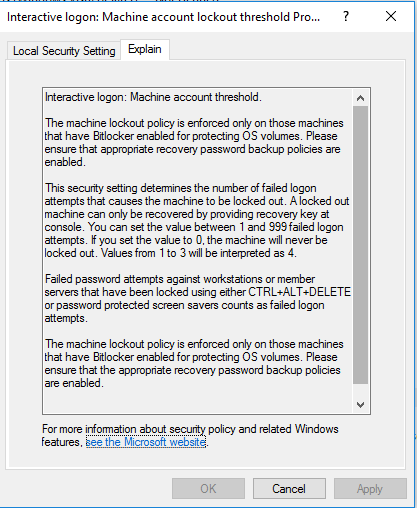
If a user is running Windows 8 or later and has encrypted the OS volume, there is a GPO designed to protect against Windows password guessing. If Windows credentials are cached, which is common for laptops, it is possible to bypass account lockout settings if the system doesn't have access to a domain controller. However, this GPO will help protect a system even if it can't reach a domain controller.

Administrators can set the “Interactive logon: Machine account lockout threshold” Group Policy under \Computer Configuration\Windows Settings\Security Settings\Local Policies\Security Options.

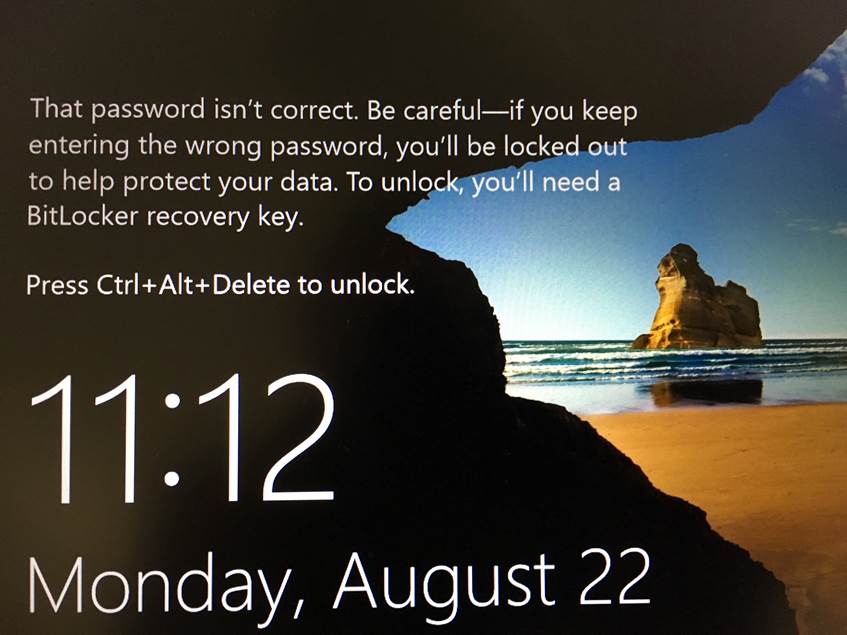
When applied, this setting will cause the following message to be displayed shortly before the machine account threshold is reached. After the threshold is exceeded, the system will reboot and require a BitLocker recovery key in order to boot.


On September 9th, 2016, the Federal Financial Institutions Examination Council (FFIEC) released a revised Information Security booklet.  This booklet is one of eleven booklets that make up the FFIEC Information Technology Examination Handbook (FFIEC IT Handbook). The IT Handbook is designed to provide information and reference to financial institutions and examiners.  The Information Security booklet specifically “provides guidance to examiners and addresses factors necessary to assess the level of security risks to a financial institution’s information systems.”

To learn more about the new FFIEC Information Security Booklet, join us for a webinar on October 11th at 2:00pm CDT. Register now

To see other webinars offered by CoNetrix, visit our webinars page.

About the FFIEC: The FFIEC was established in 1979 per Title X of the Financial Institutions Regulatory and Interest Rate Control Act of 1978.  The FFIEC is comprised of the Board of Governors of the Federal Reserve System (FRB), the Federal Deposit Insurance Corporation (FDIC), the National Credit Union Administrator (NCUA), the Office of the Comptroller of the Currency (OCC), the State Liaison Committee (SLC), and the Consumer Financial Protection Bureau (CFPB).


Recently I worked on a desktop system that was having issues connecting to WSUS and installing patches. This was a Windows 10 system (upgraded from Win 8.1) with Office 2016 (upgraded from Office 2013). Every time that I opened the Windows Update app, it listed several Office 2013 updates that couldn’t install. You could press the Retry Now button and it would run for a minute or two, but always fail with a non-specific and non-helpful error.

After running through troubleshooting steps of resetting the Windows Update agent, I finally started looking at the Office 2013 aspect. I decided to uninstall whatever 2013 components were still there and reinstall, if necessary. I loaded Programs and Features and Office 2013 was not listed.

I found a Microsoft utility to forcibly uninstall Office 2013/2016 products (link) and ran it on this PC. On the first run (and subsequent reboot), Office 2016 was removed, but 2013 was still detected by the Windows Update agent. On the second run (and subsequent reboot), Windows Update installed all of its normal patches without the Office patches listed.

I reinstalled Office 2016 and was able to bring the computer up to date. It really appears as if the 2016 upgrade didn’t fully remove all of the 2013 components as a part of the upgrade.


Due to a recent audit finding, one of our customers requested that only TLS 1.2 be allowed and the cipher security level set to “high” (AES256-SHA256 DHE-RSA-ASE256-SHA256) on their Cisco ASA firewall. The AES256-SHA256 security ciphers are not proposed by Java 8 natively. In order to add the security ciphers, you must perform the steps below.

Directions to setup Java Cryptography Encryption (JCE) Unlimited Strength Jurisdiction Policy:


  • On your PC, browse to C:\Program Files (x86)\Java\jre1.8.XXX\lib\security
  • Rename files
    • Rename local_policy.jar to local_policy.jar.OLD
    • Rename US_export_policy.jar to US_export_policy.jar.OLD
  • Go to http://www.oracle.com/technetwork/java/javase/downloads/jce8-download-2133166.html for the following files:
    • Copy local_policy.jar to C:\Program Files (x86)\Java\jre1.8.XXX\lib\security
    • Copy US_export_policy.jar from to C:\Program Files (x86)\Java\jre1.8.XXX\lib\securit
  • Launch ASDM again and the ASA will negotiate to the DHE-RSA-AES256-SHA256 security cipher


After installing Windows 10 from scratch, I noticed some applications would occasionally need .Net Framework 3.5. If I went to Programs and Features then Windows features to install .Net Framework 3.5, it would ask to download from Windows update which would always fail. I found a KB article at https://support.microsoft.com/en-us/kb/2734782 that indicated I would have to use the Windows 10 installation DVD (or ISO) as the source for the updates. This was accomplished by editing Group Policy on the local system:

Going to Computer Configuration -> Administrative Templates -> System

then enabling Specify settings for optional component installation and component repair

then, in the Alternate source file path, point to the DVD or ISO sources\sxs folder


You then need to run the gpupdate /force command then add the .Net Framework 3.5 Windows feature.


Here are two links to articles discussing the NIST and their discouraging of SMS use for multi-factor authentication. The special publication by NIST actually says

If the out of band verification is to be made using a SMS message on a public mobile telephone network, the verifier SHALL verify that the pre-registered telephone number being used is actually associated with a mobile network and not with a VoIP (or other software-based) service. It then sends the SMS message to the pre-registered telephone number. Changing the pre-registered telephone number SHALL NOT be possible without two-factor authentication at the time of the change. OOB using SMS is deprecated, and will no longer be allowed in future releases of this guidance.”

https://techcrunch.com/2016/07/25/nist-declares-the-age-of-sms-based-2-factor-authentication-over/


https://www.engadget.com/2016/07/29/sms-two-factor-authentication-isn-t-being-banned/


We have a backup internet connection that is tied into our Test Lab environment. As a part of this, I needed to change the default gateway on all of my Test Lab VMs so that everything would go out the proper connection. Now, I could RDP into each one and make the change, but that is boring and this is a LAB! It’s time to play a little bit and see if we can change this efficiently.

My initial thought was to use a combination of "psexec" and "netsh" commands to change that IP. I figured out the netsh command necessary to change an IP address (including the default gateway) and just left the IP address information out of the command. Much to my surprise, it set the adapter to DHCP, yet statically configured a default gateway. For our LAB this doesn't work since DHCP doesn't grab an address, but at least now I know. So how do you go about scripting a change to the default gateway for multiple Windows systems?

Use a route add command, of course! Using psexec to push the command out, I ran “route add -p 0.0.0.0 mask 0.0.0.0 10.1.1.1” where 10.1.1.1 is my new default gateway. Much to my surprise, it changed the default gateway entry on the adapter without issue.


Since Veritas took over Backup Exec from Symantec, we’ve had issues getting licensing migrated and renewed for various reasons.  

For one customer we had recently renewed maintenance for one year and needed to apply the license to the Backup Exec console. In the console, I could see there were product licenses and maintenance licenses. The maintenance licenses had indeed expired. 

When I went to the Veritas licensing portal to retrieve the licenses, they showed an expiration date in one year from now. I downloaded the new licenses, but no matter what I tried to import or delete existing licenses, it never would display the new maintenance expiration dates.

I called Veritas and they changed the way maintenance licenses are managed from the Veritas portal; they are not managed on the Backup Exec console any longer.  You can ignore the dates for the maintenance contract now since they moved over to Veritas.


When I was upgrading to Windows 10, I decided to install from the Current Branch for Business ISO rather than an in-place upgrade since it'd been more than three years since I'd performed a clean install. Immediately after the Windows 10 install and activation, I decided to enable BitLocker since it seemed like a good idea to do this as early in the process as possible.

After enabling BitLocker and setting a PIN I rebooted and was presented with the BitLocker passcode screen. I entered the code and pressed Enter and the system stayed on the BitLocker screen. After several minutes, I forced power off and then powered the laptop on. The BitLocker screen appeared again with the same results after entering the code. After repeating this cycle several times, I pressed the escape key in order to enter the recovery key. Rather than prompting for a recovery key, the system booted directly into Windows and, after logging in, displayed an error message about C: not being encrypted because the key could not be obtained from the TPM chip.

I tried several things related to UEFI-only boot and UEFI/legacy boot in the laptop startup screens without any success. Every time we changed any boot options on the laptop and then saved and restarted, the system could not find the boot drive until we forced power off. Then, the boot drive could be found.

Finally, I installed Windows patches before trying to enable BitLocker and it worked perfectly.