Blog: printing

Windows 7 by default installs the Universal Print Driver for HP device and uses the native Windows scanning options. Which is not as robust as the previous versions that came with the All-In-One systems. The user was complaining that the scanning was not usable and needed the same functionality that was there before Windows 7. This method will allow you to install the same software options previously available on Windows XP and Vista. After installation of the software on a Windows 7 PC in Compatibility Mode the following software components are installed:

  • Print Driver
  • Send Fax
  • Uninstall Utility
  • User Guide
  • Twain and WIA Scan Drivers
To run the Windows Vista software on a Windows 7 PC in Compatibility Mode follow the steps below:
  1. Copy the entire product CD for Windows Vista 32 bit to the hard drive of the Windows 7 PC.
  2. The Windows Vista Full Software Solution on hp.com can also be used. Download the Full Software Solution for your product for Windows Vista from hp.com. Unzip/extract to the hard drive of the Windows 7 PC.

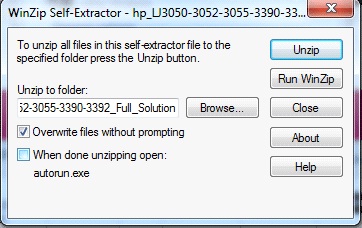
    Uncheck the checkbox "When done unzipping open: autorun.exe" before Unzipping the hp.com download bundle. [more]

    Figure 1: WinZip Self-Extractor
  3. There are 4 executable (.exe) files in the full solution software bundle that are included in the copied/extracted software bundle on the Windows 7 PC hard drive that need to be run in Compatibility Mode for a successful install on a Windows 7 PC.

    These 4 files are:

    • Autorun (.exe)
    • Hpzsetup (.exe)
    • Hpzstub (.exe)
    • Setup (.exe)

    Note: These 4 files may not show the file type extensions (.exe) when listed in the Full Software Solution folder.

    Figure 2: Files listed in the Full Software Solution folder
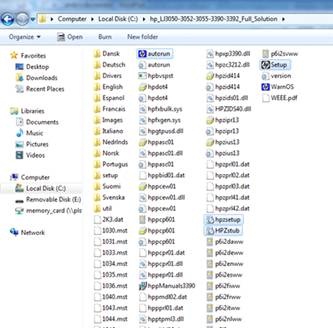
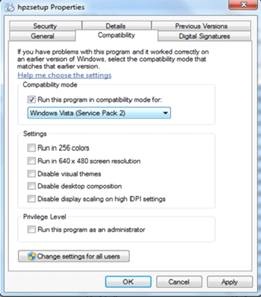
  4. 4. Each of these 4 files (autorun, hpzsetup, HPZstub, and Setup) need to be modified to be run in Compatibility Mode on the Windows 7 PC. Right click on each file and go to Properties. Click on the Compatibility tab and checkmark the box Run in compatibly mode for: and select Windows Vista (Service Pack 2) from the dropdown box. Click on Apply or OK . Repeat this step for EACH of the 4 files listed above.

    Figure 3: Selecting the compatibility mode
After the 4 files have been set to run in Compatibility Mode, double click the autorun.exe file and allow the installation to begin. Click on Install Software from the top of Begin Setup screen and follow the installation prompts.

 

We began to see the autocreation of printers (or redirected printers) starting to fail for users when logging in to a customer's Terminal Servers lately.  On the same server we also start seeing the printers that were autocreated not being deleted (orphaned session printers) when users logged off a Terminal Server.  The cause turned out to be two outdated DLLs installed on the Terminal Servers:

Hpmini.dll - This issue occurs with HP model driver versions 60.x.x.x and 4.x.x.x. containing hpbmini.dll version 1.0.0.18 or older. Version 1.0.0.19 and newer has the fix. The memory leaks and memory corruption possible with the 1.0.0.18 (or older) dll will not cause a spooler crash, but can degrade performance of the server.  Version 4.x.x.x print drivers have an issue unloading hpbmini.dll which will likely cause a spooler crash when the server has a heavy load of connected users.

hpcdmc32.dll - This issue occurs with 60.x.x.x and 4.x.x.x HP print drivers containing hpcdmc32.dll version 1.0.2.30 or older. Version 1.0.2.31 and newer has the fix. The most recent version of hpcdmc32.dll is 1.0.2.35. The memory leaks possible with the 1.0.2.30 (or older) dll will not cause a spooler crash but may cause performance degradation.

Here is what turned out to be the solution for us: [more]

  1. Upgrade to latest driver available for printer model(s) causing issue – verify that the two DLLs above are updated during this process. If the files are in use while the driver is updated, they will not be replaced.
  2. Manually replace the two DLLs above with updated versions.
  3. Install and use HP Universal print driver


If you have forgotten a password on a Xerox Workcentre 5225 you won't find any documentation on Xerox's website on how to reset the password. If you ask them they will tell you that a technician (who you have to pay) will need to reset it. There is a way around this however. You can enter what is called "debug" mode and reset the password if you have lost the password to the printer (WARNING: Do not try adjusting anything in debug mode that you do not know how to do as it could have negative effects). In order to enter debug mode you will need to hold down the 0 button on the control panel for approximately 5 seconds, then while still holding this down press the start button. You will then be prompted to enter a passcode. The default is "6789". Now that you are in debug mode you can change the username/password just like you would if you had already logged in as the admin as follows: [more]

  1. Press the <Machine Status> button on the Control Panel.
  2. Press the [Tools] tab.
  3. On the Tools screen press the [Authentication/Security] Settings.
  4. Press [System Administrator Settings].
  5. Press [System Administrator's Login ID]
  6. On the System Administrator's Login ID screen, Select [Keyboard]
  7. Type in <username here> for the Login ID, and select [Save]
  8. On the Retype line, select [Keyboard]
  9. Enter the same Login ID, and select [Save] twice.
  10. If prompted [Do you want to change the System Administrator's Login ID?] select [Yes]
  11. Press [System Administrator's Passcode].
  12. On the Passcode screen, Select [Keyboard].
  13. Type in <Passcode here> for the [New Passcode], and select [Save].
  14. In [Retype Passcode], select [Keyboard].
  15. Enter the same passcode, and select [Save] twice.
  16. In the [Do you want to change the System Administrator's Passcode?] screen, select [Yes].
  17. If prompted choose to reboot the machine after the changes have been made.


We had a new printer that needed to be installed on a PC at a customer site. The new printer was USB and after setting it up, all of my test jobs that I sent to the printer failed. I tested out many different drivers and even tried using a different USB printer at one point. None of these things worked. I then finally decided to remove PGP endpoint protection and the printer started working immediately. This didn’t make much sense because my account was not supposed to be blocking anything through PGP. I checked the PGP settings and found that the “everybody” group (a distribution group setup at the bank which did not include my account) was given access to these “other devices” that this USB printer fell under the category of. The group that was meant to be there was the “everyone” group to which includes CoNetrix accounts.  This wasn't an easy problem to solve due to the lack of a useful error message.  If you use PGP endpoint protection be aware that you will not get an error message if it's blocking your printer and that USB printers fall under "other devices".


I’ve been researching some slow installs on one of our terminal servers for a while now. An install, which normally takes a couple of minutes, had been taking close to an hour; giving me time to complete other installs and come back to it. It seemed like a registry issue for the longest time, but I wasn’t completely sure where to begin. I found a posting on an HP forum about an older version of the Universal Print Driver leaving a ton of garbage in the registry when it was installed. Checking the tree (HKEY_CURRENT_USER\Software\Hewlett-Packard, HKEY_USERS\.DEFAULT\Software\Hewlett-Packard) and there were quite a few keys with GUIDs (100a6cf5-1f38-4593-558c-306404c054e2) running down the list. [more]

Following recommendations from http://www.rb303.net/2010/01/terminal-server-2003-msiexec-high-cpu.html, I deleted all the HP printers, deleted all the HP drivers from the local print server properties, and then backed up and deleted the trees listed above as well as the HP Universal Print Monitor key (HKEY_LOCAL_MACHINE\SYSTEM\ControlSet001\Control\Print\Monitors\HP Universal Print Monitor). I then reinstalled the necessary HP printers, one of which installed the Universal Print driver again, and checked the registry. Much cleaner.

After running a test install, it appears that removing those entries really cleaned up the registry quite a bit and is speeding up the installs. To give you an idea of the sheer size of the exported entries, in the default .reg format, the export took nearly 40MB. In plain-text (.txt) export, the size doubled. That's a lot of HP garbage.


We had a problem with a new Xerox ColorQube printer that was not allowing users to use the hole punching or stapling features (something that they had been promised by Xerox would work). When printing a job they would click on the printing preferences and then try to choose either hole punch or staple and they were both grayed out. When I was logged onto my account the option was not grayed out. This at first lead me to believe that the problem was a rights issue but it turns out it was not. I noticed that when I logged on with my account onto another terminal server that the options were grayed out for me as well. This lead me to compare settings within the printing preferences on my two profiles. [more]

I finally found through this that the problem was within the paper size choice. If the paper size setting was set to mixed output you were not allowed to choose to use the hole punching or stapling features (they were grayed out). When the size was specified such as legal or letter size the options would then become available.  It makes sense why the stapling and hole punching options were disabled with that paper size, but the user interface was less than intuitive.


Here's a helpful hint that will save you some time trying to figure out why your additional paper tray won't work after moving your HP printer.  I recently encountered this problem after moving an HP printer to a different spot in the same office.  After I plugged it back in the add on paper tray wouldn't work.  Turns out, the paper tray had to have power before the printer was turned on, or the printer would not recognize it.  Power applied simultaneously did not work.


I have been working on a proof of concept install of VMware View v4 at a customer location. One of the challenges that we ran up against was trying to get the USB redirection to work with HP USB printers. Technically, all that is necessary is to have the printer plugged in USB and have a driver loaded on the virtual machine that you are connecting to using the VMware View client. However, in practice what we found...

HP printers are usually installed using a DOT4 USB port driver. DOT4 port types have been around a while and basically provide a bi-direction information flow between multiple devices on a single physical channel. Its most commonly seen for devices that support multiple functionality like scanning and printing, but can be used for any USB connected printer. There is an option to NOT use the DOT4 port types and in our situation it was essential because….well, the VMware View USB redirection just simply didn’t work with the DOT4 ports. The problem is that once the printer was installed it was IMPOSSIBLE to change the port type from DOT4 to USB…the printer would stop working. After about 2 days of struggling with this and not being able to remove the DOT4 port type, I finally found that the port type could be altered after the printer was installed. Heres how: [more]

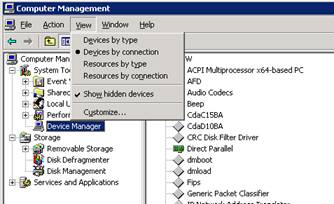
  1. Open device manager on the PC and change the view to by connection and show hidden devices
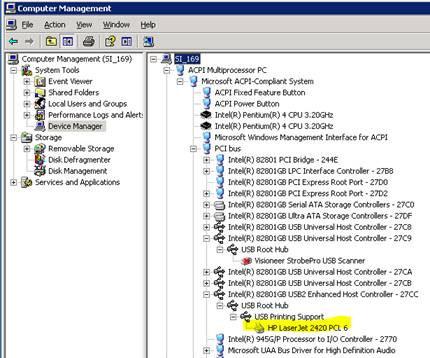
  2. Search through the USB host controllers and USB Root Hubs until you find the hub with the printer installed…It will look like the following:
  3. Next, right-click on the USB Printing Support and select properties.
  4. Select the drivers tab and select upgrade driver
  5. Choose to “Install from a specific location” and then choose “Don’t search. I will choose the driver”
  6. Then you will be give the option to choose the driver used for the USB printer support. Choose USB Printer support.
  7. Click Next and it will install new drivers and change the port type of the printer from DOT4 to USB

It is yet to be tested if this USB printer support method works with multifunction printers, but the change worked on every LaserJet USB printer that we set up. Obviously, if you have a choice, just set up all the printers as network printers and avoid the problem altogether.


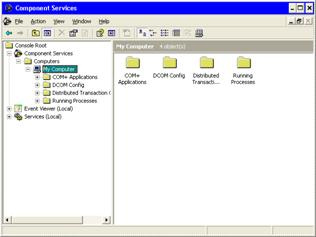
After installing ARTA Deposit on a virtual Windows XP system running user could connect and access all the data. The problem was the bank employees could not preview or print any forms. After a little investigation I called ARTA support. I went through all the normal steps of checking folder permissions and basic troubleshooting before being handed to a 2nd tier support tech. The tech asked me to check the permissions of the Component Services. I navigated to [Control Panel\Administrative Tools\Component Services]. I then went to “My Computer”, in the Microsoft Management Console, right clicked and selected “Properties”.  [more]

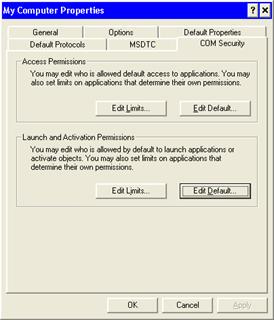
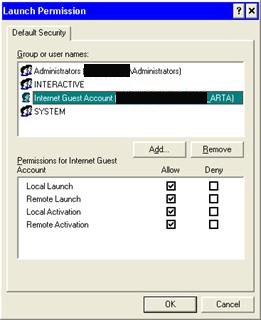
Then I select the COM Security tab and under “Launch and Activation Permissions” select “Edit Default”.  I added the local “Internet Guest Account”  with Local Launch, Remote Launch, Local Activation and Remote Activation permissions and was then able to preview and print forms in ARTA Deposit.

This is not documented as needing to be done anywhere that I could find and the tech said it was a common problem. The level 1 support did not know about these permissions either.


A client recently had a problem where printing to an HP P2035 printer from the network. When the printer was pointed to installed driver, the print spooler on the print server would crash.

The cause of the problem was that the only model specific driver to date (10/21/09) for the P2035 model was a Host-based driver – also known as: Graphic Display Interface (GDI). The driver must NOT be a Host-based printer (AKA GDI or Windows-only Printer) - Host-based Printers, will not function in a Terminal Services Environment (without 3rd party printing software). The only other available driver was the HP universal driver. [more]

In the documentation I found out that the printer does support PCL5 language. However, there is not a model specific driver in this language provided by HP. The P2015 model does have a PCL 5e driver available. I downloaded that model and installed it to the printer server and test servers. I then tested printing and things seemed to function.  However, further testing revealed failure to print images from Adobe and bank specific applications while using the P2015 driver with this printer. Images would come out as black squares. Several modifications were made to the printer settings, but nothing seemed to fix this issue. The problem was not documented on HP’s support site, probably due to the fact that this is a new model of printer.