Blog: Xerox

We were experiencing a problem where, at random times, both HP and Xerox printers have had instances where the pages printed are missing characters. Bolded or special characters and words with double-consonants are the easiest way to reproduce it.

After much troubleshooting, it appeared this was caused due to updated font files as part of the installation of Office 2010, in particular the Calibri font (which is also the default font in Word). Office 2010 updates the Calibri font set to version 5.62. This version is also included as part of the font subsystem on Windows 7 and Windows 2008 R2. However, Windows 2003 and Windows 2008 have version v5. When printing through a print server that is running on Windows 2003 or 2008, the font version mismatch would cause the missing characters. 

In the past, failing the resource group over to the other node fixes the issue. Reinstalling the Universal Print drivers on the physical nodes of the print cluster also seemed to alleviate the issue, but did not fix the problem long term. Finally during one MW, none of these fixes seem to fix the issue whatsoever and the problem was no longer random.

However, we were able to update the fonts by completing the following steps:

1. Copy the Calibri font files from a system with the updated version (4 files – regular, bold, italic, and bold italic) to an accessible location
2. Open the control panel font applet from the system with the outdated font files
3. Delete the four files for the Calibri font
4. Reboot the system.
5. Reopen the font applet from the control panel and verify the files have been removed.
6. From the File menu, select install new font.
7. Browse to the location where the files were copied to in step 1.
8. Select all fonts and choose Install
9. Reboot the system
10. Reopen the font applet from the control panel and verify the files have been added. You can open each font file and verify the version. 


I have been working on update the Xerox DocuShare client to a new version for one of our customers. They were previously using DocuShare version 5 and it was installed via GPO. They wanted to upgrade to version 6.5.1 and wanted it to be pushed out to their terminal servers using Microsoft System Center Configuration Manager (SCCM).

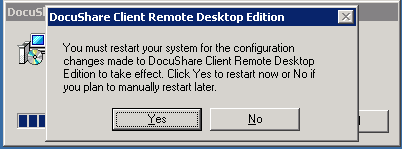
I removed the software from the server by removing the software package from the GPO with which it was installed. I started testing the install by doing a manual install of the new version. Xerox also provided an administrative installation option to create a custom MSI package. The following command is used to create the custom install package: msiexec.exe /a <path>\DSClient.msi. I noticed that there was no option to customize the directory to which the program installs, so I called Xerox. Xerox also said there was no command line switch for this. The old version was installed at D:\Program Files and the new version was forced to be installed at C:\Program Files. After installing the product using my custom MSI, each time I would restart the server I would get the messages below twice. If I clicked no on these pop-ups, the program would run correctly, but each user would get the prompts at each logon. [more]

I had a case open with Xerox for several weeks and they tried numerous data collections and custom MSI configurations to try and find the problem. I got to thinking about the problem one day and found there was a simple solution. I started searching the registry to see if any remnants of the old GPO installation were found. I found that there were several registry keys related to Xerox that were pointing to D:\Program Files\Xerox, but my new install needed to be on the C drive. These keys were left behind by the GPO uninstall. Xerox does not have a registry cleaner like several other vendors have. What was happening was that the program was trying to reconfigure itself each time it started because it could not find the files to start the DocuShare client. The registry key that ended up being the key to this was HKEY_USERS\.DEFAULT\Software\Xerox\DocuShare Client. After I deleted that key, the install worked perfectly.

The moral of this story is to check to make sure that nothing is left behind from an uninstall, especially if you are changing the directory to which the program files are installed.


After installing a new computer and upgrading to Adobe Reader 10.1, a user was unable to print PDFs in portrait orientation to a Xerox printer. The documents printed correctly to an HP printer. When printed to a Xerox printer, two portrait pages were shrunk and printed to one landscape page (like a book). To fix this error, you must follow the steps below on each printer affected. This will make the printer print exactly what is seen on the screen, just like it was a picture. 

  • Click Print
  • Click Advanced
  • Click Print as Image


At a bank IT consulting customer, the print spooler on both of print cluster nodes was crashing multiple times a day and posting the following error. The DLL in question was part of the Xerox Global Print Driver package.

Faulting application spoolsv.exe, version 6.0.6002.18294, time stamp 0x4c6a9898, faulting module x2utilGO.dll, version 5185.4100.0.0, time stamp 0x4d46e6ea, exception code 0xc0000005, fault offset 0x0004cf8a, process id 0x778, application start time 0x01cc15d439353ddd. [more]

SOLUTION:
When looking at the orphaned spool files, I found that some of the files had a .TMP extension. These type of spool files are associated with LPR print jobs. I was able to pull the printer name from the spool file and found the specific printer that sent the job. This printer was added to the network on the evening of the 16th – the print spooler started having issues on the 17.

In looking at the configuration of the printer, the TCP\IP port was set to use the LPR protocol. This was a configuration that we had used on some printers in the past. When the new printer was setup, it was assigned to the port that was used previously (which is a common procedure). Even though the documentation states this printer supports the LPR protocol, it clearly has an issue with this configuration. I set the port back to the Raw protocol and also checked every other Xerox printer port and set it from LPR to Raw where necessary (8 printers total).


One of our Lubbock IT support clients uses both the PS and PCL6 versions of the Xerox Global Print Driver (GPD) in a Windows 2008-x86 clustered print server environment.

To fix an issue that we were having with v5.173 of the GPD, Xerox suggested we upgraded to the current 5.185 version of the driver.

I successfully upgraded the PS language of the v5.185 driver on both print servers without any problems.

The problem appeared after I upgraded the PCL6 driver. I downloaded and installed the PCL6 driver to both print servers. Both servers showed that the update was installed successfully; however, the version of the driver within print management still showed to be v5.173. When I pulled up the printer that was using the driver, the version showed to be the updated version (5.185). When print jobs were sent to printers using the updated PCL6 version of this driver, the print spooler would crash and fail over. This occurred on both print servers. [more]

I was unable to uninstall the driver at this time, because over 40 printers were pointed to this driver. I then modified each printer to use the PS version of the driver. After doing so, I then removed the driver package from the print server through print management. I successfully removed the driver and the package from one print server. On the second print server, I received the following error upon removal: “Failed to remove driver package x2univx.inf. Driver package in use.” The driver itself was no longer listed in the print management window.

I then reinstalled v5.185 of the global print driver on both servers. Printing was successful on the print server on which the driver was removed successfully. However, the print spooler continued to crash on the server which had the error on driver removal. I attempted to remove the driver again, but received the same error. Restarting the print spooler as well as the server after an install but before the removal did not alleviate the issue. At this point, I called Xerox. Unfamiliar with the issue, they suggested I remove some files manually from the print virtual quorum. I completed this process, but the error still occurred upon driver removal.

Finally, I reinstalled v5.173 of the global print driver. After a successful installation, I then attempted to remove the driver.  The driver package was removed successfully and installed the new version of the driver (v5.185). I modified some of the printers to use this new driver and printing was successful.


Not all Xerox printer models are fully supported by the Global Print driver. In some cases, even newer models are not yet supported by the current version of the GPD. In this case, the driver switches to Basic Printing Mode, which disables several of the functionalities of the printer (Accounting, Color Options, etc.)

In a situation as described above, the automatic detection of the printer model can be disabled and the driver can be manually pointed to a fully supported model. Note that it is important to find a model that is close in functionality so that the correct options can be configured. Alternatively, you can select Xerox WorkCentre Device or Xerox Free Flow Device for select Xerox models and have access to more features. [more]

How-to Manually Configure the Xerox Global Print Driver

If you would like to manually select the device to configure the X-GPD and to manually configure the
installable options, do the following steps:

  1. Right-click on the current printer and select Properties.
  2. Select the Configuration tab.
  3. Select the Bi-Directional Setup button.
  4. Select the Off option button.
  5. Select OK.
  6. Select Apply.
  7. Select the Options tab.
  8. Select the new printer in the Configuration field. Select Apply.


If you have forgotten a password on a Xerox Workcentre 5225 you won't find any documentation on Xerox's website on how to reset the password. If you ask them they will tell you that a technician (who you have to pay) will need to reset it. There is a way around this however. You can enter what is called "debug" mode and reset the password if you have lost the password to the printer (WARNING: Do not try adjusting anything in debug mode that you do not know how to do as it could have negative effects). In order to enter debug mode you will need to hold down the 0 button on the control panel for approximately 5 seconds, then while still holding this down press the start button. You will then be prompted to enter a passcode. The default is "6789". Now that you are in debug mode you can change the username/password just like you would if you had already logged in as the admin as follows: [more]

  1. Press the <Machine Status> button on the Control Panel.
  2. Press the [Tools] tab.
  3. On the Tools screen press the [Authentication/Security] Settings.
  4. Press [System Administrator Settings].
  5. Press [System Administrator's Login ID]
  6. On the System Administrator's Login ID screen, Select [Keyboard]
  7. Type in <username here> for the Login ID, and select [Save]
  8. On the Retype line, select [Keyboard]
  9. Enter the same Login ID, and select [Save] twice.
  10. If prompted [Do you want to change the System Administrator's Login ID?] select [Yes]
  11. Press [System Administrator's Passcode].
  12. On the Passcode screen, Select [Keyboard].
  13. Type in <Passcode here> for the [New Passcode], and select [Save].
  14. In [Retype Passcode], select [Keyboard].
  15. Enter the same passcode, and select [Save] twice.
  16. In the [Do you want to change the System Administrator's Passcode?] screen, select [Yes].
  17. If prompted choose to reboot the machine after the changes have been made.


We had a problem with a new Xerox ColorQube printer that was not allowing users to use the hole punching or stapling features (something that they had been promised by Xerox would work). When printing a job they would click on the printing preferences and then try to choose either hole punch or staple and they were both grayed out. When I was logged onto my account the option was not grayed out. This at first lead me to believe that the problem was a rights issue but it turns out it was not. I noticed that when I logged on with my account onto another terminal server that the options were grayed out for me as well. This lead me to compare settings within the printing preferences on my two profiles. [more]

I finally found through this that the problem was within the paper size choice. If the paper size setting was set to mixed output you were not allowed to choose to use the hole punching or stapling features (they were grayed out). When the size was specified such as legal or letter size the options would then become available.  It makes sense why the stapling and hole punching options were disabled with that paper size, but the user interface was less than intuitive.


The Xerox WorkCentre Pro line of multi-function printers has network scanning capabilities.  This allows users to scan a document into a PDF and save it in a number of network directories.  Well as it turns out that number is five.  You can set one default destination and up to four alternate destination.  So if you have five people in a branch then your fine, otherwise you’re not so fine.  Well in Xerox’s infinite wisdom, they did manage to work around this issue by allowing each scanning template to be saved it a specified subfolder within a destination directory.  Therefore in order to allow users to scan to a document to their UserDocs folder, you need to do the following:

  1. Open or create the branch directory where the WorkCentre was installed
  2. Create a new folder and name it “Scans”
  3. In Scans Properties, give the domain user “Xerox” read/write/modify rights to the folder
  4. In Scans, and create a folder for each user who will use the network scanning feature.  Make the username the same as the folder name
  5. Create a shortcut of each folder and put it into the respective user’s UserDocs folder.  Rename the shortcut “Xerox Scans”
  6. Access the Xerox Web UI for the respective WorkCentre and click the Scan tab
  7. Create a new template with the username as the template name
  8. Under Name and Format, click edit
  9. Select a descriptive name for the document name and set the format as PDF
  10. Under File, edit the default destination
  11. Set the Filing Policy to “Add Date to Name”
  12. Under Document Path, enter the username in the Optional field.  This is the subfolder path the documents will be saved in.
  13. Click Apply