Blog

I was trying to post a job on Yahoo hotjobs (using a new ThinkPad running Windows 7), but after I would choose a location & select "Post Job", it would take me back to select a location.  After trying several times across two days, I finally tried to submit a "help form", but I was unable to determine if the form was actually being submitted and I never heard back from Yahoo.  After about a week (and I tried several different days through the week), I was going to sing into Google Analytics.  When I tried to log in with our account credentials, I received the error message “Your browser’s cookie functionality is turned off. Please turn it on.”  I knew it was not turned off, but followed their help and went to Tools, Internet Options, Privacy, Advanced, and verified "First-party Cookies" were not blocked.  While trying to discover what the problem was, I looked under websites to see if it was listed as a blocked site.  I found more than 100 sites listed as blocked including all the major search engines (I did not add them, so they must have come from the factory).  When I removed Yahoo.com, I began to be able to post jobs.


A customer who has switch completely to PDF format for document storage, has a need to access Tagged Image File Format (TIFF/TIF) documents from prior years. They recently ungraded all their systems to Windows 7 with Office 2007. Previously they used Office 2007 which installed the Microsoft Document Imaging program by default. The default install of Office 2007 sets the Microsoft Document Imaging program to install and run on first use. However, the first use is to access an MDI format file and have installation permission. They do not have installation permission and never access MDI files. Because it is not installed users are unable to reorder, rotate and print individual pages of a TIFF/TIF document. This means in order to print page 20 of a 65 page document you must print all the pages.

To resolve this issue, install the Microsoft Office Document Imaging program. To do this, follow these steps: [more]

  1. Click Start, click Run, type “appwiz.cpl’, and then click OK.
  2. In the Currently installed programs list, click the 2007 Office version that you have installed.
  3. Click Change.
  4. Click Add or Remove features, and then click Continue.
  5. Expand Office Tools.
  6. Click Microsoft Office Document Imaging, and then click Run all from My Computer.
  7. Click Continue.

You then need to change the TIFF and TIF file associations to open using Microsoft Document Imaging.

  1. Click Start, click Run, type “control /name Microsoft.DefaultPrograms”, and then click OK.
  2. Click Associate a file type or protocol with a program, scroll down to TIF and TIFF.
  3. Highlight TIF and Click Change program.
  4. Click Browse, and  enter “C:\Program Files\Common Files\Microsoft Shared\MODI\12.0\” in the address bar then enter.
  5. Select MSPVIE.EXE and Click Open, Ok
  6. Perform steps 3-5 for TIFF
  7. Click Close.

You can then reorder, rotate and print individual pages of TIFF/TIF documents.


I had recently upgraded a Mac user to the v10 PGP client and registered them with the bank's PGP Universal Server.  Everything seemed to work fine, but the user later discovered that PGP would prevent them from shutting down their machine if their iPod was attached.  Other devices didn't seem to affect the shutdown process.  I did some research and found this was a known issue.  The fix was to simply update the client from v10.0.0 to v10.0.2.  Obtaining the v10.0.2 update proved to be trickier than expected, but with a coworker's help I was able to download the update and put it on my USB thumb drive.  With update in hand, I strolled over to the bank and quickly installed the update off my USB drive (ensuring the customer this simple procedure would fix their problem).  When the computer rebooted, I pulled my thumb drive out and waited for the PGP screen to come up.  When it did, I had the customer enter their PGP Wholedisk passphrase.  After a couple of failed tries, PGP accepted the password and began to load OSX.  Then, the OS crashed! 

The user told me that happens sometimes after he misses his PGP password, so he simply restarted and tried again, this time putting the password in correctly the first time.  It ended the same way however.  At this point, the room became very hot and I started to sweat profusely.  I was sure I had just trashed this guys' machine by applying this simple update.  I'm sure he was starting to think the same thing too.  I sat down at his machine, wondering what in the world my next step was going to be, and then it hit me.  "I wonder if PGP needs something off the installation media (my USB drive) to update the boot process?"  I shut down the machine, plugged my USB drive back in and powered it back on.  I logged in to the PGP screen, the OS started to load...loading....loading....loading... OSX login screen!  Suddenly, the temperature in the room dropped drastically.  I had the user log in, I removed my USB drive and rebooted again.  Everything came up perfectly.... much to my relief. [more]

One other note about PGP and OSX upgrades...
In some cases, PGP will modify the system partition table enough that OSX upgrades (in my case, Leopard to Snow Leopard) won't be able to identify the currently installed OS.  This makes doing an in-place upgrade impossible.  The fix is to simply open Disk Utility, select the system disk, select the Partition tab, resize the system partition by dragging the bottom right corner up, then right back down (this should enable the "Apply" button), click Apply (confirming the change), exit Disk Utility.  The OSX upgrade should be able to correctly identify the currently installed OS after this.


During a recent bank's information security audit, a coworker and I wrestled with LANguard for the better part of two days trying to figure out why LANguard would freeze during network scanning.  There were several potential culprits including a VLAN setting on the port I was using, a “switch” (which looked just like a little 4 port hub) the company had set up to allow me to use two laptops, etc.  I tried scanning from my laptop, from my VM, from the other laptop, skipping the “switch”, etc.  Finally, I set LANguard to a single thread and noted the scan stopped at the “Enumerate Trusted Domains” step.  The company had two domains, something we don’t often encounter.  I disabled this item in the scanning profile and, presto, the scan ran.  To eliminate any other variables, I turned “Enumerate Trusted Domains” back on and it stalled again.


Microsoft Office Picture Manager (and iPhoto on the Mac) has a feature which helps organize digital photos.  In order to organize photos it is most helpful to be able to rename them, but renaming them is tedious if you have many photos.

If you are running Windows and have Microsoft Office 2007 installed the Picture Manager should be under All Programs -> Microsoft Office -> Microsoft Office Tools -> Microsoft Office Picture Manager.  In Microsoft Office Picture Manager all you have to do to easily rename photos is open a folder of photos, select more than one, right click on one of the selected photos and choose Rename.  A work panel will open which allows you to enter a name which will be applied to all the selected photos as well as options for defining sequential numbering. [more]

For us in the CoNetrix Information Security group, we have many site photos to store after an audit. This renaming feature allows us to organize the images by branch name (fcblfxx) with the application filling in the “xx.”  Quick and easy.   For personal photos naming will probably involve using a description of an event like “2010Christmasxx” or “10thBirthdayxx.”


I was installing Exchange 2007 SP2 Update Rollup 4 the other day at one of our network support client's sites. This particular customer has 6 exchange servers that needed the update. The first couple of servers took forever to install the update rollup. It really shouldn’t take 30 minutes to install a 50 MB download. After two servers the other guys working the maintenance window were already waiting on me so I had to make up some ground. After some searching (I didn’t have to look far…its posted on the “how to install exchange updates” page -> http://technet.microsoft.com/en-us/library/ee221147%28EXCHG.80%29.aspx) I found that during the install, if setup can’t connect to the CRL web site, the installation takes an abnormally long time to finish.

The reason is that each time the installer compiles an assembly, it has to check the code signing certificate used to sign the assembly against the CRL. If that connection can’t be made, each attempt must time out before moving on to the next assembly. Ok, so why can’t the CRL be downloaded? At this particular customer location, the problem was due to a Barracuda web filter that requires authentication. The attempts to download the CRL come across as anonymous and are blocked. It could also happen if an ISA server is in place and only certain groups of users are allowed internet access via security group membership. Whatever the reason, the work around is to turn off “Check for publisher’s certificate revocation” option in Internet Explorer. There is a registry key you can change, but I found the option in IE.  [more]

  1. Start IE
  2. Go to Tools -> Internet Options
  3. Click on Advanced -> Security
  4. Click to clear the “Check for publisher’s certificate revocation” check box
  5. After the update is installed, reverse your change


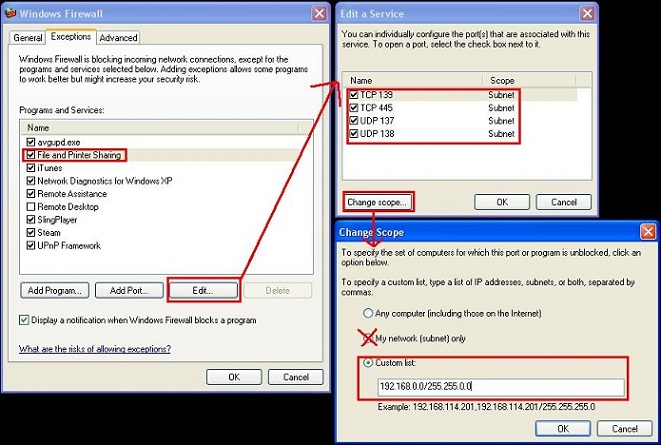
I needed to have access on a branch PC on another subnet (192.168.2.0) from the main site’s subnet (192.168.1.0). 

Using remote desktop, I turned off Windows Firewall on the PC and could access the C$ share on the remote PC from the main subnet. 

Looking at the Windows Firewall exceptions, I could see that File and Printer Sharing was already checked.  I clicked edit and saw the required ports defined here.  When I clicked “Change Scope”, I saw that it was set to “My network (subnet) only”.  For all four entries, I changed the scope to use a custom list that encompassed all 192.168.x.x networks and was able to browse the C$ share from all subnets. [more]


When entering commands at the Windows command prompt or creating Windows batch files that run under cmd.exe, you can use the caret character (^) to quote special characters.  This means it can be used at end of a line to continue commands.  This makes batch files much more readable and maintainable.

You can also use an ampersand (&) to separate multiple commands on the same line and every command will be executed.  If you use && between commands, the second command will only be executed if the first command completes with a successful status.  You can also use two vertical bars (||) between commands and the second command will only be executed if the first command completes with a unsuccessful status.


A coworker and I ran up against a very interesting situation at a virtualization consulting customer's site the other day. We got an after-hours call from the customer that said he was working on the console of a new Windows 2008 virtual machine. He was trying to set the IP address on the NIC and accidentally choose the “bridge network adapters” setting. Afterwards, he was unable to get to anything in the internal network from this server and several other VMs could not communicate with the internal network either. My coworker connected via VPN just fine, but was unable to ping the vmhost2. He could ping the SBS server, one terminal server, and the ISA server. We discussed over the phone that the particular ESX server that those servers were on must have somehow gotten isolated from the network. Sure enough, when my coworker checked the NIC status on vmhost1, it showed that all NICs connected to the LAN network were disconnected. We decided to go onsite and check out what was going on. On the way out, I realized what had happened. When the two NICs got bridged on that VM, it created a loop and must have looped a BPDU and err-disabled the port. Once onsite we confirmed that the port was down and portfast was NOT enabled on that port.

So, the warning here is two fold…yes, a VM can take down the whole ESX server. And second, its best to turn on portfast for ports connected to ESX servers. They don’t understand STP anyway.


If you want something wired right, sometimes you have to do it yourself.

This story started out with a new T1 connection being installed for a customer to connect to a new router.  Before I arrived on location, it was understood that the T1 connection was ran by AT&T and ready to go.  Upon arrival, I checked the networking closet where the new router was going.  I looked for the usual biscuit jack to connect the T1 to the router.  After being unable to find it, I called AT&T and had them tell me where it was.  The smartjack was outside the building with no extension on the line to the inside.  This required an electrician to come out and extend the T1 into the building. 

After the electrician came out, we had the customer connect the cat5 cable into the biscuit jack and router’s T1 card.  The electrician had already left by this time.  The serial connection showed down and further tests concluded that AT&T was not seeing the router.  At the other end of the T1 connection (point to point T1), it was showing looped when testing from the problem end.  The electrician said that he saw “fire” on the line and refused to return saying that it was a problem with AT&T.

Later, AT&T returns back onsite to confirm that the smartjack is working and places a loopback on the biscuit jack.  They concluded that there were some wiring problems with the biscuit jack and had fixed the problem.  AT&T says they were able to loop back to their test equipment, but the router was still not coming up.   At this point, we go to Cisco TAC and get them to send us a new T1 card to try thinking that the current one is faulty.

I receive the new T1 card and arrive onsite.  I install the new T1 card and check the interface to find it still down.  On the card, the alarm light was lit amber and the CD (carrier detect) was off.  At this point, I’m thinking that the card isn’t the problem, but the problem is still with the wiring.  The kicker here is that I put my loopback plug on the biscuit jack and verified that the other end’s router showed the circuit as up and looped.  I put the original card back in the router and installed the new card into the other available slot so that there were now both T1 cards in the router.

I went outside and opened the box to the network enclosure.  Instead of finding a nice simple smartjack, I find this: [more]

An RJ-48 connector from the smart jack feeds these other 4 connectors into the posts.  There were two sets of 4 posts.  The top set of four said T1, the bottom four said "Data".  As a note, T1 only requires 4 copper wires to connect.  Later examinations showed that only the T1 wires were even connected and nothing went to the bottom four pins for data (further wire tracing was necessary to determine this).

After one of our other network engineers and I began looking at the diagrams for the wiring enclosure and the biscuit jack pin outs, we could tell that something was still not quite right.  I removed the biscuit jack which had been wired in as white/blue, blue, empty, white green, green, empty, brown, white/brown.  We know that T1 should be using pinouts of 1,2,4,5.  From the picture above, we can see that green and blue pairs are being connected to the T1 posts.  The brown and orange wires aren’t doing anything here.

I cut off the biscuit jack and started putting RJ-45 plugs on the cable, and we tried switching the green and blue pairs around.  This time when I plugged the cable into the router, the CD light lit up and the alarm went off.  We could see the circuit as up, but it was going up and down constantly.  We tried changing the wires around in different orders leaving the greens on 1 and 2, and blues on 4 and 5.  After finding more diagram information on the enclosure and tracing wires, we came to a conclusion that we had it correctly set at White/green, green, empty, white/blue, blue, empty, empty, empty.

The circuit was still going up /down so I then decided to try moving the cable into the new card that had been put in the other slot on the router.  This move fixed the circuit problem going up and down, and it stayed up. 

The next challenge was testing pings across the line, and there were a few packets being dropped.  We changed the clock rate source on the serial interface to be internal and this fixed the dropped packets.

Again, I wanted to point out that the loopback plug worked by showing the connection up, but it did not appear that the wires necessarily had to be in the correct order.