Blog

Windows 7 by default installs the Universal Print Driver for HP device and uses the native Windows scanning options. Which is not as robust as the previous versions that came with the All-In-One systems. The user was complaining that the scanning was not usable and needed the same functionality that was there before Windows 7. This method will allow you to install the same software options previously available on Windows XP and Vista. After installation of the software on a Windows 7 PC in Compatibility Mode the following software components are installed:

  • Print Driver
  • Send Fax
  • Uninstall Utility
  • User Guide
  • Twain and WIA Scan Drivers
To run the Windows Vista software on a Windows 7 PC in Compatibility Mode follow the steps below:
  1. Copy the entire product CD for Windows Vista 32 bit to the hard drive of the Windows 7 PC.
  2. The Windows Vista Full Software Solution on hp.com can also be used. Download the Full Software Solution for your product for Windows Vista from hp.com. Unzip/extract to the hard drive of the Windows 7 PC.

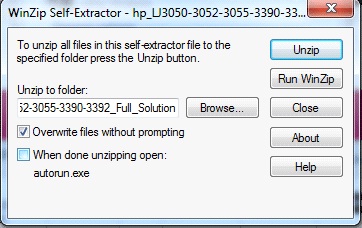
    Uncheck the checkbox "When done unzipping open: autorun.exe" before Unzipping the hp.com download bundle. [more]

    Figure 1: WinZip Self-Extractor
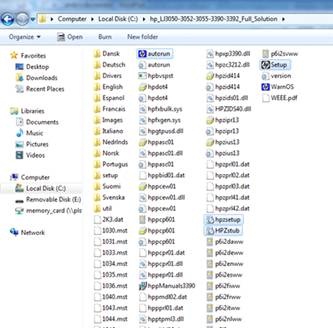
  3. There are 4 executable (.exe) files in the full solution software bundle that are included in the copied/extracted software bundle on the Windows 7 PC hard drive that need to be run in Compatibility Mode for a successful install on a Windows 7 PC.

    These 4 files are:

    • Autorun (.exe)
    • Hpzsetup (.exe)
    • Hpzstub (.exe)
    • Setup (.exe)

    Note: These 4 files may not show the file type extensions (.exe) when listed in the Full Software Solution folder.

    Figure 2: Files listed in the Full Software Solution folder
  4. 4. Each of these 4 files (autorun, hpzsetup, HPZstub, and Setup) need to be modified to be run in Compatibility Mode on the Windows 7 PC. Right click on each file and go to Properties. Click on the Compatibility tab and checkmark the box Run in compatibly mode for: and select Windows Vista (Service Pack 2) from the dropdown box. Click on Apply or OK . Repeat this step for EACH of the 4 files listed above.

    Figure 3: Selecting the compatibility mode
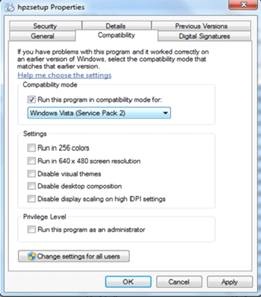
After the 4 files have been set to run in Compatibility Mode, double click the autorun.exe file and allow the installation to begin. Click on Install Software from the top of Begin Setup screen and follow the installation prompts.

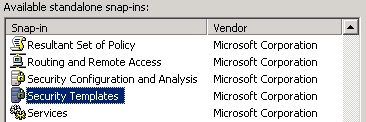
 

I needed to turn on NTFS file system auditing for two specific application EXE files on 30+ servers.  I didn’t want to have to touch each server individually, so I decided to look into applying the audit settings centrally using group policy.  Using the Security Templates snap-in for MMC on one of the systems I wanted to set up auditing for, I was able to configure a custom file system security policy.

 Security Templates Snap-in:

Within the Security Templates MMC: [more]

  1. Define a new, empty security template
  2. Expand the new Template
  3. Right click on the File System section
  4. Select "Ad File..."
  5. Browse to the file you want to ad a group policy enforced ACL to
  6. Configure your desired access controls/audit settings
  7. Set appropriate inheritance options
  8. Once the policy settings you want are complete, right click the security template name
  9. Select "Save As..."
  10. Save the INF file somewhere
  11. Delete the security template

In my case, I only wanted to apply the audit policy portion of the ACL (not the file system permissions), so I opened the INF file and removed the permission settings that started with “D:PAR” and just left the “S:AR” settings.

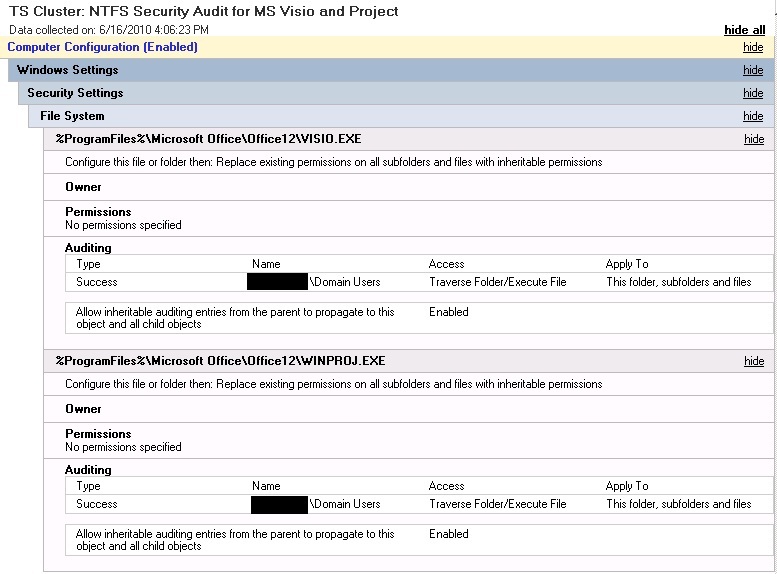
Then, using the Group Policy Management console, I was able to create a new group policy object and import my file system auditing settings from the INF.  I then applied the group policy to the proper OUs and waited for the new settings to get applied.  Everything worked like a charm.  The completed policy looks like this (in the Group Policy Management HTM view):


Declaring that “the American people will never again be asked to foot the bill for Wall Street’s mistakes,” President Obama signed the 2300-page Dodd-Frank Wall Street Reform and Consumer Protection Act into law today.  The American Bankers Association (ABA) and Independent Community Bankers of America (ICBA) have released similar statements declaring that core provisions in the new legislation provide the much-needed reform that banks have long supported, but they are leery of the seemingly unrelated regulations added to the bill during its journey from inception to signing.

Some highlights of the Dodd-Frank Act include:

  • Creating the Consumer Financial Protection Bureau with the authority to write new rules for mortgages, credit cards, payday loans, and other consumer products
  • Increasing FDIC protection to $250,000
  • Enhancing the authority of the Fed and other bank regulators to examine and take enforcement action against non-bank subsidiaries, such as mortgage affiliates
  • Eliminating the Office of Thrift Supervision, bringing savings and loan holding company and institution supervision to the Fed, OCC, and FDIC
  • Imposing strict controls on large bank holding companies and significant nonbank financial companies
  • Prohibiting banks and their affiliates from engaging in proprietary trading and providing strict limits on investment in and sponsoring of hedge and private equity funds
  • Allowing merchants to discriminate or discount based on payment type and set minimum payment amounts for acceptance of debit and credit cards
  • Subjecting holding companies to new “source of strength” rules regarding their depository institution subsidiary

Most provisions will be enacted immediately, but many have delayed effective dates. [more]

For a more detailed summary of the Dodd-Frank Act, as well as a timeline of deadline dates, visit the ABA Regulatory Reform Center at http://aba.com/RegReform/default.htm or the ICBA’s Victories, Helpful Exemptions and Harmful Measures for Community Banks at http://www.icba.org/files/ICBASites/NSPDFs/Frank-DoddSummary071510.pdf.

While legislators are in staunch disagreement over whether or not this bill should have been passed, no one seems to disagree that this will change the face of the banking and financial industry as we know it.


Last week one day I had a message popup on my iPhone which said my Voicemail password was wrong.  The message caught me off-guard because I wasn’t trying to access my Voicemail and I hadn’t made any changes recently.  Also, I wasn’t sure if it was my voicemail with AT&T or my office voicemail in Cisco’s integrated messaging.  Since I was busy with other things, I didn’t pursue it.

After a couple of days, the message appeared again.  This time I thought I should find out what was happening.

I selected the button (don’t remember the name) to get more details and I learned it was the password with the AT&T.  On my iPhone I went to Settings > Phone > Change Voicemail Password.  There I was prompted to put in my old password (really just a four digit PIN).  I entered the old one which it took (so it means my old password was still valid with AT&T) then entered a new password, which was accepted.  Behind the scenes my phone updated my password.  After exiting Settings, two new voicemail messages appeared. [more]

The gotcha is not new, just surprising in its occurrence.  I had updated my iPhone to iOS 4.x.  I knew the update did not keep up with passwords, but I had reentered email passwords and VPN keys, etc. and everything I could think of at the time.  All appeared to be working.

The Voicemail password error didn’t not appear until a couple of weeks after my iOS update.  The time span was sufficient for me to not realize it was all a part of the update.  The long duration was because I had not received any voicemail.  When I did receive a Voicemail, my iPhone, which after the update did not have any password, tried to authenticate to AT&T and caused the error to appear.

So, after updating to iOS 4.x be prepared for weeks or months of password errors or requests.  Every time you attempt to contact a vendor of an App who had required you to register, you will need to reenter you password.  The message may say the password is wrong, but it really means the password which had been stored on your iPhone has been deleted.  Probably your password is not wrong, just missing.


Setting up additional accounts in Outlook is handy to get email from different servers.  You can use additional accounts to send email from those different mailboxes also.  But did you know that you can use this feature to send email from different email addresses that are set up on your Exchange server?  For example, if email messages you send come from [email protected], but you also want to be able to send email from [email protected].  Here is a step by step guide on how to do this in Outlook 2007:

  • Go to Tools->Account Settings
  • E-mail tab
  • New...
  • Next >
  • Manually configure server settings...
  • Next >
  • Internet E-mail
  • Next >
  • Enter your name, email address such as [email protected]
  • Account type POP3
  • Incoming mail server exchserver1.example.org
  • Outgoing mail server (SMTP) exchserver1.example.org
  • Enter username as <your domain>\<your username> and your domain password
  • If you save the password, you will have to update it here when you change it
  • You can choose the Test Account Settings...
  • It will get an error retrieving email using POP3, but we don't need that
  • Next >
  • Finish

At the bottom of the Accounts Settings window, be sure it is using your inbox for receiving messages. [more]

Go to Tools->Send/Receive->Send/Receive Settings->Define Send/Receive Groups
Edit the All Accounts group (and possibly any other groups) to exclude this account
This will prevent it from trying to retrieve email using POP3 all the time

Now, to send email from that email address, select that account from the Account dropdown under the Send button.


I recently wanted change the offline files cache location in Windows 7.  Instead of the default location of C:\Windows\CSC, I wanted the offline files to be stored on my D: drive.  After checking around the Internet, I found several articles stating that moving offline files worked in XP, but didn’t work in Vista or Windows 7.  In the end, I found this blog post.  It worked.  However, I made one modification – I cleared the cache prior to moving the cache location and did not delete the original cache location after moving it.  My reasoning was 1) I wanted to clear the cache in order get rid of any residual offline files and 2) taking ownership and deleting a folder in the Windows directory seems like asking for trouble (besides I might need to move the cache back at some point). 

In order to clear the cache, add a DWORD registry key named FormatDatabase to HKLM\System\CurrentControlSet\Services\CSC\Parameters, set the key to a value of 1, and reboot.  One word of warning, do not set both the FormatDatabase registry key and CacheLocation registry key mentioned in the blog at the same time and reboot.  Windows blue screened on me during the reboot.  I had to boot into safe mode and remove the CacheLocation registry key in order to avoid the blue screen.  The correct sequence is clear the cache, reboot, change the cache location, reboot.


We recently encountered a problem where users were unable to type in the password or username box after locking Terminal Server sessions from their Thin Clients. Their keyboards were responsive (pressing CAPS Lock key initiated the notification on the Terminal Server) but the cursor or any keys entered would not show up.

It is suspected that one of the multiple windows updates that were released for the month of June may have caused this. Users started complaining the day after the updates were applied. However, testing was not completed to determine which one of the updates caused this or if removal of the update fixed the issue.

Here is the workaround we found:  The problem does not occur if the user locks their screen using the left CTRL+ALT combination. This issue only presents itself if the user locked their session using the right CTRL+ALT key combination. If the user does lock their session using the right CTRL+ALT key combination and is presented with the problem, pressing the left CTRL+ALT keys simultaneously will allow the user to enter their information into the password\username boxes to unlock their session.


I started receiving unwanted automated calls on my iPhone late one night.  Some automated calling service was calling my number about once an hour and there was only a recorded voice on the other side.  I needed to have my phone on and the ringer loud because I was expecting an important phone call early the next morning.  Muting the phone was not an option.  While searching for a solution, I found this website: [http://www.mylittleportal.com/call-block-cell-phone-number-iphone] “How to block any phone number on your iPhone for free”

The process is very quick, easy, and free:

  1. Download this silent ringtone to your computer.
  2. Open iTunes and copy the ringtone.
  3. Sync your iPhone.
  4. Make a new contact with the number you want to block and assign the silent ringtone to the contact.
  5. Get a full night’s sleep.


We began to see the autocreation of printers (or redirected printers) starting to fail for users when logging in to a customer's Terminal Servers lately.  On the same server we also start seeing the printers that were autocreated not being deleted (orphaned session printers) when users logged off a Terminal Server.  The cause turned out to be two outdated DLLs installed on the Terminal Servers:

Hpmini.dll - This issue occurs with HP model driver versions 60.x.x.x and 4.x.x.x. containing hpbmini.dll version 1.0.0.18 or older. Version 1.0.0.19 and newer has the fix. The memory leaks and memory corruption possible with the 1.0.0.18 (or older) dll will not cause a spooler crash, but can degrade performance of the server.  Version 4.x.x.x print drivers have an issue unloading hpbmini.dll which will likely cause a spooler crash when the server has a heavy load of connected users.

hpcdmc32.dll - This issue occurs with 60.x.x.x and 4.x.x.x HP print drivers containing hpcdmc32.dll version 1.0.2.30 or older. Version 1.0.2.31 and newer has the fix. The most recent version of hpcdmc32.dll is 1.0.2.35. The memory leaks possible with the 1.0.2.30 (or older) dll will not cause a spooler crash but may cause performance degradation.

Here is what turned out to be the solution for us: [more]

  1. Upgrade to latest driver available for printer model(s) causing issue – verify that the two DLLs above are updated during this process. If the files are in use while the driver is updated, they will not be replaced.
  2. Manually replace the two DLLs above with updated versions.
  3. Install and use HP Universal print driver


Recently an information security audit customer of ours lost a backup domain controller and contacted their network vendor to rebuild the machine.  The bank thought everything was in order until three months later when they were audited.  The audit discovered the old backup domain controller had not been rebuilt to be a backup domain controller again as well as no antivirus software was installed.   When the bank contacted their network vendor, the bank was told there were some issues the vendor "meant to get back to".  Regardless of errors assigning roles for the domain controller, the vendor still should have installed antivirus and other applications requested by the bank. 

The reason why steps were missed? [more] No equipment recovery checklists had been created in the bank's Business Continuity Plan (BCP) so the vendor didn’t have a detailed list of steps to take in order to recover.  This can lead to both lost time and missed steps when rebuilding equipment.  Ensure equipment recovery lists exist for critical components of your infrastructure.