Blog

We were experiencing a problem where, at random times, both HP and Xerox printers have had instances where the pages printed are missing characters. Bolded or special characters and words with double-consonants are the easiest way to reproduce it.

After much troubleshooting, it appeared this was caused due to updated font files as part of the installation of Office 2010, in particular the Calibri font (which is also the default font in Word). Office 2010 updates the Calibri font set to version 5.62. This version is also included as part of the font subsystem on Windows 7 and Windows 2008 R2. However, Windows 2003 and Windows 2008 have version v5. When printing through a print server that is running on Windows 2003 or 2008, the font version mismatch would cause the missing characters. 

In the past, failing the resource group over to the other node fixes the issue. Reinstalling the Universal Print drivers on the physical nodes of the print cluster also seemed to alleviate the issue, but did not fix the problem long term. Finally during one MW, none of these fixes seem to fix the issue whatsoever and the problem was no longer random.

However, we were able to update the fonts by completing the following steps:

1. Copy the Calibri font files from a system with the updated version (4 files – regular, bold, italic, and bold italic) to an accessible location
2. Open the control panel font applet from the system with the outdated font files
3. Delete the four files for the Calibri font
4. Reboot the system.
5. Reopen the font applet from the control panel and verify the files have been removed.
6. From the File menu, select install new font.
7. Browse to the location where the files were copied to in step 1.
8. Select all fonts and choose Install
9. Reboot the system
10. Reopen the font applet from the control panel and verify the files have been added. You can open each font file and verify the version. 


Recently, I was able to upgrade a vCenter environment from 5.0 to 5.1. One of the major steps in this is the installation of the Single Sign-On service. This is an interesting installation as there are potentially a dozen gotcha’s before you even get to the install button. One of these said gotcha’s is this:

I got to a step where the installation wanted to talk to the newly created database named “RSA” (that I had created in an earlier step using some scripts). I had to formulate a jdbc (Yes, java) connection string so that it could successfully authenticate. During this process, I found that the application wanted to install two new users, an RSA_User and RSA_DBA to the database and configure permissions so that everything was secured around those two users correctly.

The problem I kept running into was an error that stated “Unable to authenticate to db”. That’s all. I was able to connect to said “db” using the same credentials I (thought) it was using. This didn’t happen to be the case. [more]

http://kb.vmware.com/kb/2035449

In my case, this error occurred because when the SQL instance was originally set up for the vCenter installation, it was set to use Windows Authentication only. For a vCenter 5.0 or prior installation, this is fine; however, for a vCenter 5.1, we’ve got to enable Mixed Mode authentication. I made the change on the instance, restarted services, and my installation continued (sort of) smoothly (not really, but that’s a Gotcha for another time).


I had been helping a vendor install Cisco VPN Client and the installation kept failing with “Error 27850.  Unable to manage networking component.  Operating system corruption may be preventing installation.”

As it turns out, there was other VPN software installed and bound to the local network adapter.  Windows 7 has a default maximum number of 8 network filter drivers it can have assigned to the network adapter. 

The image at the following link shows a good example of adding more than 8 network filters to an adapter: https://supportforums.cisco.com/thread/2015629#3067225

The maximum number of filter drivers for Windows 7 can be set to 14.  To increase the value from the default, the change must be done in HKEY_Local_Machine\System\CurrentControlSet\Control\Network\MaxNumFilters.  Increasing the value to 14 allowed the Cisco VPN Client installation to complete.


Starting with Microsoft Outlook 2010, a new feature called “Suggested Contacts” automatically keeps track of everyone you send a message to, but isn’t in your Outlook contacts.  By default, when you sync Contacts with an iPhone, both “Contacts” and “Suggested Contacts” are copied over.

To Turn off the Suggested Contacts feature: in Outlook, click File > Options > Contacts, and uncheck “Automatically create Outlook contacts...”  Note: you will still need to remove any existing “Suggested Contacts” for them to be removed your iPhone contacts.


While testing a honeypot solution on our network I noticed some interesting traffic.  I was seeing consistent UDP broadcasts (port 43440) from various ThinkPads on our network.  The packet showed "Lenovo ThinkPad" in clear text but nothing else helpful.  After more research I discovered these broadcasts were generated by the power management driver on the Thinkpad.  The only way to stop the broadcasts was to stop the power management service.

But it seemed odd the power management service would send UDP broadcasts.  More research indicated this was part of the Cisco EnergyWise initiative.  This is designed to allow hardware manufacturers a method to manage power settings on network-attached devices via a Cisco switch.  Several hardware companies are on-board but Lenovo appears to be the only PC or laptop manufacturer that's participating. [more]

Links:
http://forums.lenovo.com/t5/T61-and-prior-T-series-ThinkPad/ThinkPad-Power-Manager-3-52-pwmewsvc-exe-broadcasting-data/ta-p/439107
http://www.cisco.com/en/US/solutions/ns726/intro_content_energywise.html


A day or so after returning home from an audit trip I noticed my system seemed to be extremely slow when performing everyday tasks.  For example, I noticed 100% CPU utilization that seemed to be tied to offline files synching up.  I fiddled with it off and on and then realized what had happened when Carl sent an email explaining a little research he’d done.

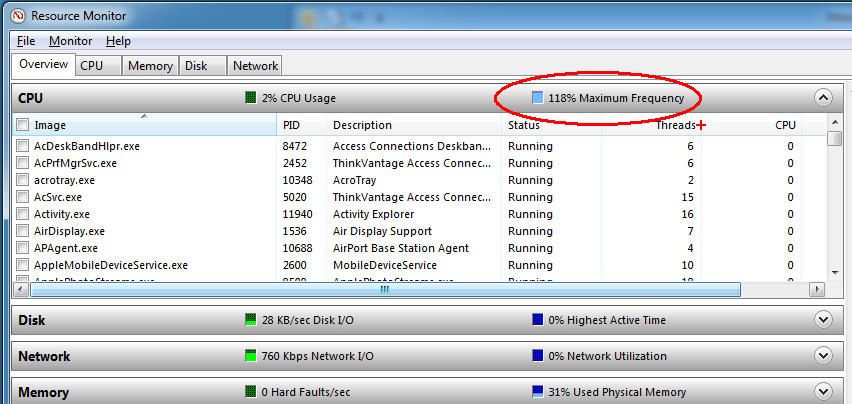
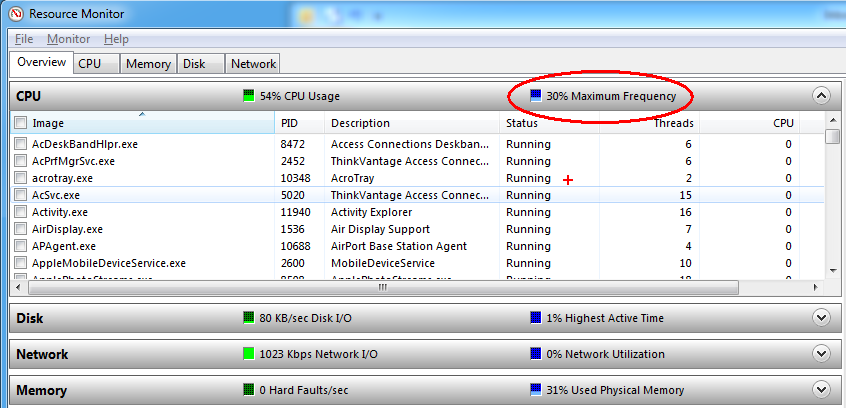
He explained what the Maximum frequency indicator in the resource monitor meant.  If it’s 100% or higher, the system is running close to its top speed. However, if it’s running lower, it is probably something like speed step cutting back on resources to save power. [more]

I looked at mine and the maximum frequency was showing about 30%.  That’s when I remembered changing to power saver mode for battery savings when I was in an exit meeting at the bank prior to coming home.  I didn’t have access to a power plug and I didn’t want to run out of juice during the meeting.  Then when I got home, I didn’t think of it until this came up.

I changed back to my normal power mode and the maximum frequency jumped above 100% and things began running normally.

With regular power settings (maximum CPU, etc.):

However, if I use the predefined "Power Saver" power mode:


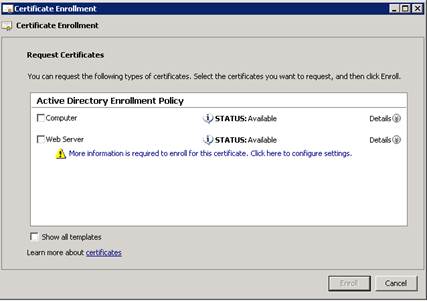
I setup a Remote Desktop Gateway for a customer a few weeks ago. During the setup, I was prompted to create a certificate for the server, but it was just a self-signed certificate. I need a certificate signed from my internal CA for testing with my laptop outside of the network. I originally created a computer certificate, but when I tried to connect it would not allow me to connect because the remote desktop gateway address did not match and name on the certificate. This was obvious because the internal domain is a domain.local address and I was trying to access ts.domain.com. Also, a computer certificate does not allow for subject alternate names. A web server certificate is the type of certificate to use when adding subject alternate names, but I was unable to create one for the computer account.
The solution is quite simple, change the permissions on the certificate template. [more]

  1. On your internal certificate authority, go to Start > Administrative Tools > Certificate Authority
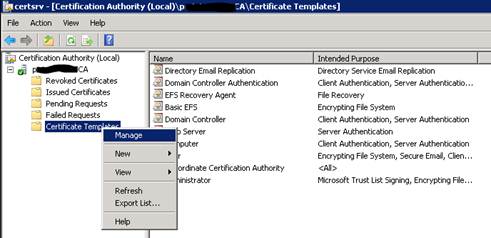
  2. Expand your CA from the list > Right click Certificate Templates > Manage
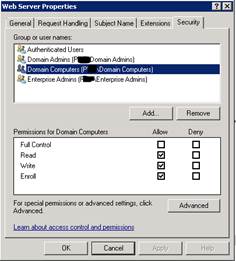
  3. Right click Web Server > Properties
  4. Select the Security tab. Grant Domain Computers (or the specific computer) Read, Write, and Enroll permissions.
  5. Close all open windows.
  6. You can now request a certificate from the computer account based on the Web Server template.


OneNote is a great application because it allows you to collect all types of digital information – text, images, audio, video and organize it all in a fashion of tabbed notebooks. And then, after all the info is collected, OneNote allows you to search through tabbed sections of an entire notebook or all the notebooks you have open. "Search" is a powerful feature of OneNote.

Until recently I was disappointed with "Search" in 2010. You could still search all the places I described, but in OneNote versions prior to 2010, when you searched, the search results pane would open and you would be able to cycle through all the search results by clicking on Next and Previous icons in order to see each of the occurrences. In 2010 I thought the Next and Previous options were gone, at least they weren’t visible in my OneNote.

I started thinking maybe I had missed a settings option. So I started researching. I learned the search features are different, but I am happy some of the old benefits are still available. Here is how it works now. [more]

You still click in the search box and type what you want to find (you get to set the default scope of the search as well as select it each time if you want). When you do this, OneNote opens a pop-up box to show you the quick results of your search. If you see what you need in the pop-up box, you can click on it and see the page. However, if you click outside the pop-up box to view more content on a page, the pop-up box closes. That was frustrating because I thought there was no way to see all the individual search results.

There are more options. When the pop-up box appears, you can elect to "Open the Search Results Pane" (click a link at the bottom of the pop-up box or type "Alt-O"). In previous versions of OneNote, the Search Results Pane would open automatically which I liked. With the Search Results Pane open you will see all the pages listed where the searched text appears and they remain available as long as you keep the Search Result Pane open. You can click on any page and see the first occurrence of the found text. Then I learned when you press "Return" you will jump to the next occurrence. By repeatedly pressing ‘Return’ you will be able to see all the search results. Not the old way, but in time I may like it better.

A bonus OneNote feature is the character recognition. When you paste an image that contains text, OneNote gives you the option of making the text in the image searchable. In testing the search features I saw OneNote was searching the text in images, even though I had not previously made the image searchable. Very cool.


You can install snap-ins to PowerShell in order to extend the functionality.  Examples include the PowerCLI for VMware and the Exchange snap in.  Basically, these snap-ins include libraries of additional commands that you can use to perform automation.  However, if you simply create powershell scripts (.ps1 files) with these commands, you will get errors because the default enironment does not include the snap in(s).

To add a snap in to the powershell environment automatically, you use a powershell script that is invoked every time you start powershell.  This is the profile.ps1 file, located in C:\Windows\System32\WindowsPowerShell\v1.0.  You may have to create the profile.ps1 file, as it is not needed for the default environment.

One syntax to add a snap in to the default environment is this:

$VMCore = Get-PSSnapin VMware.VimAutomation.Core -EA 0
if ( -not $VMCore ) { Add-PSSnapin VMware.VimAutomation.Core }

You can find examples of other syntax online, but the core behavior is this:  Check if the snap in is active, and if it isn't there use the Add-PSSnapin commandlet to add it.

Caveat:  You must download and install the snap in on your system before you can add it to your default PowerShell environment.  For example, the VMware.VimAutomation.Core is installed with the PowerCLI software from VMware.

Note:  I have added the VMware automation snap in to the default environment on the Security Bank management servers.  Additionally, I've put a script on these servers that will check for any VM snapshots.  (D:\cnx\scripts\List_Snapshots.ps1)


Few apps are as widely installed as an underlying operating system and thus, until fairly recently, the OS is where crooks have directed most of their attacks. However, the criminals are now aiming a large percentage of their attacks at ubiquitous apps like Adobe Reader and Java. In an astonishing turn of events, the security firm, Kaspersky, recently reported “in the last quarter, 56 per cent of all attacks on systems in its security network sought to exploit unpatched Java flaws as an entry point for malware attacks”. The report went on to state that Adobe Acrobat Reader was the second most targeted app (with 25% of reported attacks) and Microsoft Windows was a distant third, with only 4% of reported attacks.

Why Java, in particular? Oracle’s Java page reports there are 1.1 BILLION desktops running Java, almost 1 BILLION downloads each year, 3 BILLION mobile phones running Java and 3 times more Java phones shipped annually than iOS and Android phones combined. That’s a ton of potential targets for a crook’s exploit to wreak havoc. And, financial institutions, companies and individuals generally have much less of a handle on keeping Java and Adobe apps patched than they do on patching the Windows OS.

Why all this background info, much of which you probably already know?

Oracle just announced it will stop patching Java 6 after February 19, 2013. Oracle has been issuing patches for both Java 6 and the current version, Java 7, for some time. As a result, many individuals and enterprises have resisted the move to Java 7. The good news is Oracle says the next Java patch, after February 19th, will be released on June 18, 2013. However, Oracle cannot possibly guarantee it will not issue any patches during those 4 months because currently undiscovered vulnerabilities might need to be patched during that period.

“Java 6's support death presents special problems for Mac users. While Java 7 runs on all current editions of Windows, including the 11-year-old Windows XP, it requires OS X 10.7, aka Lion, or its successor, Mountain Lion, on Macs,” reports Gregg Keizer with Computerworld.

Well, best to start investigating potential compatibility issues with Java 7 sooner than later. Because in 60 days, Java 6 will reach its end-of-support.

http://goo.gl/H3XyC
http://goo.gl/MuhHf