Blog

Few apps are as widely installed as an underlying operating system and thus, until fairly recently, the OS is where crooks have directed most of their attacks. However, the criminals are now aiming a large percentage of their attacks at ubiquitous apps like Adobe Reader and Java. In an astonishing turn of events, the security firm, Kaspersky, recently reported “in the last quarter, 56 per cent of all attacks on systems in its security network sought to exploit unpatched Java flaws as an entry point for malware attacks”. The report went on to state that Adobe Acrobat Reader was the second most targeted app (with 25% of reported attacks) and Microsoft Windows was a distant third, with only 4% of reported attacks.

Why Java, in particular? Oracle’s Java page reports there are 1.1 BILLION desktops running Java, almost 1 BILLION downloads each year, 3 BILLION mobile phones running Java and 3 times more Java phones shipped annually than iOS and Android phones combined. That’s a ton of potential targets for a crook’s exploit to wreak havoc. And, financial institutions, companies and individuals generally have much less of a handle on keeping Java and Adobe apps patched than they do on patching the Windows OS.

Why all this background info, much of which you probably already know?

Oracle just announced it will stop patching Java 6 after February 19, 2013. Oracle has been issuing patches for both Java 6 and the current version, Java 7, for some time. As a result, many individuals and enterprises have resisted the move to Java 7. The good news is Oracle says the next Java patch, after February 19th, will be released on June 18, 2013. However, Oracle cannot possibly guarantee it will not issue any patches during those 4 months because currently undiscovered vulnerabilities might need to be patched during that period.

“Java 6's support death presents special problems for Mac users. While Java 7 runs on all current editions of Windows, including the 11-year-old Windows XP, it requires OS X 10.7, aka Lion, or its successor, Mountain Lion, on Macs,” reports Gregg Keizer with Computerworld.

Well, best to start investigating potential compatibility issues with Java 7 sooner than later. Because in 60 days, Java 6 will reach its end-of-support.

http://goo.gl/H3XyC
http://goo.gl/MuhHf


After carrying an iPhone for about 4 years, I recently made the leap to Android…with some trepidation. My iPhones had always worked with few hiccups.

The reason for the switch, you ask?

First, Apple hasn’t gotten a clue yet that their iPhone screen size compares poorly to many Android smartphones.

Secondly, I hate iTunes. I’d never had an Apple product of any kind until my first iPhone. And, with it, the necessary installation of iTunes. Most of my 4,000 song music library are WMA files ripped from my own CDs. iTunes doesn’t play WMA files but it will gladly convert them to MP3 files and, in so doing, create duplicate files on your hard drive. Since my music library already consumed almost 20GBs of HD space, duplicate music files are not insignificant. But, wasted HD space wasn’t the worst of the process. In the conversion, the metadata on many of the files did not convert correctly...album info, artist info, etc. was fouled up and album art was, too. I don’t know how many hours I wasted trying to clean up the mess – when everything was perfect in Windows Media Player before. And, of course, Windows Media Player saw the new (duplicate) MP3 files and added them to the WMP library. Lovely. And, iTunes invariably charges more for music than Amazon. And, you get their stupid proprietary music file format. And, you better hope you have a backup because, according to many friends, you’re out of luck if your HD dies. Did I say I HATE iTunes?

Lastly, it has always gotten under my skin that Apple refuses to include memory card slots in their devices. Forcing you to spend $100 for an incremental increase in storage capacity. Shameful!

Well, I bought the Samsung Galaxy Note 2. I could go on and on about the ginormous screen and cool S Pen. The quad core processor and 2 GBs of RAM make for a blazing fast response. But, you can read all about it here: http://www.samsung.com/us/the-next-big-thing-galaxy-note-ii/?cid=ppc-

As to the reasons for my conversion:

  1. The aforementioned 5.5” HD Super AMOLED display is massive compared to my old iPhone 4 (and even the only slightly larger iPhone 5)
  2. No more iTunes. I copied my music library by dragging and dropping it into the Music folder on my Note 2, which is recognized on my Windows 7 system with a cheap, non-proprietary USB cable. Boom…done!
  3. I doubled the phone’s 16GB memory capacity with a $10 microSD card.

I did lose 2 apps (of dozens) in the process: A disc golf scorecard app and the T. Rowe Price app. Every other app on my iPhone was available in the Google Play store. I haven’t even gone looking in the other Android stores.

Don’t be afraid to free yourself from the Apple shackles! Life is good on the other side.


I came across a weird issue with a user running Windows 7 with Outlook 2010.  Tif attachments opened from an e-mail launched Windows Photo Viewer.  When the document was printed, it was cutting off a good portion of the bottom from all of the pages. 

While troubleshooting printer settings, I had saved the tif attachment to the user’s desktop and it printed correctly after opening it from there.  There were no changes between opening the document from Outlook vs. the desktop, but something was causing the printer to cut off the bottom area. [more]

It was suggested that we try using the Microsoft Office Document Imaging (MODI) application to handle tif files instead of the Windows Photo Viewer in Windows 7.  Upon trying to install the feature from Office 2010, it is not available. Microsoft has the following workarounds listed in this article http://support.microsoft.com/kb/982760.

I chose to go with option 2 which was to download the free SharePoint Designer 2007 which includes the MODI tool.  Beware that this download is 295 MB, so it took me about 30 minutes to download just to get this little utility. 

After performing the custom install for MODI, it does not show up in the list when you right click the tif file and choose what program to open tif files with.  I had to right click on the shortcut in the start menu and get the file path from the properties.  Then I added MODI to the list of applications to open tifs with and checked “always use”.

The Microsoft Office Document Imaging utility printed out the user’s tif documents without any issues.


I was curious how I could stop a virus scan in progress from the Symantec Endpoint Protection management console.  It’s a little hard to find, but here’s what I found.

  • Go to Monitors > Logs > Computer Status
  • Select the computer on the top-left Command drop-down 
  • Select Cancel all scans 
  • Select the computer
  • Click Start


A customer was unable to connect to the internet after returning from a trip. There was a plethora of items checked in trying to resolve the issue. Initially it looked like just a single client issue because all the other users could access the internet. It was discovered that the Barracuda Web Filter was not authenticating new users to the DC. The traffic showed in the weblog but only under the IP without a username and was always blocked. If an IP exclusion was added to the Barracuda, internet would work.

A new IP was requested from DHCP and internet worked. The traffic showed the right IP but a different user name. I requested a different IP and internet stopped working and weblog showed traffic was blocked with no username. It was realized that the Barracuda was working from cached settings. 

I came upon the Account View under the Users/Groups tab. It contains a list of usernames and IPs associated with those users.  The user in question was not listed. I click logout next to Conetrix’s administrator account  and could no longer access internet from any system. I checked the authentication and LDAP showed to be working; however, the DC Agent showed a status of unavailable "red". I checked the DC agent on DC1 and it was stopped. I restarted the service and still could not access internet.  I initiated a sync from the Barracuda and still nothing.  I then opened the DC agent on DC1 and initiated a sync from the utility and then was able to access internet from the user’s PC. The only reason users could still access the internet was because of the cached accounts in the Barracuda.  Had I logged all the cached accounts out no one could have accessed the internet while the DC Agent was down.


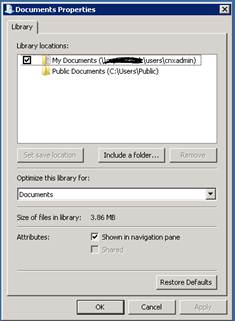
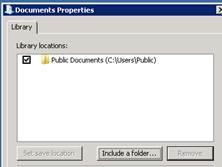
Libraries in Windows 7 and Server 2008 by default contain the Public Documents and My Documents location. I was working with a user who’s documents were set with a group policy. This user had an odd configuration, in that his documents were in a different location than the other users. After moving his documents to a new location, they still showed up in his Documents library. I decided to remove the old documents folder that points to the old network location. After removing the old documents folder and correcting the group policy that was applying the settings, his Music/Pictures/Movies were all pointed to the new location, but his Documents only showed the Public documents. [more]

After much searching, I decided to click “Restore Defaults”. This immediately fixed the problem.

The GotCha is that the My Documents Library is a single location for the files, no matter where the folder is pointed. When I hid the old documents location, it remained hidden until I restored the folder to defaults.


A while back when I was setting up a new Exchange 2010 environment, I had just finished getting the new Unified Messaging server online and had begun testing. One of the issues I ran into was when I tried to administratively reset someone’s PIN. As usual, I’d go into the EMC, find the mailbox, right-click, and choose Reset PIN. Then I’d let it auto-generate one and send the email. Except it wouldn’t send the email. In the application log, I would see something like:

"E:\Program Files\Microsoft\Exchange Server\V14\UnifiedMessaging\voicemail\048696bb-3475-41d8-b497-b839c9e1daa8.txt". Error details: "Microsoft.Exchange.UM.UMCore.SmtpSubmissionException: Submission to the Hub Transport server failed. The operation will be retried. ---> Microsoft.Exchange.Net.ExSmtpClient.UnexpectedSmtpServerResponseException: Unexpected SMTP server response. Expected: 220, actual: 500, whole response: 500 5.3.3 Unrecognized command

In the end user’s mailbox, they would not receive an email in the inbox with their new PIN; however, it occasionally would appear in the Drafts folder as if Exchange had composed the email, but had forgotten to hit Send. [more]

They say hindsight is 20/20. I believe it.

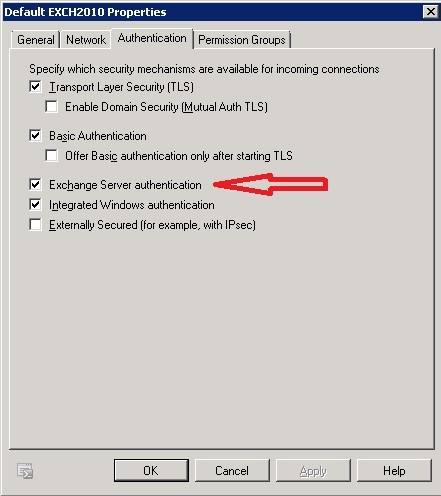
Turns out, none of the receive connectors in Exchange allowed for Exchange Server Authentication. Whoops!


Interner Explorer 9.0 will display a warning if the view a website over SSL that is using a certificate signed by an untrusted certificate authority (CA).  This is often the case for self-signed certificates and it can become annoying.  Here's how to eliminate the warning:

  1. Browse to the site whose certificate or certificate authority you want to trust.
  2. When told "There is a problem with this website's security certificate.", choose "Continue to this website (not recommended)."
  3. Select Tools->Internet Options.
  4. Select Security->Trusted sites->Sites.
  5. Confirm the URL matches, and click "Add" then "Close".
  6. Close the "Internet Options" dialog box with either "OK" or "Cancel".
  7. Refresh the current page.
  8. When told "There is a problem with this website's security certificate.", choose "Continue to this website (not recommended)."
  9. Click on "Certificate Error" at the right of the address bar and select "View certificates".
  10. (if it is a self-signed certificate, skip to step 13) [more]
  11. Click the Certification Path tab
  12. Click the root CA
  13. Click View Certificate
  14. Click on "Install Certificate...", then in the wizard, click "Next".
  15. On the next page select "Place all certificates in the following store".
  16. Click "Browse", select "Trusted Root Certification Authorities", and click "OK".
  17. Back in the wizard, click "Next", then "Finish".
  18. If you get a "Security Warning" message box, click "Yes".
  19. Dismiss the message box with "OK".
  20. Select Tools->Internet Options.
  21. Select Security->Trusted sites->Sites.
  22. Select the URL you just added, click "Remove", then "Close".
  23. Now shut down all running instances of IE, and start up IE again.
  24. The site's certificate should now be trusted.

The most common application I see is with SSL VPN users, but it is also useful for accessing management interfaces (such as an ASA or a McAfee ePolicy Orchestrator).


There was a customer that had been migrating printers from Windows 2003 SBS Domain Controller/Print Server to Windows 2008 and somehow in the process accidentally deleted all of the shared printers.  When this happened, all printing at the company came to a halt.  There were almost 20 different printers that had been deleted including all the share names, printer ports, specific settings, etc.  It was going to be next to impossible to try and recreate the printers exactly as they were within a decent amount of time.

The customer had VEEAM backups of the system drive, but we decided that restoring the entire drive would most likely be a BAD idea on a Domain Controller.  Our preferred plan at this point was to try and merge the printer registry keys from a backup into the current registry.  From VEEAM, we restored the C:\Windows\System32\Config folder to an alternate location.  This folder contains the registry files named SYSTEM, SOFTWARE, etc.  TIP: If you do not have backup of the files, you may be able to find copies of registry files in C:\Windows\Repair folder.  Just make sure and look at the timestamps of the modification dates to see if they might be usable. [more]

What we concluded before beginning was that local printers were stored in the registry at HKLM\SYSTEM\CurrentControlSet\Control\Print\Printers.  The actual printer shares and security settings were stored in HKLM\SYSTEM\CurrentControlSet\services\LanmanServer\Shares.  At this point make sure you backup the current registry by doing an export.

Using the LOAD HIVE method in the registry, we mounted our SYSTEM file as SYSTEM_Backup under HKLM.  However, the CurrentControlSet subkey was not there.  Instead it only had CurrentControlSet001 and CurrentControlset003.  Also, the Printers subkey was missing in both CurrentControlSet001 and 003.  The reason CurrentControlSet is not there is because it is simply a pointer to CurrentControlSet001.  You can verify this by looking at the HKLM\SYSTEM\Select subkey. 

The main problem was that we had no idea where the Printers subkey was.  I had a feeling that it was also dynamically linked from somewhere else in the registry, so I created a new printer with a unique name as a test and did a registry search.  I found what appeared to be all of the printer settings in HKLM\SOFTWARE\Microsoft\Windows NT\CurrentVersion\Print.  Now, I went back and loaded the SOFTWARE file as SOFTWARE_Backup under HKLM.  When I looked in the Print subkey, I saw all the missing printers.  It appears that this location is linked with the missing Printers subkey under Control\Print.

Now to get the data we need for all the printers and the shares, I exported HKEY_LOCAL_MACHINE\SOFTWARE_Backup\Microsoft\Windows NT\CurrentVersion\Print and HKEY_LOCAL_MACHINE\SYSTEM_Backup\ControlSet001\Services\lanmanserver from the loaded registry hives.  After that is done, unload the backup hives as they are no longer needed. 

Right click your two exported .reg files and open with notepad.  Do a replace on SOFTWARE_Backup with SOFTWARE and the same for SYSTEM_Backup with SYSTEM in the appropriate files.  After that, the registry files are ready for merging.  Right click the .reg file and select "Merge."

After we merged the registry files, we thought we may have to reboot to get the printers to appear, but simply restarting the Print Spool service made the printers reappear like magic.


Often we are required to install programs or run applications under users logins that have restrictions in place. Many times right clicking and selecting “Run as administrator”, allows the application to run or prompts for credentials.  Other times the application tries to run and fails without prompting for credentials and the solution is to login as an administrator and run it. If you hold the “Shift” key and right click the application or install file, another option will appear “Run as a different user”. By selecting “Run as a different user” you are immediately prompted and can input the administrator credentials before the application even tries to run. This eliminates the need to logoff the users account and logon as an administrator.