|
|
Recently, a customer said they were no longer able to shadow remote desktop sessions for some new thin clients that were installed. The error message was "Access is Denied". It turns out that these new thin clients were dual monitor setups.
According to https://support.microsoft.com/en-us/kb/2484290 , this is normal behavior when trying to shadow a multiple monitor session.
After installing Windows 10 and Office on a new laptop, I started getting the following error message when I tried to click on any link in any email message or click on a table of contents link in a Word doc:
"Your organization's policies are preventing us from completing this action for you. For more info, please contact your help desk"
While it's not an entirely bad thing to have email links require a copy and paste, it's a real problem with other links like the Table of Contents in a long Word document.
There is a KB article at https://support.microsoft.com/en-us/kb/310049 that discusses this issue. The solution for Windows 10 is to find a system that doesn't have the problem and export a registry key then import it into the offending system. The key it references was missing from my system.
The steps that worked for me were to find a Windows 10 system that didn't have the problem, run regedit and locate the following subkey:
HKEY_LOCAL_MACHINE\Software\Classes\htmlfile\shell\open\command
Then you export the subkey to a file, copy the file to the system having the problem and import it into that system's registry (either by double clicking the .reg file or importing it via regedit).
There is a last verification step to verify the String (Default) value of "HKEY_CLASSES_ROOT \.html" key is "htmlfile".
I was recently working on a project to migrate a customer from a physical server to new virtual servers on a new ESX host. I installed ESXi 6.0 Update 2 on the new physical server and delivered to the customer site. After the server was onsite, I began building my first virtual machine. Since it was the first virtual machines and vCenter was not installed yet, I downloaded the VI client and connected to the host.
While creating the first VM, I received the following warning:
"If you use this client to create a VM with this version, the VM will not have the new features and controllers in this hardware version. If you want this VM to have the full hardware features of this verison, use the vSphere Web Client to create it."
According to the warning message, I needed to use the vSphere Web Client to create a VM with the latest full hardware feature set. The vSphere Web Client is part of vCenter, so I didn’t see how this was possible because vCenter was not installed yet. VMware has been planning to obsolet the VI client and moving to the web client, so I figured this was just a push in that direction. Obviously, this doesn’t work well for customers who are just building their first virtual servers. I didn’t need the new hardware features, so I just picked Virtual Machine Version: 11 and continued building the VM.
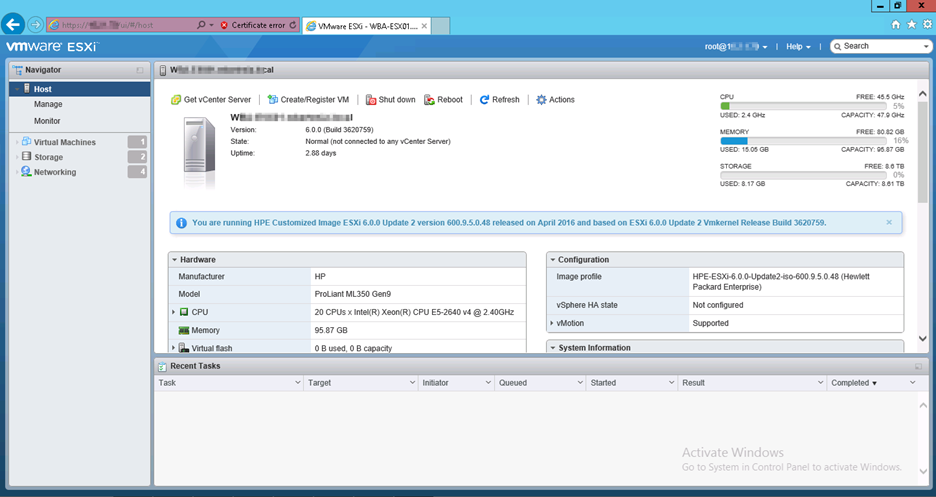
A few days later I was curious as to what the warning message meant and decided to do some more investigation. It turns out that with ESXi 6.0 Update 2, VMware started embedding a new VMWare Embedded Host Client (EHC) in ESXi. This new Embedded Host Client is a HTML5-based tool to directly manage the ESXi host and is a replacement for the VI client. This is nice because nothing needs to be downloaded or installed to manage the ESXi host using the EHC.
Here's a screenshot of the new EHC:
Knowing that the EHC exists, I now understand what the warning message I received when using the VI client was saying. They were not necessarily saying I had to use the vSphere Web Client that uses vCenter, but rather that I could connect directly to the ESXi host using the Embedded Host Client.
The VMware Embedded Host Client can be access by going to http://IPAddressOfESXiHost/ui. More information on the VMWare Embedded Host Client can be found here: http://blogs.vmware.com/vsphere/2016/04/vsphere-6-0-update-2-whats-new.html
Windows 10 includes a Spotlight feature to provide random background images that appear on the lock screen. Some of these images are very nice so I found a way to save them for use on other devices like a phone or tablet.
The traditional method of opening Windows Task Manager, going to the Users tab, right clicking the user, and clicking Remote Control is no longer and option on Windows Server 2012 R2.
To shadow a session in Windows Server 2012 R2, you must use the "mstsc" command with the /shadow switch. First, open Windows Task Manager and go to the Users tab. Find the ID of the user you wish to shadow and remember this number. Then, from RUN or a Command Prompt, type “mstsc /shadow:<session id>”. The user will be prompted to allow you to shadow their session. This will work on Remote Desktop and normal servers.
If the server is a Remote Desktop Server, you can use Server Manager to shadow the session. Go To Remote Desktop Services, then Collections, and find the Connections window. Right click the user and click Shadow. The user will be prompted to allow you to shadow their session.
This is handy if you need to quickly connect to the console of a VM and don't need any other features of the vSphere web interface. The documentation from VMware says to run this from the web interface, but it can be run standalone, like this:
"C:\Program Files (x86)\VMware\VMware Remote Console\vmrc.exe" "vmrc://DOMAIN\[email protected]/?moid=vm-VMID"
VCENTER.DOMAIN.COM should be replaced with the FQDN of your vCenter server.
The "DOMAIN\USERNAME@" can be omitted, but if you are saving this command somewhere, you might as well include your username.
Use VMware PowerCLI PowerShell command "get-vm MACHINENAME | fl id" to find the VMID. Just use the part that starts with vm-. You can also get these from the ESX console.
Download VMRC from here: https://my.vmware.com/web/vmware/details?downloadGroup=VMRC90&productId=491. There is a link to this on the vSphere web page. This requires an account with VMware.
For some versions of the TPM chip found in the Lenovo ThinkPad T420, you will receive an Access Denied error message when attempting to encrypt the hard disk if you have a group policy enabled that restricts CD/DVD access. Apparently, some models of TPM chip are seen by the system as a CD/DVD device, and will not function correctly if it has been disabled via Group Policy.
The fix is to just disable the group policy until after the disk has been encrypted and the PIN has been setup. Once it has been encrypted you can reapply the Group Policy and it will continue to function normally.
I recently updated a standalone ESXi 5.5 server through command line patching. After the ESXi server rebooted and came back online, it showed no datastore and no access to virtual machine disks.
I found a post about ESXi 6 updates causing similar issue when the HP Storage Array drivers had been removed during the update process. Since I still had my update logs pulled up in console window, I was able to locate a line that said "VIBs Removed: Hewlett-Packard bootbank scsi-hpsa <version>".
I was able to find a link to download drivers and transferred them to the ESXi server's /tmp directory:
http://h20564.www2.hpe.com/hpsc/swd/public/detail?swItemId=MTX_11afb713b03045a2a9508fe915
The command to install the patch was:
"esxcli software vib install -d /vmfs/volumes/datastore1/hpsa-<version>-offline_bundle-<number>.zip"
After a reboot, I had access to the datastore again and averted potential disaster!
Recently, a customer pointed out that Outlook had identified Nov 1, 2015 as U.S. Election Day when it is actually Nov 8, 2016. My Outlook calendar also showed Nov 1st.
Outlook uses a ".hol" file to import holidays into the calendar. Microsoft periodically updates this file to add more years, fix errors, etc.
It seems that the holidays do not always change on the calendar when Microsoft issues an updated .hol file. The holidays in my caledar were originally created in 2013 and had the error with Election Day.
In order to change the holidays, I performed the following steps:
This adds a new set of holidays to your calendar, but leaves the old set, resulting in duplicate holiday entries. To remove the old holidays: