Blog: Remote Desktop

The May 2019 Microsoft patch releases included an update for a very high-risk vulnerability (CVE-2019-0708, aka BlueKeep) that affects Windows XP, Windows 7, Server 2003, Server 2008, and Server 2008 R2.

This vulnerability allows an unauthenticated attacker (or malware) to remotely execute code on the vulnerable system. It is considered as VERY high risk, particularly for systems with Remote Desktop Protocol (RDP, port 3389) directly exposed to the Internet. However if a system inside the network is compromised it could easily spread to other PC's and servers because RDP is enabled by default.

CoNetrix strongly recommends all customers ensure the May updates are installed as soon as possible.

Microsoft has not only released updates for Windows 7, Server 2008 & R2, but also has issued updates for Windows XP and Server 2003 which are not officially supported.

All CoNetrix Technology customers with managed services agreements and all cloud hosted Aspire systems, were updated shortly after this vulnerability was announced.

This vulnerability can be mitigated by enabling Network Level Authentication (NLA) - https://docs.microsoft.com/en-us/previous-versions/windows/it-pro/windows-server-2008-R2-and-2008/cc732713(v=ws.11). Additionally CoNetrix recommends disabling RDP access over the Internet to internal systems.


If you are using Server 2016 as a Citrix or RDS server, users often request for Windows Photo Viewer to be their default program for photos instead of Paint. Photo viewer is installed with Server 2016, but does not have the file associations needed. Also, setting the default application is a per user setting and will require a GPO policy.

Here are the steps:

  1. Import the registry settings to create the file associations needed for Windows Photo Viewer
  2. Set Default Program associations
    1. Control Panel > Default Programs > Set default programs
    2. Select Windows Photo Viewer
    3. Select Choose Defaults for this program
    4. Select the extensions you want to set as default for Windows Photo Viewer
    5. Click Save
  3. Verify functionality by opening a file with extension set in previous step and verify it opens with Photo Viewer
  4. Create default association file to set default for all users at logon
    NOTE: the above process sets defaults for the current user only, to set for a user at logon the settings must be imported at logon
    1. Via powershell run the command below to create an XML document with the necessary associations
      "dism /Online /Export-DefaultAppAssociations: C:\cnx\DefAppAssoc.xml"
    2. Copy XML to a network location accessible by GPO policies
  5. Create or modify an existing GPO to pull XML file settings
    1. Computer Configuration > Administrative Templates > Windows Components > File Explorer > Set a default associations configuration file
    2. Enable policy and set network path of file from previous step


I recently built some new Remote Desktop Server for a customer. They had previously used roaming profiles set via the Profile Path setting in the Remote Desktop Services Profile tab of the user's Active Directory object. This worked well when setup correctly, but sometimes the IT department would forget to add this path to new user profiles which would cause issues. I was looking for a way to eliminate the need for IT to have to remember to add this option to the profiles of the RDS users.

I remember User Profile Disks being an option in Windows Server 2012 and newer server operating systems. I added the User Profile Disks to the configuration when I setup my new collection and it initially seemed to work well. However when I then logged into all six of my RDS server at the same time and noticed that I received a temporary profile on all but one of the RDS servers. Some investigation led me to find that a User Profile Disk can only be connected to one server at a time. This likely would have been fine 99% of the time, but I wanted to be sure that the odd occasion where a user got connected to two servers at one time due to something like a server being prevented from accepting new connection would now cause problems. I ultimately decided not to enable user profile disk to avoid any potential issues when a user might have a session on two servers.

As an alternative I was able to set a roaming profile path via a computer Group Policy and link it to the OU containing the RDS servers. This accomplished the goal of automating the user profile setup. If a user is logged into to servers at one time, there may be an issue with which profile is written back to the share last, but it will not cause a temporary profile to be created on the RDS server. The settings I enabled are shown below:


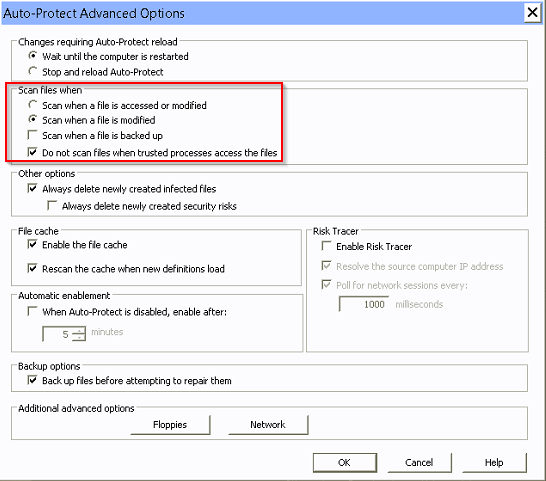
We had a customer who was experiencing slowness on their terminal servers and the slowness was keeping some reports in their core banking application from running.  We found that when we excluded the entire C: drive of the terminal server from all Symantec Endpoint Protection scans, the errors would not occur. Through trial and error, we tracked down the setting in SEP that was causing the performance problems. We changed the “Scan files when” setting from “Scan when a file is access or modified” to “Scan when a file is modified”. This solved the performance issues and reports in their core banking application are running properly now.


Recently, a customer said they were no longer able to shadow remote desktop sessions for some new thin clients that were installed.  The error message was "Access is Denied".  It turns out that these new thin clients were dual monitor setups.

According to  https://support.microsoft.com/en-us/kb/2484290 , this is normal behavior when trying to shadow a multiple monitor session.


The traditional method of opening Windows Task Manager, going to the Users tab, right clicking the user, and clicking Remote Control is no longer and option on Windows Server 2012 R2.

To shadow a session in Windows Server 2012 R2, you must use the "mstsc" command with the /shadow switch. First, open Windows Task Manager and go to the Users tab. Find the ID of the user you wish to shadow and remember this number. Then, from RUN or a Command Prompt, type “mstsc /shadow:<session id>”. The user will be prompted to allow you to shadow their session. This will work on Remote Desktop and normal servers.

If the server is a Remote Desktop Server, you can use Server Manager to shadow the session. Go To Remote Desktop Services, then Collections, and find the Connections window. Right click the user and click Shadow. The user will be prompted to allow you to shadow their session.


Even though Session Roaming was disabled for customer’s Citrix environment, users were ‘hijacking’ their Citrix sessions randomly when launching applications from two separate computers. These users had recently been migrated to XenApp 6.5 environment using Storefront (from XenApp 6.0\Web Interface configuration).
 
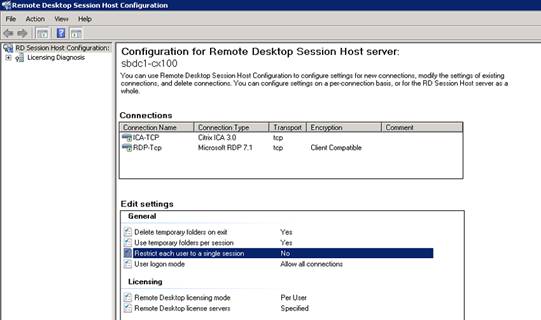
Troubleshooting showed that the hijacking was only occurring for the user when Citrix load evaluators placed the user on the same Citrix server in the farm for both sessions. The issue did not have to do with the Citrix Session Roaming feature, but rather an RDS setting to limit users to only one session per RDS server.
 
The resolution is to modify RDS Host Configuration setting to not ‘Restrict each user to a single session’. This setting is configured on each individual RDS\Citrix server.


Microsoft has changed the way that RemoteApp are made available to users in Server 2012 R2. They have done away with the MSI Installer method and the ability to create a RDP file. The two deployments options now are RDWeb and RemoteApp/Desktop Connection.

RDWeb is a great option for remote users, Mac users, and users of Microsoft operating systems older than Windows 8. The users simply go to a website, login, and are presented with all of the applications published to them. You can also use RDWeb to allow users to start RDP connections to Windows computers, which might be useful for users working remotely who need to connect to their office computers.

The RemoteApp/Desktop Connection method publishes the RemoteApps available to a user to their desktop, without having to log into RDWeb. The applications the user has published to them simply show up in their Start Menu. This setting can be deployed to users using Windows 8 and newer computers via a Group Policy Object. The Desktop connection URL setting under User Configuration | Policies | Administrative Templates | Windows Components | Remote Desktop Services | RemoteApp and Desktop Connections should be set to https://FQDN/RDWeb/Feed/webfeed.aspx as shown below.

It is important to note that the RemoteApp/Desktop Connection method requires that the SSL certificate issued to the remote desktop server be trusted on the user’s PC for the GPO to apply. RDWeb will also show security warning if the SSL certificate is not trusted on the user’s PC. While eliminating these security messages can be achieved by using an internal certificate, in cases where there is not an internal certificate authority, it is likely more economical to purchase a trusted third party SSL certificate than use the self-signed certificate from the remote desktop server. A third party certificate will eliminate the need for the user’s PC to have any certificates imported into their certificate store.


There was a 2012 R2 server I had configured and been using to test with for several months. After a few months, I could no longer connect to the server with remote desktop. I could ping the server and browse the admin shares across the network. I logged in and verified the Remote Desktop Services service was started and enabled.

Looking at the event log, I could see that every time I tried to remote in, the System log was adding event 36870 – “A fatal error occurred when attempting to access the SSL server credential private key. The error code returned from the cryptographic module is 0x8009030D. The internal error state is 10001.”

More research seemed to indicate that this was a problem with the Remote Desktop certificate on the system.  I opened the certificate manager for the local system, backed up the remote desktop certificate and then deleted it the certificate store.  Now, when I restarted the Remote Desktop Services service, I started getting a different event 1058 – “The RD Session Host Server has failed to replace the expired self-signed certificate used for RD Session Host Server authentication on SSL connections.  Access is denied.”

More research pointed me to checking the permissions in C:\ProgramData\Microsoft\Crypto\RSA\MachineKeys.  When I tried to set a permission on the folder, it propagated to all the files within except for one which said that access was denied.  I was unable to modify the permissions on the file itself even though I was logged in as the local administrator.

Taking a chance, I stopped the Remote Desktop Services service and was able to delete the file with the permission issues.  I restarted the Remote Desktop Services service and observed that a new Remote Desktop certificate had been created as well as a new file in the MachineKeys folder.  I was now able to connect to the server using remote desktop.