Blog: Networking

  • Citrix and TS do not support scanner redirection out of the box. There are a number of 3rd party utilities that will do this.
  • Depending on your scanner, the types of features you're looking for, citrix client (9.x+) and XenApp (4.0) versions, you may be able to utilize the out-of-the-box TWAIN redirection feature of Citrix XenApp.
    • XenApp and the ICA protocol can redirect client-connected TWAIN imaging devices, notably document scanners, from the client to the server, regardless of connection type. This allows users to control client-attached imaging devices from applications that run on the server and the redirection is transparent.
    • Version 9.x or later of the ICA Client for 32-bit Windows is required for this feature.
    • 16-bit TWAIN drivers are not supported
    • The image acquisition software must be installed on the XenApp Server. Examples of supported applications include Microsoft PictureIT, OmniPage, PaperPort, Photoshop, Paint Shop Pro
    • Image acquisition software that provides the USB device drivers must be installed on the client platform.

How it works [more]

To capture an image, users connect to a server from a client machine that has an imaging device and the associated vendor-supplied TWAIN driver installed locally. When the TWAIN application is run from within this session, the application detects and interacts with the client-side device. The server-based application that is accessed runs as a client-based application.

Enabling TWAIN redirection

You enable the redirection of TWAIN devices by enabling the policy rule Configure TWAIN redirection.

  1. Open the properties of a policy in which you want to control TWAIN redirection.
  2. Enable the rule Client Devices > Resources > Other > Configure TWAIN redirection.
  3. Use the options to allow and disallow TWAIN redirection, as well as control the level of data compression.

 

Recently I got assigned a task to investigate why users could copy/paste from their laptops to their View machine, but were unable to copy/paste in the opposite direction.  After doing some research I found out that this option is disabled for security reasons, but figured out how to fix it.  There are VMWare View Group Policy templates located on the View Connection Server in: c:\Program Files\VMware\VMware View\Server\extras\GroupPolicyFiles\ .

The policy for the “Configure clipboard redirection” is in the pcoip.adm template.  I added the policy to the VMWare View machines group and enabled it.  There are several different choices to pick from and I chose to “Enable it in both directions”.

After I added the policy to the VMWare View machines, I ran a “gpupdate /force” on my machine and noticed it didn’t fix the problem.  You have to restart the View machine in order for the policy to work.


My IP Communicator continually hung at "registering."  I found a post where someone was experiencing the same issue, and could resolve it by deleting the HKCU\programs\cisco inc\ip communicator registry settings each time before running the software.  So far, I've only had to delete the registry key once.


I had recently upgraded Adobe Reader to version 10.1.2 and my printer would only print a blank page when I tried to print a PDF document.  The printer lights would blink, and all print jobs after that would not print until I physically rebooted the printer.  I thought there might be something wrong with the PDF that I was trying to print until it happened to me again with another file.

I came across a knowledge base article from Adobe last updated 1/25/2012, http://kb2.adobe.com/cps/928/cpsid_92870.html that gives a link to a patch for being unable to print at all, and it mentions that Duplex is set to “ON” by default after the upgrade. 

Unchecking the Duplex option allowed me to print successfully.  The patch may help others in troubleshooting print problems.  As Adobe Reader updates get installed on our customers’ PCs, we may have an increase in support calls.


When roaming profiles are loaded and saved from and to the server over the network, sometimes the profile will load as temp or local.  The type and status should be roaming.  After renaming or copying the old profile and then recreating it, it works for a few times, and then same thing happens over and over.  You can spend a lot of time recreating profiles and fixing other things that might break when going from profile to profile.  The trick is to check the cable back to the switch.   Check the client on another run if possible, or use a fluke to test the cable(s) and connections.  The cable might test good one time and bad the next.  This is where just enough packet can be lost to corrupt the profile being saved or loaded. 


I needed to extend a component HD video connection between rooms and wanted to find a solution that would do this over Cat5e/6 UTP.  The solution I found (http://www.tripplite.com/en/products/model.cfm?txtSeriesID=977&txtModelID=4597) referred to something that I hadn't heard of before, low-skew or zero-skew UTP.  After more research I found the following:

Common CAT 5e/6 cable can have internal twisted pairs that vary greatly in length, which is good for eliminating cross-talk in Ethernet use, but causes image distortion in video over UTP applications. A difference in length in one twisted pair will produce a noticeable misalignment of the primary colors displayed.

The extenders are rated up to 300ft and it's working fine for my 60ft run of Cat5e.  The cost of the zero-skew cable is about double that of Cat5e, but I didn't test what it classifies as on a Fluke.


A customer called with a  laptop that would not connect to any mapped drives.   Investigating found that attempting to map via name would not work but mapping via IP did work.  DNS was working properly and the file server would ping by name or IP.  Logged in with an administrator account and all mapped drives came up properly.   Finally discovered that this machine had not been on the domain for some months and there were old cached credentials for the file server in stored credentials.  These are stored by path so it was using those credentials by default when attempting to map by name but not when mapping by IP.  Removal of these stored credentials allowed the mapping to complete properly. 


I have been working on update the Xerox DocuShare client to a new version for one of our customers. They were previously using DocuShare version 5 and it was installed via GPO. They wanted to upgrade to version 6.5.1 and wanted it to be pushed out to their terminal servers using Microsoft System Center Configuration Manager (SCCM).

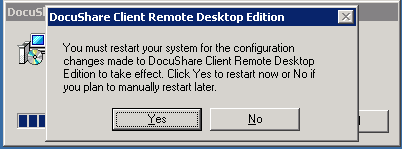
I removed the software from the server by removing the software package from the GPO with which it was installed. I started testing the install by doing a manual install of the new version. Xerox also provided an administrative installation option to create a custom MSI package. The following command is used to create the custom install package: msiexec.exe /a <path>\DSClient.msi. I noticed that there was no option to customize the directory to which the program installs, so I called Xerox. Xerox also said there was no command line switch for this. The old version was installed at D:\Program Files and the new version was forced to be installed at C:\Program Files. After installing the product using my custom MSI, each time I would restart the server I would get the messages below twice. If I clicked no on these pop-ups, the program would run correctly, but each user would get the prompts at each logon. [more]

I had a case open with Xerox for several weeks and they tried numerous data collections and custom MSI configurations to try and find the problem. I got to thinking about the problem one day and found there was a simple solution. I started searching the registry to see if any remnants of the old GPO installation were found. I found that there were several registry keys related to Xerox that were pointing to D:\Program Files\Xerox, but my new install needed to be on the C drive. These keys were left behind by the GPO uninstall. Xerox does not have a registry cleaner like several other vendors have. What was happening was that the program was trying to reconfigure itself each time it started because it could not find the files to start the DocuShare client. The registry key that ended up being the key to this was HKEY_USERS\.DEFAULT\Software\Xerox\DocuShare Client. After I deleted that key, the install worked perfectly.

The moral of this story is to check to make sure that nothing is left behind from an uninstall, especially if you are changing the directory to which the program files are installed.


I found out last week how easily one can get a certificate from GoDaddy with a SAN (Subject Alternative Name) for a non-registered domains name. This would include domains that end in .dom or .local that do not have a public registrar. Since GoDaddy cannot retrieve a WHOIS record for the domain, their authorization email only needs to be approved by the account that requests the certificate. This vulnerability removes a significant barrier for a man-in-the-middle attack, since the certificate would be trusted and the name would match the URL requested by the users.

Additionally, Office 365 AD Sync (needed for password synchronization) will not work with these type of non-registerable DNS names in a UPN suffix. While the UPN suffix can be changed to be different than the domain name, the problem would not exist for domains that use names like “internal.registereddomain.com”.


We were receiving the following error on one of our customers Netapp SANS:
Autosupport (WEEKLY_LOG) cannot connect to url support.netapp.com/asupprod/post/1.0/postAsup through proxy (Could not find hostname '""', hostname lookup resolution error: Unknown host)

So I tried to check the auto support proxy configuration setting:
netapp> options autosupport.support.proxy
autosupport.support.proxy    ""

After many attempts to remove “” from the proxy server configuration, I finally broke down and contacted support.  The technician also tried a number of things to change the configuration and ultimately found the solution after he asked one of his colleagues.  The way to get rid of the "" is a little counter-intuitive.  You simply apply the following command: [more]
netapp> options autosupport.support.proxy ""
which yields you the following result:
                autosupport.support.proxy

Fight fire with fire, I suppose.

Also, NetApp has a pretty cool tool that shows you the progress of you SnapMirror syncs. (SAN to SAN replication)

NetApp SnapMirror Progress monitor:
http://now.netapp.com/NOW/download/tools/smpm/