Blog: Citrix

If you are using Server 2016 as a Citrix or RDS server, users often request for Windows Photo Viewer to be their default program for photos instead of Paint. Photo viewer is installed with Server 2016, but does not have the file associations needed. Also, setting the default application is a per user setting and will require a GPO policy.

Here are the steps:

  1. Import the registry settings to create the file associations needed for Windows Photo Viewer
  2. Set Default Program associations
    1. Control Panel > Default Programs > Set default programs
    2. Select Windows Photo Viewer
    3. Select Choose Defaults for this program
    4. Select the extensions you want to set as default for Windows Photo Viewer
    5. Click Save
  3. Verify functionality by opening a file with extension set in previous step and verify it opens with Photo Viewer
  4. Create default association file to set default for all users at logon
    NOTE: the above process sets defaults for the current user only, to set for a user at logon the settings must be imported at logon
    1. Via powershell run the command below to create an XML document with the necessary associations
      "dism /Online /Export-DefaultAppAssociations: C:\cnx\DefAppAssoc.xml"
    2. Copy XML to a network location accessible by GPO policies
  5. Create or modify an existing GPO to pull XML file settings
    1. Computer Configuration > Administrative Templates > Windows Components > File Explorer > Set a default associations configuration file
    2. Enable policy and set network path of file from previous step


Even though Session Roaming was disabled for customer’s Citrix environment, users were ‘hijacking’ their Citrix sessions randomly when launching applications from two separate computers. These users had recently been migrated to XenApp 6.5 environment using Storefront (from XenApp 6.0\Web Interface configuration).
 
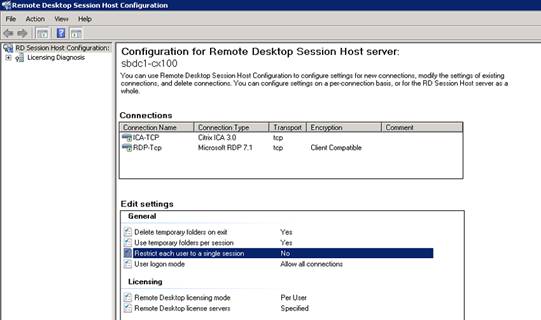
Troubleshooting showed that the hijacking was only occurring for the user when Citrix load evaluators placed the user on the same Citrix server in the farm for both sessions. The issue did not have to do with the Citrix Session Roaming feature, but rather an RDS setting to limit users to only one session per RDS server.
 
The resolution is to modify RDS Host Configuration setting to not ‘Restrict each user to a single session’. This setting is configured on each individual RDS\Citrix server.


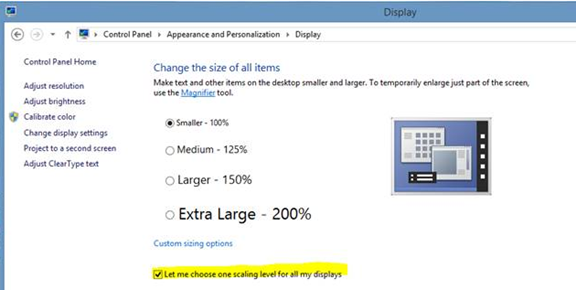
There is a known issue when connecting to a Citrix server when the Windows 8.1 DPI scaling function is enabled. The user may experience a flickering screen when connected to a Citrix published application. [more]

To disable DPI scaling, open display settings on the client and check the option ‘let me choose one scaling level for all my displays’. After changing the setting, the user must log off of their system and log back in for the setting to be applied.


Users had intermittent connection problem to published applications when using Citrix NetScaler Access Gateway that provides access to a XenDesktop 7 site.  Citrix receiver would spin saying “connecting to server” and then time out.  The NetScaler was deployed prior to a recent subnet change.  Connections worked ok when the user session was assigned to a server in the bottom half of the new subnet.  If connection was assigned a server in the top half on the new subnet then no connection could be made.

It was determined that the subnet mask for the NetScaler was wrong. The subnet that contained the XenDesktop hosts was recently changed from a /24 to a /23 due to IP shortage.  The resolution to the problem was to update the subnet mask for the NetScaler.

Be aware this change needs to be made via command line on the console of the VPX.  Changing the subnet mask from GUI can break access to NetScaler web GUI.  The subnet mask change can require that you remove and add a route.


With the installation of the new Citrix receiver 3.0 (which includes the Citrix online plug-in 13.0) and subsequent versions (version 3.3 of the Receiver is currently available), the following issues have been encountered.

After installing Citrix Receiver 3.0 or newer, users cannot launch Published Applications from the System Tray Notification Area Menu.

In the previous PNAgent or Citrix plug-in, the list of published applications was displayed.

In the new version, when you click the Citrix Receiver icon from the Systray, the menu displayed is shown in the following screen shot (newer versions have even viewer options available from the system tray icon). [more]

Citrix published this statement as the reason for this change: "Receiver for Windows 3.0 Citrix has specifically deprecated support for the option of launching applications from the Notification Area menu to achieve a better and more intuitive user experience in Receiver deployments. This type of access on Windows 7 causes issues. Application access from the Notification Area is no longer consistent with Microsoft User Experience Guidelines."

Microsoft’s User Guidelines can be read here: http://msdn.microsoft.com/en-us/library/windows/desktop/aa511440.aspx . The Notification Area purpose and design is explained in this section: http://msdn.microsoft.com/en-us/library/windows/desktop/aa511448.aspx

The resolution provided by Citrix is to publish all applications to the start menu or desktop via the Deliver Console. While this is an acceptable solution, a lot of users are complaining because they are having to retrain users and dislike the lack of the availability of the ease of access. With the new version of the Receiver, the online plug-in is basically wrapped in the Receiver Experience package. This wrapper can be removed by deleting the following registry key: HKEY_LOCAL_MACHINE\SOFTWARE\Citrix\ReceiverInside. This will bring back the full functionality of the online plug-in to the notification area. Removal of this registry key also reverts the icon from the black square icon to the round blue icon users are used to seeing.

After installing Citrix Receiver 3.0 or newer, the receiver requires a server URL that uses SSL (https:\\). Any non-secure URL is not accepted within the configuration.

Citrix has designated the default configuration of the Receiver to require SSL for connections to the server store. Modifying this default configuration is not available through the client itself, however the following registry key addition will allow you to add non-secure URLs for the server path:

Under HKEY_LOCAL_MACHINE\SOFTWARE\Citrix\Dazzle

REG_SZ: AllowAddStore

Value: A

Note: Changing the value to A allows you to add non-secure URLs.


Environment:

  • Server: XenApp 6, Windows Server 2008 R2
  • XenDesktop Controller: XenDesktop 5.6
  • Client: Various (Windows 7 Embedded TC, Windows 7 PC)

Two types of redirection supported for imaging devices:

  • TWAIN redirection (XenApp, XenDesktop)
  • USB Redirection (XenDesktop only) NOTE: XenApp does support USB Redirection, but not for Image Scanners. For details on USB devices supported by XenApp, refer to CTX816193. 

TWAIN Redirection [more]

  • The imaging device must be connected locally to the user device and have the associated vendor-supplied TWAIN driver installed
  • Citrix online plug-in 11.x or later or the Citrix offline plug-in
  • XenApp\XenDesktop 32-bit and 64-bit OSes support TWAIN redirection for 32-bit TWAIN applications only. XenApp does not support 16-bit TWAIN drivers
  • Citrix Policies (XenApp\XenDesktop): The Client TWAIN device redirection policy setting must be added to the appropriate policy. To configure image compression, add the TWAIN compression level setting and select the appropriate compression level. 
    • User Policy
    • Enabled by default
  • PROCESS: To capture an image, users connect to a server from a client machine that has an imaging device and the associated vendor-supplied TWAIN driver installed locally. When the TWAIN application is run from within this session, the application detects and interacts with the client-side device using a DLL hook process that communicates with the driver on the local client.
  • TWAIN Redirection troubleshooting: CTX107411
USB Redirection
  • When redirecting USB devices, the endpoint client device must first recognize the USB device to have it mapped to the session. If the device requires a special driver, it must be installed on both the client machine, as well as the Virtual Desktop Agent (VDA) machine. The device can still be mapped without the driver as long as the endpoint recognizes it, but it will not function as expected until the driver is installed on the VDA machine.
    NOTE: In some cases, installing the driver locally can break USB redirection. If the driver does not allow the device to be released for redirection, the VDA may not be able to communicate with the device.
    • When a device is detected, you can view the properties of the device via device manager or 'Printers and Devices'
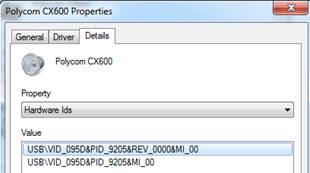
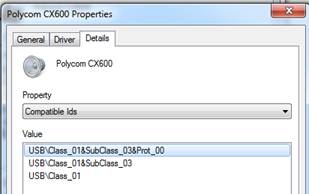
    • It is important to determine the devices vendor ID (VID) and product ID (PID) as well as the device’s Class. This information is usually found on the details tab of the properties of the device. 
    • Here is an example of a USB device and its defined properties:
      • Property = Hardware IDs (VID = 095D, PID = 9205)
      • Property=Compatible IDS (Class=01)
  • Certain USB classes are blocked by default because they are used mainly only on local workstations.  When some devices, such as a smartcard, Keyboard or Mouse, are connected, they will be connected by one of the predefined standard channels. Therefore, these types of devices are blocked by default for the USB channel as their functionality is required on the local endpoint
    • Communications and CDC Control (Classes 02 and 0a)
    • Human Interface Devices (Class 03)
    • USB Hubs (Class 09)
    • Smart Card (Class 0b)
    • Wireless Controller (Class e0)
  • Certain USB classes are allowed by the default USB policy rules
    • Audio (Class 01)
    • Physical Interface Devices(Class 05)
    • Still Imaging (Class 06)
    • Printers (Class 07)
    • Mass Storage (Class 08)
    • Content Security (Class 0d)
    • Video (Class 0e)
    • Personal Healthcare (Class 0f)
    • Application and Vendor Specific (Classes fe and ff)
  • Components of USB Redirection
    • Receiver – Citrix Client used to connect to XenDesktop\XenApp
      • Citrix Remote USB Device Driver (intercepts devices normal driver)
      • Configured by four methods
        • Desktop Viewer Toolbar (user)
          • Preferences must be set to Connect All or Ask each time to be presented with device on XenDesktop
        • Connection Center (user)
          • Session Security > USB Device must be set to Ask Permission or Full Access
        • GPO Computer or User policies (admin)
          • Configures settings mentioned above
          • Also setting for USB Device Rules
            • Allows for blocking or allowing devices based off VID, PID and Device Class
        • Registry (admin)
          • Devices can be automatically redirected by adding the VID and PID information into a registry key. See this article for details: CTX123015
    • VDA (Virtual Desktop Agent) – XenDesktop VM
      • Citrix Remote USB Host Controller (communicates with USB Device Driver)
      • Citrix USB Service (handles addition\removal of devices, monitors devices)
      • Configured by:
        • HDX Policy via XenDesktop Controller (admin)
          • Client USB device redirection policy must be enabled (disabled by default)
          • USB Device Rules
            • Allows for blocking or allowing devices based off VID, PID and Device Class
    • Troubleshooting
      • HDXMonitor Tool (runs on VDA) – Real time status on USB device connection, provides network performance stats, reports active USB rules in place, delivers USB filtered event log messages http://hdx.citrix.com/hdx-monitor
      • When using USB redirection for an imaging device, TWAIN redirection must be disabled. If the scanner is TWAIN compliant, the VDA will not be able to communicate with the device since the TWAIN redirection process is using the device. In my case, I received a message that it the device was “busy or in use”.
      • In my case, there also seemed to be an issue with Citrix Receiver 3.0 (online plug-in v13). Downgrading to v 12.3 of the online plug-in or upgrading to version 3.3 (online plug-in v13.3) fixed the USB redirection issue.


Citrix XenApp has a feature called Client-to-Server content redirection. If content redirection is used, when a user double-clicks a file the corresponding application is started on the Citrix server. For example, a user clicks a document with a .xlsx extension from their PC and Excel is started on the Citrix Server. Content Redirection is set per published application through the Citrix Management Console. By default, most widely used applications (MS, Adobe) will add all known possible extensions to the registry during installation. Citrix pulls these registry settings (extensions and associated filetypes as shown above) from the HKLM portion of the registry. There is not a way to add extensions manually within the Citrix Management Console. [more]

Certain applications do not add all the necessary registry entries for all extensions that may be used by the application. With Windows 2008, there isn’t a way to add extensions via windows explorer as there was in Windows 2003. Users can add extensions by using the open with command and choosing a program to associate with the unknown extension. However, this adds the association to the HKCU portion of the registry which will not be read by the Citrix Management Console when extensions are imported. You can use the following steps to solve this problem:

  1. Using the following commands from the command prompt to set file associations globally on a server:
    • To display a list of file extensions and their associations, type assoc at a command prompt, and then press ENTER.
    • To display the association for a specific file extension, type assoc .<xxx> at a command prompt, and then press ENTER, where <xxx> is the file extension whose association you want to view.
    • To change the association for a specific file extension, type assoc .<xxx>=<file type> at a command prompt, and then press ENTER, where <xxx> is the file extension whose association you want to change, and <file type> is the program, dynamic data exchange (DDE), or OLE object you want to associate with the file extension.
    • To display the open command to use when launching a certain file type, type ftype <file type>  at a command prompt, and the press ENTER, where <file type> is the program, dynamic data exchange (DDE), or OLE object you want to associate with the file extension.
    • To change the program association for a specific file type, type ftype <file type>=<program path> at a command prompt, and the press ENTER, where <file type> is the program, dynamic data exchange (DDE), or OLE object you want to associate with the file extension and <program path> is the path to the executable used to open the application.
    • If the file type for the extension you are wanting to add already exists (for example Excel.Sheet.12), all you would have to do is associate the new extension with that file type. This would allow the new extension to open with the program associated with that file type.
    • If the file type for the extension you are wanting to add does not exist or you do not know what its file type is, you would have to add both the association and the file type. The example below associates the extension .tstx with the file type test.document. It the associates the file type test.document to open with the program test.exe. This would allow any documents with the extension .tstx to open with test.exe.
  2. Once the association has been added to the registry, complete the following steps in the Citrix Management Console to view the new file associations:
    • Within the console, browse to Citrix server from which you are running the console (this should be the same server on which you added the file extensions)
    • Right click server, select Other Tasks > Update file types from registry.
    • Browse to published application with which new association should use content redirection with.
    • Right click application and choose application properties and select content redirection menu.
    • Uncheck “show all available file types for this application” (if necessary), click apply, and then recheck the option. This should refresh the file extensions added to the registry in previous steps.


  • Citrix and TS do not support scanner redirection out of the box. There are a number of 3rd party utilities that will do this.
  • Depending on your scanner, the types of features you're looking for, citrix client (9.x+) and XenApp (4.0) versions, you may be able to utilize the out-of-the-box TWAIN redirection feature of Citrix XenApp.
    • XenApp and the ICA protocol can redirect client-connected TWAIN imaging devices, notably document scanners, from the client to the server, regardless of connection type. This allows users to control client-attached imaging devices from applications that run on the server and the redirection is transparent.
    • Version 9.x or later of the ICA Client for 32-bit Windows is required for this feature.
    • 16-bit TWAIN drivers are not supported
    • The image acquisition software must be installed on the XenApp Server. Examples of supported applications include Microsoft PictureIT, OmniPage, PaperPort, Photoshop, Paint Shop Pro
    • Image acquisition software that provides the USB device drivers must be installed on the client platform.

How it works [more]

To capture an image, users connect to a server from a client machine that has an imaging device and the associated vendor-supplied TWAIN driver installed locally. When the TWAIN application is run from within this session, the application detects and interacts with the client-side device. The server-based application that is accessed runs as a client-based application.

Enabling TWAIN redirection

You enable the redirection of TWAIN devices by enabling the policy rule Configure TWAIN redirection.

  1. Open the properties of a policy in which you want to control TWAIN redirection.
  2. Enable the rule Client Devices > Resources > Other > Configure TWAIN redirection.
  3. Use the options to allow and disallow TWAIN redirection, as well as control the level of data compression.


In working with XenServer over the past couple of months, I have found that information is harder to come by than it is with VMware. We are only using XenServer for one customer and they are using the free version so support is not an option. Up until last week, I had no need to get into the CLI of Xen much. It’s pretty easy to configure via XenCenter and our setup is pretty simple. However, the other day, our monitoring software detected an issue where the network interfaces on one of the monitored VMs was logging a high number of discards. One of the peculiar things was that the discards were the exactly the same for Tx and Rx. After some research, I decided that it would be a good idea to run off all the offloading features in XenServer. XenServer sees network interfaces in two forms: physical interfaces (pifs) and virtual interfaces (vifs). Pifs are the actual connections to the server. Vifs are the NIC interfaces of the VMs. Naturally, turning off all of this can only be done via the XenServer CLI. So, part one of the gotcha…here is a set of scripts that can help in manipulating network interfaces in Xenserver
 
Script to turn off all offloading techniques off on all vifs and pifs: [more]
====================================================
#!/bin/bash
 
if_modes="rx tx sg tso ufo gso"
 
if [[ "$1" == "--local" || "$1" == "-l" ]]; then
echo -n "disabling checksum offloading for local devices... "
for iface in $(ifconfig | awk '$0 ~ /Ethernet/ { print $1 }'); do
for if_mode in ${if_modes}; do
ethtool -K $iface $if_mode off 2>/dev/null
done
done
echo "done."
else
echo -n "disabling checksum offloading in xapi settings... "
for VIF in $(xe vif-list --minimal | sed -e 's/,/ /g')
do
###xe vif-param-clear uuid=$VIF param-name=other-config
for if_mode in ${if_modes}; do
xe vif-param-set uuid=$VIF other-config:ethtool-${if_mode}="off"
done
done
for PIF in $(xe pif-list --minimal | sed -e 's/,/ /g')
do
###xe pif-param-clear uuid=$PIF param-name=other-config
for if_mode in ${if_modes}; do
xe pif-param-set uuid=$PIF other-config:ethtool-${if_mode}="off"
done
done
echo "done."
fi
====================================================
- create text script file (turnOffloadingOff) using VI
- Change perms to make it a script
                        chmod 777 turnOffloadingOff
- Run script
                        ./turnOffloadingOff
 
Other Useful XenServer Commands
 
- determine uuids of physical interfaces on XenServer
                        xe pif-list host-name-label=<hostname>
- determine parameters of the specific pif given the uuid
                        xe pif-param-list uuid=<uuid of pif>
- determine uuids of virtual interfaces of VMs on Xenserver
                        xe vif-list
- determine parameters of the specific vif given the uuid
                        xe vif-param-list uuid=<uuid>
- new VMs created since the script was executed will NOT have the same vif other-config settings disabled
xe vif-param-set uuid=<uuid of vif> other-config: ethtool-gso=”off”
xe vif-param-set uuid=<uuid of vif> other-config: ethtool-ufo=”off”
xe vif-param-set uuid=<uuid of vif> other-config: ethtool-tso=”off”
xe vif-param-set uuid=<uuid of vif> other-config: ethtool-sg=”off”
xe vif-param-set uuid=<uuid of vif> other-config: ethtool-tx=”off”
xe vif-param-set uuid=<uuid of vif> other-config: ethtool-rx=”off”

So on to part two of this post…this didn’t fix the problem. After a ton of additional troubleshooting, I determined that this behavior is due to the Citrix Paravirtual NIC driver. The issue goes away if you uninstall XenTools and the PV driver isn’t used. On Windows 2008 and Windows Vista/7 VMs, the PV Ethernet driver reports discards to the OS. In Windows 2003 and XP, it does not. Keep in mind the discards could be broadcast packets not intended for the VM or misc DOM0 traffic. In any case, it doesn’t make much sense, but there isn’t actually anything wrong with the VM. I ended up removing the monitoring of the VMs NIC interfaces because I did want to use the PV Ethernet driver.


One of our customers has a device that re-pins debit cards.  During the migration from moving users off the old Citrix farm to the new CoNetrix Citrix farm, users were having issues with this Magtec Application.   When we launched the application it would pop up a “Request Pin Timeout” error.  This meant that the application was unable to detect the Magtec IntilliPen device through the Citrix client.  We were on a very strict time schedule so a coworker began looking into the issue first as I continued to migrate users.  Four hours later after numerous tests, Magtec still wasn’t working. [more]

After we finally finished migrating all the users, (2 weeks later) my coworker tagged me to help tackle this issue of why this was not working.  After numerous tests,  I was sure that something in the intCat.ini file wasn’t set up correctly.  We could launch this application and it would connect fine on the old farm but on the new farm it would not work.  After calling Magtec support 3 times, explaining to them “I KNOW YOU HAVE SEEN THIS PROBLEM BEFORE” I finally got a technician to send me over a document that was Citrix and Terminal Server friendly.

In this document I found 2 changes that needed to be added to the intCat.ini file

a.       [Communication] add IPType="REMOTE_RS232"

b.      [Motorized_Intellicoder] change to DeviceName="MCPUM_COM2"

The communication part I believe is the most important piece as it tells the application that instead of using the local COM1 port it uses the Clients Com1 port.  After adding this in the intCat.ini file the device connects up immediately.