Blog: General

A network support customer was having an issue on one PC that every time he opened Excel documents with graphs generated by data from worksheets, no graph would appear. However the same Excel document opened on any other PC would work fine. If other users logged into the affected system the graphs worked. I found that defect print drivers could cause this problem, so I changed his default printer and the graphs work. Changed it back and the graphs wouldn’t work. I then uninstalled and reinstalled the drivers for the default printer he was using and the problem was gone. So do not run out corrupt print drivers when troubleshooting Office 20XX problems.


When performing searches on Google I often find it helpful to narrow the results based on when the pages were indexed by Google.  This is helpful in situations where the results for your keywords are returning a lot of old pages with dated information, but you’re looking for new information pertaining to the subject.  Google provides the options to search for recent pages through their advanced search options.  To see the options available you can click the “Advanced search” link beside the search box, click the “Date, usage rights, numeric range, and more” link, and change the “Date” option.  The options currently available are past 24 hours, past week, past month, past year.

Using the advanced search works, but it takes a few clicks to get to and doesn’t have many options for the date range.   I’ve found it’s quicker and more flexible to just add a query string parameter to the end of the URL after you search for your keywords.  [more]

ValueResult
&tbs=rltm:1 real time results
&tbs=qdr:s past second
&tbs=qdr:n past minute
&tbs=qdr:h past hour
&tbs=qdr:d past day (24 hours)
&tbs=qdr:w past week
&tbs=qdr:m past month
&tbs=qdr:y past year

In addition to those basic parameters you can also add an integer after the “qdr” unit values to specify a specific number.  For example “&tbs=qdr:w2” will only return pages discovered by Google within the last 2 weeks.  Here is what your URL would look like in that case: http://www.google.com/#sclient=psy&hl=en&q=conetrix&tbs=qdr:w2


I needed to make an audio recording using my laptop.   Previously I had good success using an USB Plantronics headset which has a microphone (DSP 400).

This was my first recording with my new laptop (ThinkPad T410, Windows7).   The T410 uses the Conexant 2085 SmartAudio HD sound adapter.

I downloaded the open source software “Audacity.”  It is great software with many advanced features I have never tapped.  It is simple enough I can use the basics and be up and running as soon as it is installed.

When I plugged in the Plantronics headset, it was recognized right away, but there were a couple of problems to address before being able to record.  [more]

First the internal microphone on the laptop was not deactivated when the headset was plugged in.  This meant extra noise and sounds were being captured. 

I looked through the sound control panel “Recording” tab and could not find any means to the mute the microphone.  (A co-worker later showed me the control panel microphone mute button.  It has the same icon as the speaker mute button, so I overlooked it.)  What I did discover was the volume slider did not appear to effect the internal microphone as the recording level meter continued to register sounds even when the slider was all the way down.  For my first recording I resorted to disabling the internal microphone in order to limit recording to the headset microphone.

Second, when I did a test recording with Audacity, there as a stream of white noise which was as loud as my voice.  Back in the Sound control panel I remembered seeing some Windows settings to automatically adjust sound volumes when the PC is used to place or receive phone calls (Skype-like calls I assume).  I went to the Communications tab in the Sound control panel.  By default the setting was set to “Reduce the volume of other sounds by 80%.”  I changed the setting to “Do Nothing.”  I made another test recording and the white noise was gone.

After I completed the recording project, I attempted to enable the internal microphone.  It was gone from the Sound control panel.  With the headset unplugged there were no recording devices listed. 

The only way I could get the internal microphone to reappear was to uninstall Conexant in the device manager and restart the laptop.  When the laptop restarted it reinstalled the Conexant adapter and the internal microphone was available again in the Sound control panel under Recording.

Preparing to write this post, I was able to take the time to look further for a way to mute the internal microphone.  And, the Gotcha took on new dimensions.  There is a “Mute Microphone” button at the top of the keyboard.  My old laptop didn’t have this button and so I never thought about having a dedicated mute button.  No need to disable and ultimately reinstall, just press the button.

UPDATE:  People have commented that the mute microphone button did not fix the problem for them, but turning off the microphone boost did.


I was recently helping a friend who was having trouble getting online with her Mac laptop.  After over an hour of talking to Apple they told her that her computer was self assigning the IP address, but did not tell her how to fix it. 

A little bit of forum scouring provided me with more than a few people who are having the same issues and a few ideas of how to fix this issue.  The idea that seems to have fixed the problem was resetting the PRAM.  Parameter RAM, or PRAM, is a small amount of RAM that stores the basic setup information about the computer.  This includes settings for the mouse, keyboard, startup, etc.  Warning, you may lose some of your customized settings.  However, you can use the Control Panels to restore them.  Here are the steps to reset your PRAM:  [more]

  1. Shut down the computer.
  2. Locate the following keys on the keyboard: Command, Option, P, and R. You will need to hold these keys down simultaneously in step 4.
  3. Turn on the computer.
  4. Press and hold the Command-Option-P-R keys. You must press this key combination before the gray screen appears.
  5. Hold the keys down until the computer restarts and you hear the startup sound for the second time.
  6. Release the keys.


The Internet Explorer 9 Beta is out and already I can see several new features and improvements over previous versions. While it still isn’t enough to get me to switch from Chrome, they are making serious improvements in the UI and how it handles certain websites. One new feature, however, I find quite interesting. They’re called jump lists and basically, it’s a bookmark on steroids.

Windows 7 has allowed you to pin applications to the taskbar for easy access. IE also provided the ability to switch tabs via the pinned application on the taskbar. Now, they have taken it to the next level. You can pin a specific site to the taskbar and open to it as if you were starting a new application. Currently, this is an IE only feature, but Microsoft hopes to turn it into a standard for other browsers to follow suit. [more]

Let’s say, you browse to http://arstechnica.com and you want to pin their site to your taskbar. Click/drag the tab to your taskbar and it will automatically pin. Notice that the icon has changed.

Then when you click on it, it opens up a “special” version of IE with its own special colors and icons.

This information is grabbed from the favicon.

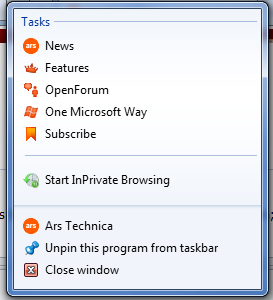
Finally, the jump list. Right-click on the pinned application:

Notice that there are new “tasks”. When you click on one of these, it opens that specific page. The code to add this information is really simple.

<!-- C-razy IE9 stuff --><meta name="application-name" content="Ars Technica"/>
<meta name="msapplication-starturl" content="http://arstechnica.com/"/>
<meta name="msapplication-tooltip" content="Ars Technica: Serving the technologist for 1.2 decades"/>
<meta name="msapplication-task" content="name=News;action-uri=http://arstechnica.com/;icon-uri=http://arstechnica.com/favicon.ico"/>
<meta name="msapplication-task" content="name=Features;action-uri=http://arstechnica.com/features/;icon-uri=http://static.arstechnica.net/ie-jump-menu/jump-features.ico"/>
<meta name="msapplication-task" content="name=OpenForum;action-uri=http://arstechnica.com/civis/;icon-uri=http://static.arstechnica.net/ie-jump-menu/jump-forum.ico"/>
<meta name="msapplication-task" content="name=One Microsoft Way;action-uri=http://arstechnica.com/microsoft/;icon-uri=http://static.arstechnica.net/ie-jump-menu/jump-omw.ico"/>
<meta name="msapplication-task" content="name=Subscribe;action-uri=http://arstechnica.com/subscriptions/;icon-uri=http://static.arstechnica.net/ie-jump-menu/jump-subscribe.ico"/>

I’ve added this to one of my sites within minutes and all works as intended. Now because the jump list is actually pinned to the taskbar, the Windows team had to modify the structure of their code to allow IE to do this. This is why it still requires a reboot to install IE9. They’re modifying the kernel to allow for jump lists. Pretty neat stuff.


Back in 1982 Digital Research released DR PalmDOS which ran on Palm personal digital assistants.  When you used a PCMCIA card for storage, instead of adding a drive letter, it added a drive number - 0:, 1:, 2:. Today, even with Windows 7, non-alphabetic characters can be used, including  $ [ ] ` { } etc.  But some characters are just too special and cannot be used: % & ^ = | \ " ; , /..

The subst command is the only way I could find for using these, though.  This could be handy for a system where you are connecting removable media and you would have trouble knowing which drive letters would be available.  For example: [more]

subst 1: "C:\Documents and Settings\username\My Documents"

subst *: "C:\Documents and Settings\username\My Documents"

Unfortunately, the regular Explorer windows cannot handle these "special" drive designations, but they can be used from the command line.


New Windows 7 hotkeys

Keyboard Shortcut Action
Windows logo key +Home Clear all but the active window
Windows logo key +Space All windows become transparent so you can see through to the desktop
Windows logo key +Up arrow Maximize the active window
Windows logo key +Down arrow: Minimize the active window or restore the window if it's maximized
Windows logo key +Left/Right arrows Dock the active window to each side of the monitor
Windows logo key +Shift+Left/Right arrows If you've got dual monitors, this will move the active window to the adjacent monitor
Windows logo key +T Shift focus to and scroll through items on the taskbar
Windows logo key +P Adjust presentation settings for your display
Windows logo key +(+/-) Zoom in/out
Windows logo key +Click a taskbar item Open a new instance of that particular application

Ease of Access keyboard shortcuts

The following table contains keyboard shortcuts that can help make your computer easier to use.  [more]

Keyboard Shortcut Action
Right Shift for eight seconds Turn Filter Keys on and off
Left Alt+Left Shift+PrtScn (or PrtScn) Turn High Contrast on or off
Left Alt+Left Shift+Num Lock Turn Mouse Keys on or off
Shift five times Turn Sticky Keys on or off
Num Lock for five seconds Turn Toggle Keys on or off
Windows logo key +U Open the Ease of Access Center

General keyboard shortcuts

The following table contains general keyboard shortcuts.

Keyboard Shortcut Action
F1 Display Help
Ctrl+C (or Ctrl+Insert) Copy the selected item
Ctrl+X Cut the selected item
Ctrl+V (or Shift+Insert) Paste the selected item
Ctrl+Z Undo an action
Ctrl+Y Redo an action
Delete (or Ctrl+D) Delete the selected item and move it to the Recycle Bin
Shift+Delete Delete the selected item without moving it to the Recycle Bin first
F2 Rename the selected item
Ctrl+Right Arrow Move the cursor to the beginning of the next word
Ctrl+Left Arrow Move the cursor to the beginning of the previous word
Ctrl+Down Arrow Move the cursor to the beginning of the next paragraph
Ctrl+Up Arrow Move the cursor to the beginning of the previous paragraph
Ctrl+Shift with an arrow key Select a block of text
Shift with any arrow key Select more than one item in a window or on the desktop, or select text within a document
Ctrl with any arrow key+Spacebar Select multiple individual items in a window or on the desktop
Ctrl+A Select all items in a document or window
F3 Search for a file or folder
Alt+Enter Display properties for the selected item
Alt+F4 Close the active item, or exit the active program
Alt+Spacebar Open the shortcut menu for the active window
Ctrl+F4 Close the active document (in programs that allow you to have multiple documents open simultaneously)
Alt+Tab Switch between open items
Ctrl+Alt+Tab Use the arrow keys to switch between open items
Ctrl+Mouse scroll wheel Change the size of icons on the desktop
Windows logo key +Tab Cycle through programs on the taskbar by using Aero Flip 3-D
Ctrl+Windows logo key +Tab Use the arrow keys to cycle through programs on the taskbar by using Aero Flip 3-D
Alt+Esc Cycle through items in the order in which they were opened
F6 Cycle through screen elements in a window or on the desktop
F4 Display the address bar list in Windows Explorer
Shift+F10 Display the shortcut menu for the selected item
Ctrl+Esc Open the Start menu
Alt+underlined letter Display the corresponding menu
Alt+underlined letter Perform the menu command (or other underlined command)
F10 Activate the menu bar in the active program
Right Arrow Open the next menu to the right, or open a submenu
Left Arrow Open the next menu to the left, or close a submenu
F5 (or Ctrl+R) Refresh the active window
Alt+Up Arrow View the folder one level up in Windows Explorer
Esc Cancel the current task
Ctrl+Shift+Esc Open Task Manager
Shift when you insert a CD Prevent the CD from automatically playing
Left Alt+Shift Switch the input language when multiple input languages are enabled
Ctrl+Shift Switch the keyboard layout when multiple keyboard layouts are enabled
Right or Left Ctrl+Shift Change the reading direction of text in right-to-left reading languages

Dialog box keyboard shortcuts

The following table contains keyboard shortcuts for use in dialog boxes.

Keyboard Shortcut Action
Ctrl+Tab Move forward through tabs
Ctrl+Shift+Tab Move back through tabs
Tab Move forward through options
Shift+Tab Move back through options
Alt+underlined letter Perform the command (or select the option) that goes with that letter
Enter Replaces clicking the mouse for many selected commands
Spacebar Select or clear the check box if the active option is a check box
Arrow keys Select a button if the active option is a group of option buttons
F1 Display Help
F4 Display the items in the active list
Backspace Open a folder one level up if a folder is selected in the Save As or Open dialog box

The following table contains keyboard shortcuts that use the Windows logo key .

Keyboard Shortcut Action
Windows logo key Open or close the Start menu.
Windows logo key +Pause Display the System Properties dialog box.
Windows logo key +D Display the desktop.
Windows logo key +M Minimize all windows.
Windows logo key +Shift+M Restore minimized windows to the desktop.
Windows logo key +E Open Computer.
Windows logo key +F Search for a file or folder.
Ctrl+Windows logo key +F Search for computers (if you're on a network).
Windows logo key +L Lock your computer or switch users.
Windows logo key +R Open the Run dialog box.
Windows logo key +T Cycle through programs on the taskbar.
Windows logo key +number Start the program pinned to the taskbar in the position indicated by the number. If the program is already running, switch to that program.
Shift+Windows logo key +number Start a new instance of the program pinned to the taskbar in the position indicated by the number.
Ctrl+Windows logo key +number Switch to the last active window of the program pinned to the taskbar in the position indicated by the number.
Alt+Windows logo key +number Open the Jump List for the program pinned to the taskbar in the position indicated by the number.
Windows logo key +Tab Cycle through programs on the taskbar by using Aero Flip 3-D.
Ctrl+Windows logo key +Tab Use the arrow keys to cycle through programs on the taskbar by using Aero Flip 3-D.
Ctrl+Windows logo key +B Switch to the program that displayed a message in the notification area.
Windows logo key +Spacebar Preview the desktop.
Windows logo key +Up Arrow Maximize the window.
Windows logo key +Left Arrow Maximize the window to the left side of the screen.
Windows logo key +Right Arrow Maximize the window to the right side of the screen.
Windows logo key +Down Arrow Minimize the window.
Windows logo key +Home Minimize all but the active window.
Windows logo key +Shift+Up Arrow Stretch the window to the top and bottom of the screen.
Windows logo key +Shift+Left Arrow or Right Arrow Move a window from one monitor to another.
Windows logo key +P Choose a presentation display mode.
Windows logo key +G Cycle through gadgets.
Windows logo key +U Open Ease of Access Center.
Windows logo key +X Open Windows Mobility Center.

Windows Explorer keyboard shortcuts

The following table contains keyboard shortcuts for working with Windows Explorer windows or folders.

Keyboard Shortcut Action
Ctrl+N Open a new window
Ctrl+W Close the current window
Ctrl+Shift+N Create a new folder
End Display the bottom of the active window
Home Display the top of the active window
F11 Maximize or minimize the active window
Ctrl+Period (.) Rotate a picture clockwise
Ctrl+Comma (,) Rotate a picture counter-clockwise
Num Lock+Asterisk (*) on numeric keypad Display all subfolders under the selected folder
Num Lock+Plus Sign (+) on numeric keypad Display the contents of the selected folder
Num Lock+Minus Sign (-) on numeric keypad Collapse the selected folder
Left Arrow Collapse the current selection (if it's expanded), or select the parent folder
Alt+Enter Open the Properties dialog box for the selected item
Alt+P Display the preview pane
Alt+Left Arrow View the previous folder
Backspace View the previous folder
Right Arrow Display the current selection (if it's collapsed), or select the first subfolder
Alt+Right Arrow View the next folder
Alt+Up Arrow View the parent folder
Ctrl+Shift+E Display all folders above the selected folder
Ctrl+Mouse scroll wheel Change the size and appearance of file and folder icons
Alt+D Select the address bar
Ctrl+E Select the search box
Ctrl+F Select the search box

Taskbar keyboard shortcuts

The following table contains keyboard shortcuts for working with items on the taskbar.

Keyboard Shortcut Action
Shift+Click on a taskbar button Open a program or quickly open another instance of a program
Ctrl+Shift+Click on a taskbar button Open a program as an administrator
Shift+Right-click on a taskbar button Show the window menu for the program
Shift+Right-click on a grouped taskbar button Show the window menu for the group
Ctrl+Click on a grouped taskbar button Cycle through the windows of the group

Magnifier keyboard shortcuts

The following table contains keyboard shortcuts for working with Magnifier.

Keyboard Shortcut Action
Windows logo key + Plus Sign or Minus Sign Zoom in or out
Ctrl+Alt+Spacebar Preview the desktop in full-screen mode
Ctrl+Alt+F Switch to full-screen mode
Ctrl+Alt+L Switch to lens mode
Ctrl+Alt+D Switch to docked mode
Ctrl+Alt+I Invert colors
Ctrl+Alt+arrow keys Pan in the direction of the arrow keys
Ctrl+Alt+R Resize the lens
Windows logo key + Esc Exit Magnifier

Remote Desktop Connection keyboard shortcuts

The following table contains keyboard shortcuts for working with Remote Desktop Connection.

Keyboard Shortcut Action
Alt+Page Up Move between programs from left to right.
Alt+Page Down Move between programs from right to left.
Alt+Insert Cycle through programs in the order that they were started in.
Alt+Home Display the Start menu.
Ctrl+Alt+Break Switch between a window and full screen.
Ctrl+Alt+End Display the Windows Security dialog box.
Alt+Delete Display the system menu.
Ctrl+Alt+Minus Sign (-) on the numeric keypad Place a copy of the active window, within the client, on the Terminal server clipboard (provides the same functionality as pressing Alt+PrtScn on a local computer).
Ctrl+Alt+Plus Sign (+) on the numeric keypad Place a copy of the entire client window area on the Terminal server clipboard (provides the same functionality as pressing PrtScn on a local computer).
Ctrl+Alt+Right Arrow "Tab" out of the Remote Desktop controls to a control in the host program (for example, a button or a text box). Useful when the Remote Desktop controls are embedded in another (host) program.
Ctrl+Alt+Left Arrow "Tab" out of the Remote Desktop controls to a control in the host program (for example, a button or a text box). Useful when the Remote Desktop controls are embedded in another (host) program.


I recently upgraded my laptop to Windows 7 with Office 2010. After getting everything setup I was experiencing a problem with Outlook not reopening after I had previously had closed it. I would check the task manager and it would show to instances of Outloo.exe running. I would kill the one with the highest memory usage and Outlook would open. I began disabling and enabling Outlook add-ins until I found that the problem was caused by “OutlookChangeNotifier” which is installed with iTunes. Once that was disabled Outlook opened and closed without any problems.


When we audit a bank, we talk with them about their smartphone controls - including asking about the use of remote wipe.  Recently, I was thinking about the problem of when to decide that your phone is really lost or stolen and take the remote wipe plunge.   You always think you might find the phone any minute now...

I've looked at Apple's Mobile Me service that offers a "Find My iPhone" service.  Their service works well and offers a nice feature of being able to have the phone ring loudly even if you have the ringer turned off.  However, since I didn't need the Mobile Me e-mail, contact, calendar syncing, the $99/year subscription fee seemed awfully steep for a location service.

I found a FoneHome app on the Apple app store that is an alternative to the $99/year subscription to Mobile Me if all you want is a way to track your lost phone. [more]

It's $1.99 on the store and allows you to track the phone (or phones) as long as it's online and GPS is turned on.  It'll run in the background on a 3GS or 4 with iOS 4.

The app sends an update to the FoneHome website (via SSL) periodically, more frequently when you're on the move.  You can log onto the website and see the last location it received as well as a history of locations reported.  I suppose this could act as a poor man's teenager tracker as long as the kids don't uninstall the app or turn off their GPS…

The website is www.myfonehome.com.  Once you setup an account (free), you can tie it to multiple iPhones.


If you have any programs that use Outlook to script objects in Exchange, you need to  be aware that the folder name for root public folder changed with Outlook 2010.  In previous versions of Outlook the root public folder is named “\Public Folders”.  Starting with Outlook 2010 the root public folder is named “\Public Folders – [email protected]” where [email protected] is the connected user’s primary email address.  Fortunately you can use the GetDefaultFolder() method on the Outlook NameSpace object to get common folders without hard coding the name of it.  For example you could call GetDefaultFolder(olPublicFoldersAllPublicFolders) to get the "All Public Folders" folder in the Exchange Public Folders store if you're using Exchange.