Blog

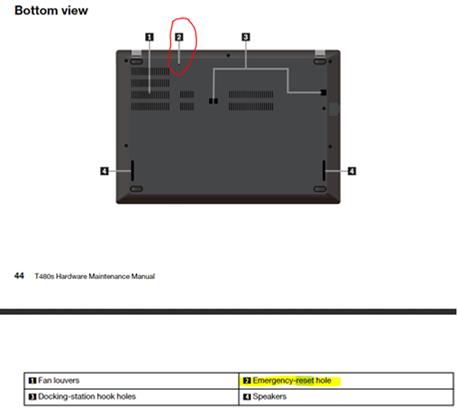
If you have a Lenovo laptop with a built-in battery and it won't power on or wake-up from a sleep state, you can use the pin-hole emergency reset hole (button) to resolve the issue.

Disconnect the power adapter and depress this button with a paper-clip or similar item. Wait for 1 minute, then reconnect the AC adapter or power up using the battery.

The location of the reset button varies by model. The location for a T480s is shown below (taken from the Hardware Maintenance Manual). You do not lose any settings or data. Best I can tell, this is the similar to removing a removable battery on older models.


After migrating Exchange to a new domain, the "Conversation History" folder in Outlook to see Skype conversation history quit syncing conversations. Follow these steps below to get conversations to show up again:

  1. Type "credential manager" in the Windows 10 Searchbox on the taskbar to select and open the Credential Manager (or alternately open it through the Control Panel)
  2. Within the Credential Manager, select Windows Credentials and click "Add a Windows credential"
  3. Add your CoNetrix domain (email) credentials:
    1. Internet or network address: mail.domain.com
    2. User name: domain\<username>
    3. Password: <domain password>
  4. Once you enter your credentials and click "Ok".
  5. Note: it may take 20-30 minutes after you complete these steps before you see your conversations begin to show up. In addition, you may begin to get some older emails that indicate you missed conversations…


We recently installed some new blade servers in our Aspire datacenter and I was working on getting ESXi 6.5 installed on them. After the installation, took the opportunity to upgrade to 6.7. I didn't want to mount an ISO to iLO, reboot each host, wipe the config, and start fresh – I wanted to do an in-place upgrade.

When a host is connected to vCenter and Update Manager, you can just use Update Manager to create a baseline for the in-place upgrade. These are fairly fresh installations and were not connected to our vCenter environment so I needed an alternative. Standalone hosts can also be upgraded using an Offline Bundle download and the "esxcli software profile" commands. I wanted to use an HP branded bundle so couldn't use the online depot, which means I would need to download the offline bundle, upload it either to every host or to a shared datastore which didn't yet exist. Surely there's an even simpler method that would still allow me to use an HP branded offline bundle image and not have to worry about the shared datastore.

Fortunately, there's a PowerShell method available. The "Install-VMHostPatch" cmdlet allows you to install host patches stored either locally, from a web location, or in a host file system.

If you have multiple hosts, just connect to all of them in the same PowerShell session (or connect to vCenter, if that's available) – "Connect-VIServer -Server abc123.host.local -User root -Password LocalPassword" – and run a "Get-VMHost | Install-VMHostPatch" to install the patches at the same time.

The basic syntax and instructions can be found here - https://www.vmware.com/support/developer/PowerCLI/PowerCLI41U1/html/Install-VMHostPatch.html - this is a quick and easy way to install patches without Update Manager or enabling SSH on each individual host.

One other thing to note, I ran into issues with the Local Path and Web Path, but I believe it was due to a lack of available space in the tmp partition to copy the installation files. Unfortunately, this means I had to mount a shared datastore anyway, but setting up NFS on a spare Linux appliance made even that simpler than it could've been.


The May 2019 Microsoft patch releases included an update for a very high-risk vulnerability (CVE-2019-0708, aka BlueKeep) that affects Windows XP, Windows 7, Server 2003, Server 2008, and Server 2008 R2.

This vulnerability allows an unauthenticated attacker (or malware) to remotely execute code on the vulnerable system. It is considered as VERY high risk, particularly for systems with Remote Desktop Protocol (RDP, port 3389) directly exposed to the Internet. However if a system inside the network is compromised it could easily spread to other PC's and servers because RDP is enabled by default.

CoNetrix strongly recommends all customers ensure the May updates are installed as soon as possible.

Microsoft has not only released updates for Windows 7, Server 2008 & R2, but also has issued updates for Windows XP and Server 2003 which are not officially supported.

All CoNetrix Technology customers with managed services agreements and all cloud hosted Aspire systems, were updated shortly after this vulnerability was announced.

This vulnerability can be mitigated by enabling Network Level Authentication (NLA) - https://docs.microsoft.com/en-us/previous-versions/windows/it-pro/windows-server-2008-R2-and-2008/cc732713(v=ws.11). Additionally CoNetrix recommends disabling RDP access over the Internet to internal systems.


If you are using Server 2016 as a Citrix or RDS server, users often request for Windows Photo Viewer to be their default program for photos instead of Paint. Photo viewer is installed with Server 2016, but does not have the file associations needed. Also, setting the default application is a per user setting and will require a GPO policy.

Here are the steps:

  1. Import the registry settings to create the file associations needed for Windows Photo Viewer
  2. Set Default Program associations
    1. Control Panel > Default Programs > Set default programs
    2. Select Windows Photo Viewer
    3. Select Choose Defaults for this program
    4. Select the extensions you want to set as default for Windows Photo Viewer
    5. Click Save
  3. Verify functionality by opening a file with extension set in previous step and verify it opens with Photo Viewer
  4. Create default association file to set default for all users at logon
    NOTE: the above process sets defaults for the current user only, to set for a user at logon the settings must be imported at logon
    1. Via powershell run the command below to create an XML document with the necessary associations
      "dism /Online /Export-DefaultAppAssociations: C:\cnx\DefAppAssoc.xml"
    2. Copy XML to a network location accessible by GPO policies
  5. Create or modify an existing GPO to pull XML file settings
    1. Computer Configuration > Administrative Templates > Windows Components > File Explorer > Set a default associations configuration file
    2. Enable policy and set network path of file from previous step


I recently built some new Remote Desktop Server for a customer. They had previously used roaming profiles set via the Profile Path setting in the Remote Desktop Services Profile tab of the user's Active Directory object. This worked well when setup correctly, but sometimes the IT department would forget to add this path to new user profiles which would cause issues. I was looking for a way to eliminate the need for IT to have to remember to add this option to the profiles of the RDS users.

I remember User Profile Disks being an option in Windows Server 2012 and newer server operating systems. I added the User Profile Disks to the configuration when I setup my new collection and it initially seemed to work well. However when I then logged into all six of my RDS server at the same time and noticed that I received a temporary profile on all but one of the RDS servers. Some investigation led me to find that a User Profile Disk can only be connected to one server at a time. This likely would have been fine 99% of the time, but I wanted to be sure that the odd occasion where a user got connected to two servers at one time due to something like a server being prevented from accepting new connection would now cause problems. I ultimately decided not to enable user profile disk to avoid any potential issues when a user might have a session on two servers.

As an alternative I was able to set a roaming profile path via a computer Group Policy and link it to the OU containing the RDS servers. This accomplished the goal of automating the user profile setup. If a user is logged into to servers at one time, there may be an issue with which profile is written back to the share last, but it will not cause a temporary profile to be created on the RDS server. The settings I enabled are shown below:


Cybersecurity budgets for financial institutions are continuing to increase in an effort to keep pace with advances in technology. CoNetrix conducted a survey to gain insights into cybersecurity and how institutions are using their funds to support their cybersecurity program. 

Cybersecurity Budget for Financial Institutions

Here is some of the information you will find in the report concerning IT and Cybersecurity budgets for financial institutions.

  • 52% of all respondents indicated their IT budget for 2019 will exceed the allotted amount for 2018.
  • 31% reported they will neither increase nor decrease their IT budget for 2019.
  • Institutions with a larger asset size are more likely to increase their IT budget in 2019.
  • 52% of respondents reported they plan to increase Network Infrastructure making it one of the top priorities in 2019.
  • 41% of financial institutions will be increasing their cybersecurity budget in 2019.
  • 44% will maintain the same cybersecurity budget.
  • Institutions with higher confidence in their Board's understanding of cybersecurity posture results in a higher likelihood the budget will increase.
  • 66% of institutions have a shared budget with IT with no designated line item for cybersecurity.
  • 19% have a shared budget with IT with a designated line item for cybersecurity.

Find out more about how institutions are managing their IT and Cybersecurity budget by downloading our report on The State of Cybersecurity in the Financial Institution Industry. https://conetrix.com/cyber-report


On April 2, 2019, the Federal Deposit Insurance Corporation (FDIC) released a new financial institution letter (FIL-19-2019) called "Technology Service Provider Contracts."

Why was this guidance published?

When FIL-19-2019 was published, it had been five years, almost to the date, since the last vendor management guidance was released by the FDIC (see FIL-13-2014, published on April 7, 2014). Presumably, it was a good time for a reminder about vendor management expectations.

In addition, the guidance stated FDIC examination findings recently noted some financial instruction contracts with Technology Service Providers (TSP) lack of sufficient detail around business continuity and incident response. 

What does it mean when the guidance states "contracts do not adequately" address some risks?

In recent exams, the FDIC was looking for a few key areas to be covered in TSP contracts, but the contracts did not always meet those expectations. Missing items included:

  • A Business Continuity Plan (BCP): Contracts should require TSPs to have BCP and acceptable recovery standards.
  • Remedies: Contracts should include assurance of compensation if a business disruption occurs and the TSP fails to restore services in the established timeframe.
  • Notification Requirements: Contracts should define who the TSP should contact (e.g., the financial institution, regulators, law enforcement, etc.) and in what timeframe, if an incident occurs.
  • Key Terms: Contracts should define what constitutes a "business disruption" or an "incident," since rights and responsibilities could be debatable without clear definitions.

How can you ensure TSP contracts are "adequate?"

It would be beneficial for you to review your TSP contracts again with these items in mind, especially if they are long-term or automatically renewing contracts. If your existing contracts are not sufficient in these areas, it is important to note that the financial institution is still responsible for assessing and applying controls to mitigate the risk.

What controls can you apply to ensure you are covered?

In vendor management, your primary control is performing adequate oversight, which is something you should already be doing. The FDIC seems to recognize this since a significant percentage of the FIL recaps guidance that already exists.

For more specific recommendations though, if your contract with a TSP does not clearly define business continuity and incident response requirements:

  • Request and Review Their BCP: Find out if your TSP actually has one and if they'd be willing to share it with you. You don't necessarily need their whole BCP; you just need to know that they have a plan and it is routinely tested.
  • Update Your BCP: If the TSP does not have a BCP or you find it inadequate, it is the financial institution's responsibility to compensate. Update your BCP to describe how you would continue to offer services to your customers or members if your TSP's services are unavailable.
  • Conduct More Frequent Reviews: Whatever the contract says, it is important to periodically confirm the TSP is holding up their end of the deal. You may want to assess this more often if the contract is weak in the areas of business continuity and incident response.
  • Renegotiate the Contract: Depending on the financial institution's risk tolerance, if the contract is deemed "inadequate," it may benefit the financial institution to consider renegotiation or an alternative TSP.

In Summary

Contracts with TSPs should address business continuity and incident response. The FDIC recommends financial institutions contractually require the TSP to have a BCP, as well as contractually define remedies, notification requirements, and key terms.

If existing TSP contracts do not stipulate these items, you should consider additional oversight options, such as requesting and reviewing their BCP documentation, updating your BCP, reviewing the TSP more frequently, or renegotiating the contract.

Does CoNetrix have anything that can help with this?

Absolutely. The Tandem Vendor Management software includes suggested significance questions, designed to help you determine if you need BCP documentation from your vendors. The module also includes a contract review template, designed with business continuity and incident response in mind. Learn more about Tandem Vendor Management.


There are times when I want to remove password protection from a PDF that has been "protected" from this type of removal. For example, if I receive a utility bill via email and the attachment is password protected. I'd rather save the bill so I can open at a later date without having to lookup the password. However, the utility company has protected the PDF and a different password is required to "unprotect" it.

I found that, if I open the PDF in a Chrome browser then print from the browser to a PDF, it will create an unprotected PDF.


When I was performing a Windows Server 2019 Standard install, the license key was not available at the time of hardware receipt so I decided to install Server 2019 and license it later once the key was received. Upon receiving the key and activating Windows the activation would return the error "This product key didn't work. Please check it and try again, or try a different key."

I double checked the version installed and the license key version were both 2019 Standard and not another edition, but found no discrepancy. I ran Windows Update check, restarted, and double checked I was logged in as the local Administrator account. Research of others finding this issue returned the recommendation of re-installing the OS and entering the license key during install to successfully activate Windows. Instead I decided to give it one last effort and decided to use the "slmgr.exe" utility accessible via Command Prompt - "Slmgr.vbs /ipk" successfully activated my Server 2019 install