Blog: VMware

I was updating ESX with a customer a few weeks ago and ran into issues. We successfully upgraded from ESXi 5.1 to 5.5 Update3 using the custom Dell ISO. We then attempted to update to the latest version of ESXi 5.5, but the host purple screened upon reboot. We decided to call VMware support to create a trouble ticket. The VMware engineer provided a simple solution for our issue, which was to press Shift+r when the Hypervisor progress bar starts loading. This takes you to a menu where you can select the previous build. The VMware article can be found here: https://kb.vmware.com/selfservice/microsites/search.do?language=en_US&cmd=displayKC&externalId=1033604. We followed these instructions and were able to successfully boot the ESX host again.


I believe what caused the purple screen was that vSphere Update Manager tried to install HP updates on Dell hardware. It turns out that vSphere Update Manager does not detect what updates are actually needed, just what isn’t installed. The fix for this is to create different baselines for each brand of hardware in mixed hardware environments.



I recenly rebuilt a vCenter environment for a customer. We decided to use the vCenter Server Appliance 6.5. The configuration of the vCenter Server Appliance was fairly simple and operates very similar to vCenter Server installed on Windows. We attempted to setup email alerts, but were unable to get the alerts to send. We initially thought the alerts would not send due to an issue with the SMTP relay. Since this was not a Windows OS, I was not able to login to the OS and test the STMP relay using telnet. I checked my configuration of email alerts several times and the administrator of the SMTP servers checked his as well and everything looked correct on both sides, but emails still would not send.

After researching for quite some time, I found that I could use the "mailq" command to view the email queue on the vCenter Server Appliance. I connected to the vCenter Server Appliance via SSH, ran the "shell" command to get to the full shell, and then ran the "mailq" command. This showed me that several messages were in the mail queue and not being sent. I began to troubleshoot this more and eventually found an VMWare article regarding a bug in the vCenter Server Appliance 6.5 that prevented SMTP from working correctly. This article had been published one day before I found it, which was about a month after I first started troubleshooting the issue. From looking at the files, the original code had the wrong patch in the sendmail.cf file. 

Here is a link to the VMWare article with instructions on how to fix the bug: https://kb.vmware.com/selfservice/microsites/search.do?language=en_US&cmd=displayKC&externalId=2148396

The following must be done to successfully SCP the file to the vCenter Server Appliance: https://kb.vmware.com/selfservice/microsites/search.do?language=en_US&cmd=displayKC&externalId=2107727


I was recently working on a project to migrate a customer from a physical server to new virtual servers on a new ESX host. I installed ESXi 6.0 Update 2 on the new physical server and delivered to the customer site. After the server was onsite, I began building my first virtual machine. Since it was the first virtual machines and vCenter was not installed yet, I downloaded the VI client and connected to the host.

While creating the first VM, I received the following warning:

"If you use this client to create a VM with this version, the VM will not have the new features and controllers in this hardware version. If you want this VM to have the full hardware features of this verison, use the vSphere Web Client to create it."

According to the warning message, I needed to use the vSphere Web Client to create a VM with the latest full hardware feature set. The vSphere Web Client is part of vCenter, so I didn’t see how this was possible because vCenter was not installed yet. VMware has been planning to obsolet the VI client and moving to the web client, so I figured this was just a push in that direction. Obviously, this doesn’t work well for customers who are just building their first virtual servers. I didn’t need the new hardware features, so I just picked Virtual Machine Version: 11 and continued building the VM.

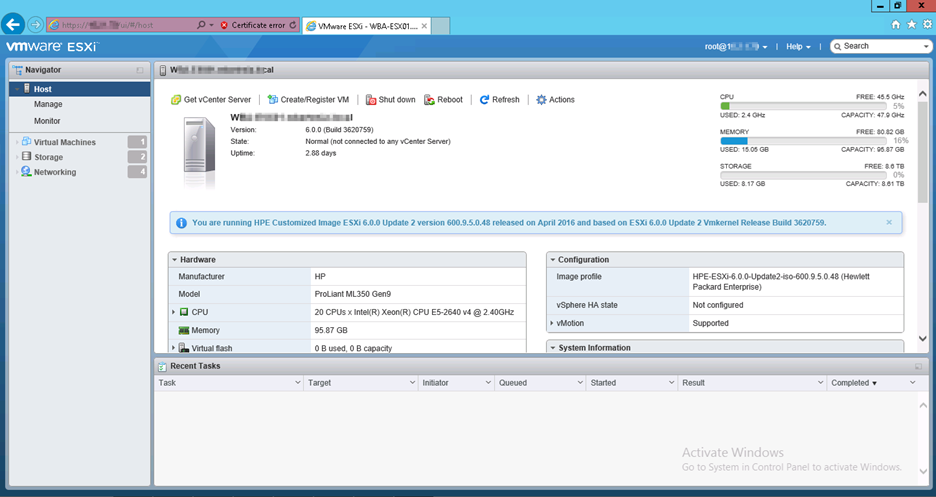
A few days later I was curious as to what the warning message meant and decided to do some more investigation. It turns out that with ESXi 6.0 Update 2, VMware started embedding a new VMWare Embedded Host Client (EHC) in ESXi. This new Embedded Host Client is a HTML5-based tool to directly manage the ESXi host and is a replacement for the VI client. This is nice because nothing needs to be downloaded or installed to manage the ESXi host using the EHC.

Here's a screenshot of the new EHC:

Knowing that the EHC exists, I now understand what the warning message I received when using the VI client was saying. They were not necessarily saying I had to use the vSphere Web Client that uses vCenter, but rather that I could connect directly to the ESXi host using the Embedded Host Client.

The VMware Embedded Host Client can be access by going to http://IPAddressOfESXiHost/ui. More information on the VMWare Embedded Host Client can be found here: http://blogs.vmware.com/vsphere/2016/04/vsphere-6-0-update-2-whats-new.html


This is handy if you need to quickly connect to the console of a VM and don't need any other features of the vSphere web interface. The documentation from VMware says to run this from the web interface, but it can be run standalone, like this:

"C:\Program Files (x86)\VMware\VMware Remote Console\vmrc.exe" "vmrc://DOMAIN\USERNAME@VCENTER.DOMAIN.COM/?moid=vm-VMID"

VCENTER.DOMAIN.COM should be replaced with the FQDN of your vCenter server.

The "DOMAIN\USERNAME@" can be omitted, but if you are saving this command somewhere, you might as well include your username.

Use VMware PowerCLI PowerShell command "get-vm MACHINENAME | fl id" to find the VMID.  Just use the part that starts with vm-.  You can also get these from the ESX console.  

Download VMRC from here: https://my.vmware.com/web/vmware/details?downloadGroup=VMRC90&productId=491.  There is a link to this on the vSphere web page.  This requires an account with VMware.


I recently updated a standalone ESXi 5.5 server through command line patching.  After the ESXi server rebooted and came back online, it showed no datastore and no access to virtual machine disks. 

I found a post about ESXi 6 updates causing similar issue when the HP Storage Array drivers had been removed during the update process. Since I still had my update logs pulled up in console window, I was able to locate a line that said "VIBs Removed: Hewlett-Packard bootbank scsi-hpsa <version>".

I was able to find a link to download drivers and transferred them to the ESXi server's /tmp directory:

http://h20564.www2.hpe.com/hpsc/swd/public/detail?swItemId=MTX_11afb713b03045a2a9508fe915

The command to install the patch was:

"esxcli software vib install -d /vmfs/volumes/datastore1/hpsa-<version>-offline_bundle-<number>.zip"

After a reboot, I had access to the datastore again and averted potential disaster!


I recently needed to move several VMDK files from a VMware datastore that had filled up due to an old snapshot. To move the first VMDK I used SSH to connect to the vSphere host, browsed to the datastore, and entered:

"cp –R /source/directory/ /dest/directory/"

to recursively copy the VMDK and snapshots to the new datastore. Because of the size of this VMDK this copy command took just over 24 hours to finish. Once it completed I unfortunately found that not only had the VMDK had been converted from thin provisioned to thick, but the snapshots had also ballooned to the size of the thick base disk.
 
It turns out that vSphere provides a much better way to copy VMDKs that will not only retain thin provisioning, but will also merge snapshots while copying. I used a command similar to the following to clone a VMDK:
 
vmkfstools -i "/vmfs/volumes/Datastore/examplevm/examplevm-000001.vmdk" "/vmfs/volumes/Datastore 2/newexamplevm/newexamplevm.vmdk" -d thin -a buslogic
 
The ‘-i’ flag tells vmkfstools that we want to clone the drive, the ‘-d’ flag specifies the disk type and the ‘-a’ flag specifies the storage adapter type (in this case SCSI with the BusLogic controller).
 
VMware has a KB on cloning VMDKs with vmkfstools, available here.


After we completed a customer’s upgrade to ESXi 5.5.3, their Veeam jobs started failing, with an error message stating the files for the virtual machines did not exist or were locked. Since the VMs were migrated to a new ESX host as a part of the upgrade, I thought the old hosts may have put a lock on some of the VM files for some reason, so I shut them down. After they were shut down, the jobs still failed but the error message changed saying that the backups failed because a NFC storage connection was not available.

Research of this error led me to an article (https://www.veeam.com/kb1198) which directed me to some backup log files. In these backup log files, I kept entries indicating Veeam was trying to establish a connection with the SSL server, but it failed due to an unsuccessful SSLv3 handshake since ESXi 5.5.3 disables SSLv3 due to vulnerabilities with the protocol.

Some more research led me to another Veeam KB article (https://www.veeam.com/kb2063) stating that this was a known bug with Veeam 7.0. The article says, “Veeam Backup & Replication is designed to use TLS or SSL, however a bug in parsing the list of supported SSL/TLS protocol versions within Veeam Backup & Replication when communicating with VMware causes the job to fail without attempting to use TLS,” and the solution is to upgrade to Veeam 8 update 3. Since this customer’s Veeam renewal was coming up, I went ahead and upgraded them to Veeam 9 and, after doing so, their backups started running without any issues.


A customer called after getting disconnected from their VM. He gave us a possible cause to his issue, stating “Right before I had this problem, I had an interesting icon in the system tray. I clicked on it and it said it was ejecting the floppy. That's when my connection dropped and I couldn't get back in.”
 
I logged onto the vSphere management console and noticed the virtual machine no longer had a NIC attached. I added the NIC back and had him test logging into the virtual machine. Everything worked. Then I started trying to figure out how he removed a NIC from the VM without editing the configuration, which he doesn’t have permission to do. Turns out he did exactly what he said he did.

According to http://kb.vmware.com/kb/1020718, ESX/ESXi v4.x and later include a feature called HotPlug. In some deployments the virtual NICs can appear as removable devices on the System Tray in Windows guest operating systems. Problems can occur if you mistake this device for one that you can safely remove. This is particularly true in VMware View environments, where interaction with the Desktop is constant. The moral of this story is do not remove virtual NICs from the Windows System Tray.


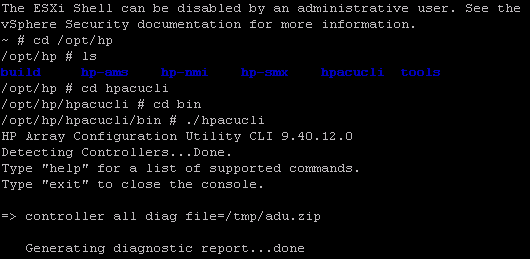
If you experience a hardware failure with a VMware host, run the following commands to create a plain-text diagnostic file which will help you determine where the failure exists: [more]

  1. Connect to the host via SSH
  2. Log in as “root”
  3. Type: “cd /opt/hp” and press ENTER
  4. Type: “ls” to list the contents of this directory. Verify hpacucli is listed
  5. Type “cd hpacucli/bin” and press ENTER
  6. Type “./hpacucli” and press ENTER
  7. Type “controller all diag file=/tmp/adu.zip” and press ENTER
  8. Once the diagnostic report has been generated, use WinSCP (or a similar application) to connect to the host
  9. Browse to the tmp directory
  10. Copy the adu.zip folder locally
  11. Extract the files and open the “ADUReport.txt” file to view the results

The diagnostic result file can be large, so you may have to do some searching before you find where the failures exist. Also this documentation is specific to HP products so commands/file paths may for different hardware manufacturers. 


One of our customers reported their Veeam backups were failing. We determined the cause to be the vCenter services were stopped and would not restart. The vCenter issue was a result of the SQL Express database having grown to its 10GB maximum size. We were able to get the vCenter services running temporarily by purging performance data from the database using the procedure at http://kb.vmware.com/selfservice/microsites/search.do?language=en_US&cmd=displayKC&externalId=1007453. [more]

This procedure removed enough data to get the services running, but didn’t reduce the overall size of the database significantly. I found a VMware SQL stored procedure named “dbo.cleanup_events_tasks_proc” that reduced the size of the database by 60%. After a couple of shrink file operations, the database and the vCenter services were up and running. 

However the Veeam backups failed yet again the next night. While the Veeam errors indicated that the vCenter services were again offline, this time it was because the virtual disk containing the SQL Server Express vCenter database was completely full. The transaction log for the vCenter database had bloated to 24GB and filled up the disk. This was confusing initially because I had checked the recovery model of the database prior to running the stored procedure to make sure it was set to “Simple” to prevent this very issue. 

With SQL Server the growth of the transaction log is directly proportional to amount of “work” that SQL Server has to perform between BEGIN TRANSACTION and COMMIT TRANSACTION commands. Certain SQL Server commands (insert, update, and delete) are always wrapped in implicit transactions. But some bulk operation transactions can be executed with explicit BEGIN/END TRANSACTION commands to control roll back. The stored procedure that I ran wraps a potentially large batch purge process in a SQL transaction that enables the entire process to be rolled back in the event of a failure. In this case, the lengthy stored procedure resulted in a ridiculously huge transaction log. Lesson learned is that “Simple” recovery model doesn’t guarantee the transaction logs will always be a manageable size.