Blog: VMware

Gotcha 1:   An alternative to using TFTP for transferring files to and from network devices is SCP (secure copy).  SCP uses port 22 just like SSH.  I’ve encountered two “gotchas” with using SCP with Cisco equipment, though.  1) WinSCP is not compatible with Cisco equipment.  2) PSCP (PuTTy SCP) requires the use of the –scp switch, because it defaults to the SFTP protocol.

Gotcha 2:  ESXi 5.1 has new hardware requirements.  The requirements can be found here and the VMware Compatibility Guide allows you to search vendors and servers to see if they are compatible.  (In particular, the feature that was missing from Crowell State Bank’s servers was the NX/XD CPU feature.)

Note that ESXi 5 (Patch 4) or higher is required to run Windows Server 2012.


Like many companies, I’m sure, our VMware environment has been built and upgraded from early 3.x to the nearly current 5.0 with all sorts of VMware extras and features thrown in (such as Upgrade Manager, VMware Converter plugin, etc.).  A while back, we upgraded our entire environment to the 5.0 tree (starting with vCenter and finishing with the hosts). Everything upgraded smoothly and there were no problems reported after the upgrade was completed.

A short while ago, I had some extra time and checked on the service status view inside the VI Client to make sure everything was green. There were a few red items that I could quickly fix with service restarts (after the last reboot of the server, some services didn’t start up correctly – simple fix), but there was also one red item that I found out would take a little doing. The error message basically stated: [more]

com.vmware.converter alert unable to retrieve health data from https://vcenter_servername.domain:port/converter/health.xml

In troubleshooting, I found something that I missed during the upgrade to vCenter 5.0. vCenter Converter is not supported in vCenter 5.0 as VMware wants to move everyone to the more robust (and better) standalone version of the Converter application. Because of this, they strongly recommend uninstalling vCenter Converter BEFORE the upgrade to vCenter 5.0. Now if you were to miss this, like me, and upgraded anyway, there is a simple solution. The problem stems from the fact that old links to Converter are left behind in the ADAM database after the upgrade.

http://kb.vmware.com/kb/2006132

Resolution
To work around this issue, uninstall vCenter Converter from the Add/Remove Programs on the vCenter Server, then remove the remaining vCenter Converter attributes from the ADAM database.

To remove the remaining vCenter Converter attributes from the ADAM database:
1. Back up the vCenter Server ADAM database before proceeding.For more information, see Manually backing up and restoring the vCenter Server 4.x and 5.0 ADAM instance data (1029864).
2. Stop the VirtualCenter Server service. For more information, see Stopping, starting, or restarting vCenter services (1003895).

Note: Stopping the VirtualCenter Server service also stops the VirtualCenter Management Webservices service and the vSphere Profile-Driven Storage service.
3. Remove the Converter folder, which is located at:

C:\Program Files\VMware\Infrastructure\VirtualCenter Server\extensions\com.vmware.converter
4. Download the cleanup.bat.gz and cleanup.class.gz files which are attached at the end of this article.
5. Using the gunzip utility, unzip the files into this folder:

C:\Program Files\VMware\Infrastructure\VirtualCenter Server

Note: If the install directory of the vCenter Server is different in your environment, you must modify the _JAVA andPATH_ROOT variables in the cleanup.bat file. Update the variables to reference your vCenter Server install directory accordingly.
6. Open a command prompt and run these commands to remove Converter and Update Manager attributes from the ADAM database:

For Converter:

cd "C:\Program Files\VMware\Infrastructure\VirtualCenter Server"
cleanup.bat com.vmware.converter

You see output similar to:

Deleting components of type com.vmware.vcIntegrity from CN=FD75D28F-CC3A-4638-8185-EEBC998DA14F,OU=ComponentSpecs,OU=Health
7. Restart the VirtualCenter Server service, the VirtualCenter Management Webservices service, and the vSphere Profile-Driven Storage service. For more information, see Stopping, starting, or restarting vCenter services (1003895).
The moral of this story is to read the release notes, as they will provide valuable information regarding the product you are installing or updating. And if you haven’t yet upgraded to vCenter 5.0, be sure to uninstall the Converter plugin before performing that upgrade.


Recently, I was able to upgrade a vCenter environment from 5.0 to 5.1. One of the major steps in this is the installation of the Single Sign-On service. This is an interesting installation as there are potentially a dozen gotcha’s before you even get to the install button. One of these said gotcha’s is this:

I got to a step where the installation wanted to talk to the newly created database named “RSA” (that I had created in an earlier step using some scripts). I had to formulate a jdbc (Yes, java) connection string so that it could successfully authenticate. During this process, I found that the application wanted to install two new users, an RSA_User and RSA_DBA to the database and configure permissions so that everything was secured around those two users correctly.

The problem I kept running into was an error that stated “Unable to authenticate to db”. That’s all. I was able to connect to said “db” using the same credentials I (thought) it was using. This didn’t happen to be the case. [more]

http://kb.vmware.com/kb/2035449

In my case, this error occurred because when the SQL instance was originally set up for the vCenter installation, it was set to use Windows Authentication only. For a vCenter 5.0 or prior installation, this is fine; however, for a vCenter 5.1, we’ve got to enable Mixed Mode authentication. I made the change on the instance, restarted services, and my installation continued (sort of) smoothly (not really, but that’s a Gotcha for another time).


You can install snap-ins to PowerShell in order to extend the functionality.  Examples include the PowerCLI for VMware and the Exchange snap in.  Basically, these snap-ins include libraries of additional commands that you can use to perform automation.  However, if you simply create powershell scripts (.ps1 files) with these commands, you will get errors because the default enironment does not include the snap in(s).

To add a snap in to the powershell environment automatically, you use a powershell script that is invoked every time you start powershell.  This is the profile.ps1 file, located in C:\Windows\System32\WindowsPowerShell\v1.0.  You may have to create the profile.ps1 file, as it is not needed for the default environment.

One syntax to add a snap in to the default environment is this:

$VMCore = Get-PSSnapin VMware.VimAutomation.Core -EA 0
if ( -not $VMCore ) { Add-PSSnapin VMware.VimAutomation.Core }

You can find examples of other syntax online, but the core behavior is this:  Check if the snap in is active, and if it isn't there use the Add-PSSnapin commandlet to add it.

Caveat:  You must download and install the snap in on your system before you can add it to your default PowerShell environment.  For example, the VMware.VimAutomation.Core is installed with the PowerCLI software from VMware.

Note:  I have added the VMware automation snap in to the default environment on the Security Bank management servers.  Additionally, I've put a script on these servers that will check for any VM snapshots.  (D:\cnx\scripts\List_Snapshots.ps1)


We have a customer who has a server that runs Windows NT4. One of the hard drives on the 15 year old server started failing, so we decided to virtualize the server. To add to the complexity, the server was on a workgroup and not on the domain like all the other servers. I installed VMware Standalone Converter on the server that would host the VM, but when I started the virtualization process, I received an error saying the remote agent could not be installed.
 
We figured out that the latest version of VMware Standalone Converter to support NT4 was version 3.0.3-89816, which is not available for download now. Luckily, we had a version of this file already downloaded. This version is a cold clone ISO. I created a CD and attempted to run the conversion from the CD. When you boot from the CD, you can only virtualize remote systems. I tried this process from the host server and the NT4 server, but both failed. Installing the v3.0.3 on the host server and then running the conversion also fails.
 
Here is the process you must go through to convert an NT4 server to a remote VM: [more] 
  • Create a bootable CD from the VMware Standalone Converter version 3.0.3-89816
  • Insert the CD in the NT4 server and browse the contents of the CD
  • On the CD, navigate to the VMWARE-CONVERTER folder and run the “VMware Agent.msi” file
  • After the install completes, run VMWARE-CONVERTER\converter.exe
  • After the agent is installed locally, you have the option to convert the local machine
  • Finish the wizard, inserting the necessary settings (VM host server, authentication, etc.)


Do you know how much additional disk space is needed to delete 4GB of data? Over 10GB of disk space.

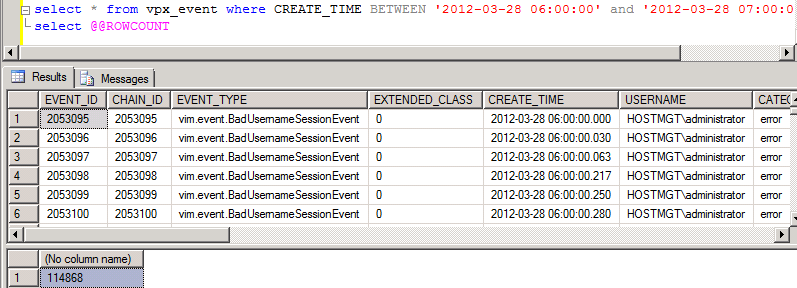
According to http://blogs.vmware.com/kb/2010/09/dealing-with-vcenter-41-database-tables-growth.html, “In larger VirtualCenter installations you might notice the VPX_EVENT_ARG and VPX_EVENT tables can become very large.” The KB article includes instructions for clearing out old events. In this particular case, I had several million entries over a few days. Issuing a broad delete statement was filling up the transaction log before it could complete, resulting in vCenter service crashes and other database problems. Rather than increase the transaction log allowed size significantly (including expanding the virtual disk), I resolved this by deleting one hour’s worth of  events at a time. This allowed the smaller transactions to complete and then re-use the space in the transaction log (since the database was set to use the Simple Recovery Model per VMware suggestions). [more]


You should avoid using the same LUN on more than one VMware vCenter environments. If this rule is not followed, deleting a datastore from one vCenter will cause it to appear as "dead" on the other vCenter when using the following command: esxcli storage core device list [more]

If a rescan HBA's is performed at this point, all management tools may become unresponsive.  To avoid this, the LUN needs to be marked as disabled, rescanned, then removed from the disabled list:

  1.   esxcli storage core device set -steate=off -d <NAA ID> (whatever the worldwide name is for that LUN)
  2. rescan HBA's 
  3. esxcli storage core device detached remove -d <NAA ID>

If everything is already unresponsive, "localcli" may be substituted for "esxcli."


Background setup:

This site has VMware vSphere 5.0 hosts which are connecting to NFS datastores on a NetApp SAN/NAS.  There is a dedicated switch stack of Dell PowerConnect 5524 switches between the NetApp and the VMWare hosts.

Issue description:

Over the last couple weeks I have been seeing where VMWare virtual machines would pause or in some cases disconnect sessions.  The Windows event log would consistently record an Event ID 129 with a Source of LSI_SAS: "Reset to device, \Device\RaidPort0, was issued."  I did some further research and found that this event is usually generated when there is high I/O on the SAN.  However, the SAN at this location wasn’t experiencing high I/O. 

I started to notice the following NFS disconnect error while I was logged into the SAN:
nfsd.tcp.close.idle.notify:warning]: Shutting down idle connection to client (192.168.1.10) where receive side flow control has been enabled. There are 0 bytes in the receive buffer. [more]

Resolution:

Per NetApp’s best practice document, flow-control should be disabled on the storage network when using modern hardware.  I had flow-control enabled on the switch and the SAN and this apparently was causing the disconnect issues. 
http://media.netapp.com/documents/tr-3749.pdf


We recently ran into a problem where a job in Backup Exec was failing when backing up the vmdk using Virtual Consolidated Backup (VCB).  Backup Exec was reporting the following error message: and reportint the following error message:  "The Virtual Machine resource is not responding."  After some trouble shooting and research we discovered an unallocated disk may cause Backup Exec to fail with that error when another allocated disk is beng backed up.  This turned out to be the problem in our case as we had an unallocated disk. [more]

Here is some more informatino about the issue from Symantec: http://www.symantec.com/business/support/index?page=content&id=TECH174797


During the installation and setup of VMware Capacity Planner we ran across a couple of servers that were not receiving performance data. After looking at GPOs and permissions, the problem still existed. It was discovered faulty performance counters could cause the problem. We connected via remote desktop to the problematic servers and opened the performance monitor. There was no data present and all the monitor names were changed to numeric values. This meant the performance monitors were corrupt causing the problem with VMWare Capacity Planner. The bank staff said they would address the problem.