Blog: Networking

The Microsoft Assessment Planning (MAP) Toolkit is a useful utility that can be used to gather hardware and software information for workstations and servers. After installing the toolkit, you can provide domain credentials which it uses to poll each device in Active Directory and gather information about the devices it finds. This data can be viewed through various Excel reports and can help to shorten the time it takes to fill out an audit questionnaire.
 
The toolkit can be downloaded from: https://www.microsoft.com/en-us/download/details.aspx?&id=7826


Like many new laptops, the new Apple MacBooks are too thin to have an onboard Ethernet adapter. After setting up a local account and connecting it to the internal wireless network (using WPA2 Enterprise), I was able to join the Macbook to the Active Directory domain without issues. However I quickly discovered that I couldn’t login to a domain account because by default wireless connections are not connected before login – remember, no Ethernet.
 
The immediate “fix” was to purchase a USB3 gigabit Ethernet adapter, but after some research later I discovered it's possible to enable WiFi before login. Here are the basic steps:

  • Install the Apple Configurator utility from the App Store. This app is designed to create deployment profiles for iOS devices but can also be used to create 802.1x profiles for OS X systems.
  • Run the Configurator and create a new profile. Update the WiFi section with the required connection information.
  • Save this profile locally.
  • Open the profile with a text editor and add XML text as outlined at http://www.ntsystems.it/post/Joining-WiFi-before-login-on-Mac-OS-X-108.aspx. This article is for an older version of OS X and refers to the discontinued iPhone Configuration Utility (which was replaced by the Apple Configurator), but the manual edits still apply to OS X 10.10 and 10.11.
  • Double-Click the edited profile to import into System Preferences. You can see the loaded profile by going to the 802.1x section of the Network->Advanced settings in System Preferences.
  • Logoff or reboot and you should be good to go.


While rebooting a Cisco 2960 switch to back out some configuration changes, I was not able to route traffic through the switch. After some troubleshooting, I noticed the following the error (with "terminal monitor" enabled):
 
%ILET-1-AUTHENTICATION_FAIL: This Switch may not have been manufactured by Cisco or with Cisco's authorization.  This product may contain software that was copied in violation of Cisco's license terms.  If your use of this product is the cause of a support issue, Cisco may deny operation of the product, support under your warranty or under a Cisco technical support program such as Smartnet.  Please contact Cisco's Technical Assistance Center for more information.
 
A quick search revealed this to be an IOS bug (actually 3 related issues). The switch shipped with 15.0(2)EX5 code. The immediate work-around was to power-cycle the switch instead of doing a soft boot (reload). The root cause of the issue is related to the "internal i2c bus" getting into a bad state. Once it does, the bus maintains power through a soft boot, so a reload does not resolve the issue. A power-cycle is required.
 
An upgrade to 15.2(2)E3 (MD) or 15.2(4)E (ED) or later will resolve this issue. http://www.cisco.com/c/en/us/support/docs/switches/catalyst-2960-x-series-switches/118837-technote-catalyst-00.html


I am constantly right-clicking the Outlook icon in the taskbar and choosing what I want from the jump list. However, after upgrading to Outlook 2016, this feature became unavailable. I followed the steps below to get the jump list working again.

  1. Unpin the Outlook 2016 icon from the taskbar
  2. Exit Outlook 2016
  3. Delete the HKEY_CURRENT_USER\Software\Microsoft\Office\16.0\Outlook\LastUILanguage registry key
  4. Start Outlook 2016, and then re-pin the icon


Cisco IOS XE devices boot into a Linux kernel first, then load IOS as a module. If you just power off the device (as we are used to doing with IOS devices), you will see disk-errors (assuming you are connected and monitoring the console) when you power it up that get auto-corrected (hopefully). This happens because log files related to the Linux kernel are still in use when you power off the device.
 
To avoid this, the documentation states to issue a reload before powering down to ensure all the log files are closed correctly, but it isn't clear at what point you can then power off. Of course if you dont, it come-back up as a result of the reload command.
 
I found a link online that recommends issuing the 'reload pause' command instead. When the device gets to the pause, it will show you a 'Enter [continue]…' prompt. At this point, you can safely power off the device and it will not have any disk errors when it boots up again.
 
This assumes you are connected to the console. Not a bad assumption as it is a bit hard to physically power down a router or switch remotely. But if you are not on the console (maybe you have a customer that will to pull the plug for you), you can still issue the reload pause command and wait about 60 seconds. That should be enough time for the device to get to that pause.


We recently needed to create SPF records for one of our customers’ several email domains. Sender Policy Framework is implemented as a DNS TXT record and it’s designed to provide a mechanism to allow an email server to verify the valid IP addresses for a given email domain. The syntax can be a little tricky so I found several good sites to help generate the SPF. One of the best was Microsoft’s, which retrieves the actual IP addresses from DNS to build the TXT record. After you answer a few questions about email flow it creates the record which you can copy/paste into your DNS configuration.
 
https://www.microsoft.com/mscorp/safety/content/technologies/senderid/wizard/


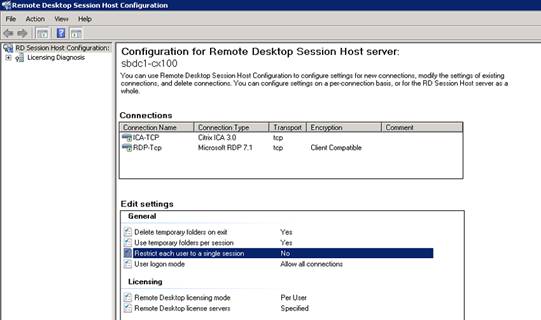
Even though Session Roaming was disabled for customer’s Citrix environment, users were ‘hijacking’ their Citrix sessions randomly when launching applications from two separate computers. These users had recently been migrated to XenApp 6.5 environment using Storefront (from XenApp 6.0\Web Interface configuration).
 
Troubleshooting showed that the hijacking was only occurring for the user when Citrix load evaluators placed the user on the same Citrix server in the farm for both sessions. The issue did not have to do with the Citrix Session Roaming feature, but rather an RDS setting to limit users to only one session per RDS server.
 
The resolution is to modify RDS Host Configuration setting to not ‘Restrict each user to a single session’. This setting is configured on each individual RDS\Citrix server.


After initially installing I was having many problems with Windows 10. Updates from Microsoft would not install. Drivers for mouse and scanner were not working. The most useful error I could get was a corrupted registry. After much frustration I decided to use the Windows 10 Repair option. To do this, boot to the Windows 10 installation media and choose the "Repair" option. Then choose the option to “Keep Windows settings, personal files and applications”.

This will reinstall and fix most issues with Windows 10. In this case I did not have to reinstall any programs except Microsoft Office.
 
Here is a detail description of the process. This article was written for Windows 8, but the process is the same with Windows 10.
https://www.winhelp.us/non-destructive-reinstall-of-windows-8-and-8-1.html


When attempting to access the SEP Management GUI, I got an error in my browser that said “ssl_error_weak_server_ephemeral_dh_key”. This is caused by weak ciphers which have been deprecated by browser updates.
 
To resolve this you have to modify the SEP server's "server.xml" file to exclude the weak ciphers and include newer and stronger ciphers, as well as replace the Java Cryptography Extension (JCE) files to support the stronger ciphers.

  1. Login to the SEP server and stop the Symantec Endpoint Protection WebService.
  2. Go to C:\Program Files (x86)\Symantec\Symantec Endpoint Protection Manager\tomcat\conf and open server.xml.
  3. In the server.xml file, find the section with cipher= value under <Service name=”WebService”> and replace the current ciphers listed in the file with the following: ciphers="TLS_RSA_WITH_AES_256_CBC_SHA, TLS_RSA_WITH_AES_128_CBC_SHA, SSL_RSA_WITH_3DES_EDE_CBC_SHA, TLS_ECDH_RSA_WITH_AES_256_CBC_SHA384, TLS_ECDH_RSA_WITH_AES_256_GCM_SHA384, TLS_ECDH_ECDSA_WITH_AES_256_CBC_SHA384, TLS_ECDH_ECDSA_WITH_AES_256_GCM_SHA384, TLS_ECDHE_RSA_WITH_AES_256_CBC_SHA384, TLS_ECDHE_RSA_WITH_AES_256_GCM_SHA384, TLS_ECDHE_ECDSA_WITH_AES_256_CBC_SHA384, TLS_ECDHE_ECDSA_WITH_AES_256_GCM_SHA384"
  4. Download the new JCE files from Java’s website here.
  5. Unzip and save those files to C:\Program Files (x86)\Symantec\Symantec Endpoint Protection Manager\jre\lib\security.  Overwrite the existing files in prompted.
  6. Start the Symantec Endpoint Protection WebService back up, and you should be all set.


Microsoft has changed the way that RemoteApp are made available to users in Server 2012 R2. They have done away with the MSI Installer method and the ability to create a RDP file. The two deployments options now are RDWeb and RemoteApp/Desktop Connection.

RDWeb is a great option for remote users, Mac users, and users of Microsoft operating systems older than Windows 8. The users simply go to a website, login, and are presented with all of the applications published to them. You can also use RDWeb to allow users to start RDP connections to Windows computers, which might be useful for users working remotely who need to connect to their office computers.

The RemoteApp/Desktop Connection method publishes the RemoteApps available to a user to their desktop, without having to log into RDWeb. The applications the user has published to them simply show up in their Start Menu. This setting can be deployed to users using Windows 8 and newer computers via a Group Policy Object. The Desktop connection URL setting under User Configuration | Policies | Administrative Templates | Windows Components | Remote Desktop Services | RemoteApp and Desktop Connections should be set to https://FQDN/RDWeb/Feed/webfeed.aspx as shown below.

It is important to note that the RemoteApp/Desktop Connection method requires that the SSL certificate issued to the remote desktop server be trusted on the user’s PC for the GPO to apply. RDWeb will also show security warning if the SSL certificate is not trusted on the user’s PC. While eliminating these security messages can be achieved by using an internal certificate, in cases where there is not an internal certificate authority, it is likely more economical to purchase a trusted third party SSL certificate than use the self-signed certificate from the remote desktop server. A third party certificate will eliminate the need for the user’s PC to have any certificates imported into their certificate store.