Blog: Networking

I was recently working with a customer and they had been prompted to reboot their server mid-day because of Windows updates. I told them to click “Restart Later” and forget about it because it should initiate the restart that night. However when I logged on to the server a few days later I got the notification that the server would reboot in 5 minutes.  I disabled the Windows Update service to prevent the reboot, then followed the steps below to force a reboot after updates are installed regardless if someone is logged into the server or the session is locked.
 
To change the AlwaysAutoRebootAtScheduledTime registry key value to enable automatic Windows Update restarts, follow these steps:

  1. Install Windows Update 2822241
  2. Start Registry Editor. To do this, follow these steps:
    1. Swipe in from the right edge of the screen, and then tap Search. Or, if you are using a mouse, point to the lower-right corner of the screen, and then click Search.
    2. In the search box, type "regedit.exe".
    3. Tap or click the displayed regedit.exe icon.
  3. Locate the following registry subkey:
    HKEY_LOCAL_MACHINE\SOFTWARE\Policies\Microsoft\Windows\WindowsUpdate\AU
  4. Swipe across or right-click AlwaysAutoRebootAtScheduledTime, and then tap or click Modify. Note If the entry does not exist, follow these steps to add it:
    1. On the Edit menu, point to New, and then tap or click DWORD Value.
    2. Type "AlwaysAutoRebootAtScheduledTime" in the Name field, and then press Enter.
  5. In the Value data box for this registry key, enter "1".
  6. Click OK.
  7. Exit the Registry Editor.

https://support.microsoft.com/en-us/kb/2835627


I had a customer that opened Outlook and discovered a public folder had mysteriously disappeared. I could not locate the folder anywhere so I assumed it had been deleted.

The good news is there is a PowerShell script that searches and generates a .txt file listing any public folders that were recently deleted. Once you locate the public folder in the text file, you can run another PowerShell command to restore the public folder with its contents.

Here is the link that has both scripts, along with a step by step process of recovering the folder:
 
http://blogs.technet.com/b/exchange/archive/2013/08/23/recovering-public-folder-information-in-exchange-2013.aspx


After we completed a customer’s upgrade to ESXi 5.5.3, their Veeam jobs started failing, with an error message stating the files for the virtual machines did not exist or were locked. Since the VMs were migrated to a new ESX host as a part of the upgrade, I thought the old hosts may have put a lock on some of the VM files for some reason, so I shut them down. After they were shut down, the jobs still failed but the error message changed saying that the backups failed because a NFC storage connection was not available.

Research of this error led me to an article (https://www.veeam.com/kb1198) which directed me to some backup log files. In these backup log files, I kept entries indicating Veeam was trying to establish a connection with the SSL server, but it failed due to an unsuccessful SSLv3 handshake since ESXi 5.5.3 disables SSLv3 due to vulnerabilities with the protocol.

Some more research led me to another Veeam KB article (https://www.veeam.com/kb2063) stating that this was a known bug with Veeam 7.0. The article says, “Veeam Backup & Replication is designed to use TLS or SSL, however a bug in parsing the list of supported SSL/TLS protocol versions within Veeam Backup & Replication when communicating with VMware causes the job to fail without attempting to use TLS,” and the solution is to upgrade to Veeam 8 update 3. Since this customer’s Veeam renewal was coming up, I went ahead and upgraded them to Veeam 9 and, after doing so, their backups started running without any issues.


HP printers are comonly detected in financial institution audits due to a vulnerable SSL version in use.  Many older models contain multiple vulnerabilities that cannot be fixed with firmware upgrades because the older printers are no longer supported.
 
Customers can use the HP WebJet Admin software to manage these printers through SNMP and disable the web server completely.  However make sure the SNMP community strings have been changed from the default "public" and "private".


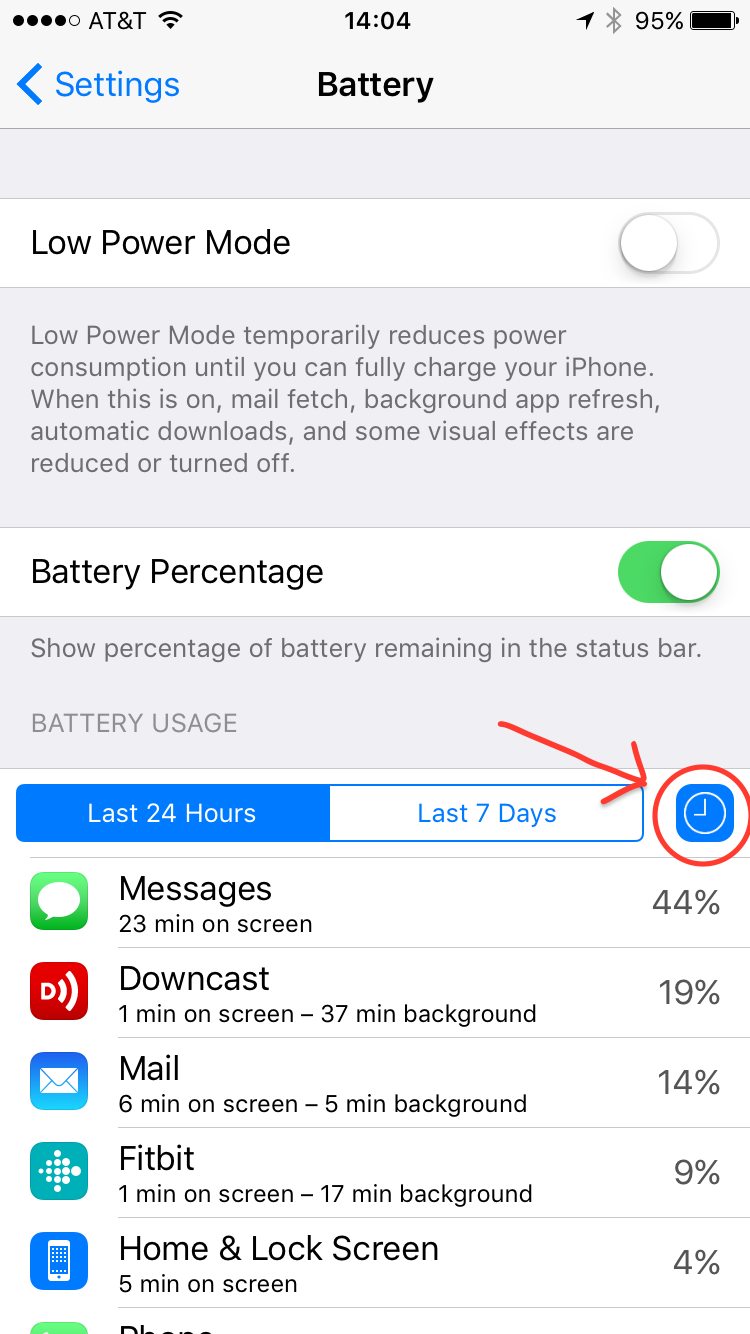
In iOS 8 Apple introduced a new Battery section to Settings that shows how applications are using battery resources. With iOS 9 this feature was improved by showing active vs. background activity. To enable this, tap on the clock symbol in the Battery area. An application that is consuming lots of battery in the background usually has a stuck process or a software bug.


I was recently working on a PowerShell Script that used Excel COM objects to pull data from remote computers put it into a spreadsheet. I finished up the script and tested it under my own account and got the result I was looking for—the data was pulled from the remote computers, an Excel spreadsheet was created and saved to a network share, and an email was sent out with the spreadsheet as an attachment.

Pleased with the script, I set it up as a Scheduled Task and set it to run under the credentials of an existing service account. When I manually ran the scheduled task, however, the script would not run. I tried using my own account for the scheduled task and it still would not run. I was using some formatting in Excel that would have been lost if I went with a CSV file and having to remember to manually run the task at the scheduled interval while I was logged in would not have been the best solution, so I decided to look for a solution rather than re-write the code.
 
After some digging, I discovered PowerShell scripts that use Excel COM objects—and presumably other COM objects—that run while a user is not logged in require the SystemProfile have a Desktop folder in order to run as scheduled tasks. The folder, however, does not exist under the C:\Users directory as you might expect. Instead, it is located at:
 
C:\Windows\System32\config\systemprofile\Desktop
                *AND*
C:\Windows\SysWOW64\config\systemprofile\Desktop
 
The empty “Desktop” directory itself needs to be created and nothing more—no special permissions or registry hacks. In the case of a 32-bit OS, only the first directory needs to be created. In the case of a 64-bit OS, *both* directories need to be created. In my case, I was on a 64-bit OS and the directory in System32 existed but the directory in SysWOW64 did not. Once I created the missing directory I was able to use the original service account to successfully run the scheduled task whether or not it was logged in to the system.


Many of our customers are still running the Citrix Online Plug-in or Citrix Receiver Enterprise 3.4 because it allows them to place application shortcuts on a user's Desktop and in the Start Menu. Later version of the Receiver require the use of the Citrix Launcher and do not allow Desktop or Start Menu shortcuts. The Citrix Receiver Enterprise 3.4 will not install on Server 2012 R2 RDP servers, so another solution is needed.

Citrix has recently reintroduced the ability to add application shortcuts to the user's Desktop and Start Menu. The current version of the Citrix Receiver is 4.4 and includes an option to disable Self-Service Mode. There are a few other options that must be set to allow icons to appear on the Desktop, which can be set via a command line install or by editing the registry.

An example command line to install the Citrix Receiver 4.4, enable single sign-on, configure the URL of a XenApp 6.5 farm, disable Self-Service Mode, add icons to the user's Desktop, and allow adding a URL that is a HTTP address is below:

"CitrixReceiver.exe /includeSSON  /STORE0="PNAgent;http://storefront.domain.local/Citrix/PNAgent/config.xml;on;CustomerXenApp" SELFSERVICEMODE=false PutShortcutsOnDesktop=true AllowAddStore=A /silent"

CitrixReceiver.exe – Install file
/IncludeSSON – Enabled Single Sign-On
/STORE0= Path to XenApp 6.5 farm config URL
SELFSERVICEMODE – Set to false to disable the Citrix Launcher and enable Desktop and Start Menu application shortcuts
PutShortcutsOnDesktop – Set to true to add application shortcuts to the user's Desktop
AllowAddStore – Set to A to allow the addition of a URL that is a HTTP address
/silent – Performs a silent install

After that command is run, the following command must also be run to complete the configuration to allow the use of a URL that is a HTTP address:

"reg add HKLM\SOFTWARE\Wow6432Node\Citrix\AuthManager /v ConnectionSecurityMode /t REG_SZ /d Any"

After these two commands are run, the Citrix Receiver will work as it did with the Citrix Online Plug-in and the Citrix Receiver Enterprise 3.4


I was helping out with a customer’s Active Directory migration and a different IT support group used a profile migration tool to help “ease” the transition between domains. But soon after the users started complaining that IE was not allowing them to save passwords. They would get prompted to store the credentials for a website and click yes, but as soon as they closed and reopened IE their stored credentials would disappear. Our suspicion was that the profile migration tool had corrupted the credential store in the registry.

I started a remote session with one of the users, checked the IE password store in the registry (HKEY_CURRENT_USER\Software\Microsoft\Internet Explorer\IntelliForms\Storage2), and saw several of the user’s old entries. In order to allow the user to store passwords again, I had to delete this registry key, reopen IE, and save credentials for a website. Once I clicked “yes” to the prompt to save credentials, the registry key was automatically recreated and the credentials got stored.


I recently attempted to upgrade a Dell Latitude laptop from Windows 7 to Windows 10. I started with a clean Win7 installation with most of the updated device drivers from Dell. The upgrade went smoothly … until it rebooted and I got the following error:
 
xC1900101 - 0x20017 Installation failed during safe OS phase with an error during boot operation
 
The good news was the installer backed out the upgrade and I was able to use the laptop with Win7. Researching this error code provided lots of suggestions related to hardware like removing RAM, disabling wireless and Bluetooth and so on. These worked for some people but not all so I kept digging.
 
Then I remembered that one of the things I didn’t upgrade was the BIOS. It was running version A06 and the current version from Dell was A16. Once I figured out I had to do a two-step upgrade (going directly to A16 did not work), I reran the upgrade tool and it worked, no boot error.
 
As a side note I found out that if you upgrade by downloading the installer from the Internet (rather than an ISO) the install files are stored in “c:\windows\$Windows.~BT”. You can run setup from this folder to avoid downloading the files again.


For several months, I dealt with the occasional task of having to restart my laptop (Windows 8.1) because the memory usage would get close to 100%, even with no apps running. There were no processes in Task Manager indicating high memory usage, so I suspected I had a memory leak in a faulty driver.
 
I first ran rammap.exe from Microsoft Sysinternals (https://technet.microsoft.com/en-us/sysinternals/bb545021.aspx). This tool showed that the non-paged pool memory usage was very high. But this didn’t tell me what process was causing the leak.

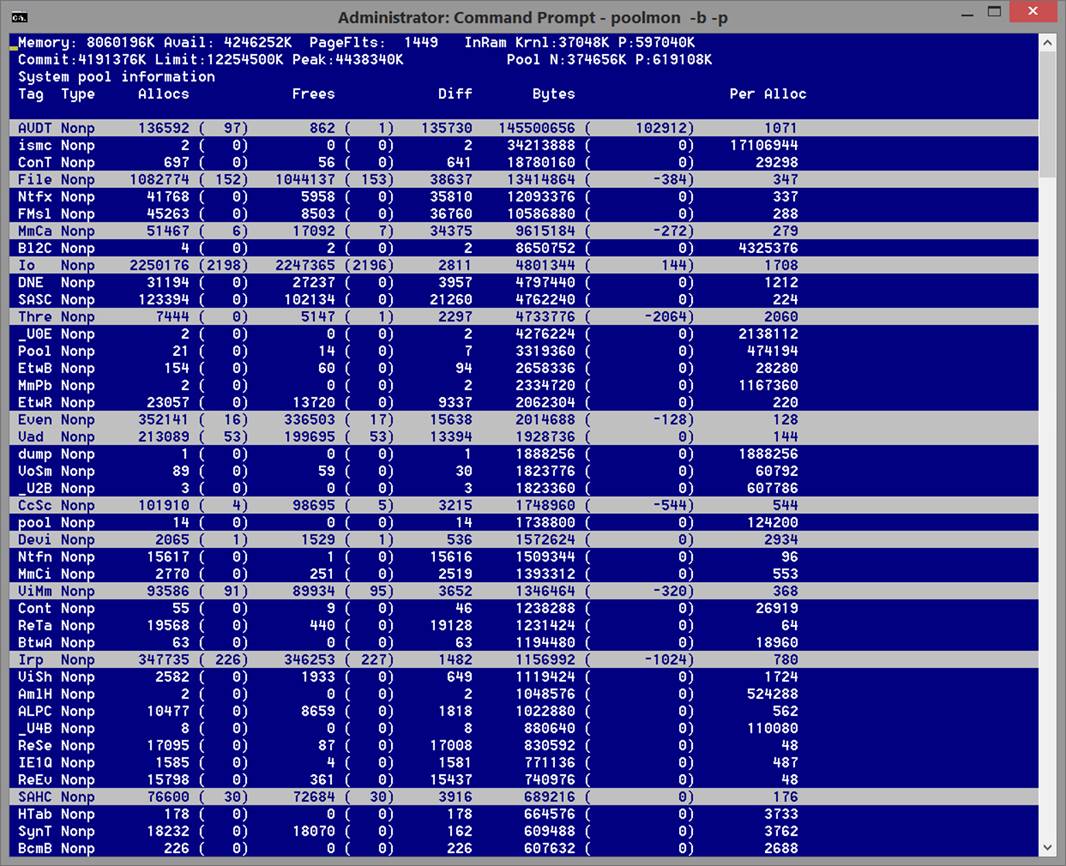
Next I downloaded and installed the Windows Driver Kit 10 from Microsoft (https://msdn.microsoft.com/en-us/windows/hardware/dn913721.aspx). This kit supports Windows 7 through Windows 10. I had to reboot to complete the install then wait until my system was running low on memory before continuing my diagnosis. Once I noticed I was low on memory again, I ran "poolmon –b –p" from C:\Program Files (x86)\Windows Kits\10\Tools\x64. The –p switch enables using Non-paged and Paged pool memory  and the –b switch sorts descending by bytes. At the top of my list was the tag "AVDT".

So how do you figure out what the tag is referring to? I opened an admin command prompt and entered "findstr /s AVDT *.sys". This searched all *.sys files (most driver files are *.sys) in all subdirectories (/s) on the C: drive for the string "AVDT". This returned a screen full of mostly non-readable text which was the contents of *.sys files containing the string "AVDT". It was fairly easy to see a path "\Program Files\WIDCOMM\Bluetooth Software\bin\btwavdt.sys". Looking at the properties of the file indicated what was obvious from the path, it was related to Bluetooth.
 
Whenever I would connect my iPhone via Bluetooth to my laptop and play music (in order to use my external speakers), the driver would eat up non-paged pool memory to the "tune" of 1 MB every 5 seconds! By opening Task Manager and viewing Memory on the Performance tab, I could literally watch the consumption of non-paged pool memory increase with every measure. Just having the phone connected via Bluetooth didn’t cause this, only when music was playing. At a rate of 1 MB every 5 seconds, it consumed about 2.8 GB of memory to listen to music for half of the day!
 
I searched to find a solution to this bug but did not not find one. So until I can get an updated driver, I won’t listen to music from my phone on my PC via Bluetooth. Or if I do, I know I only have a few hours before a reboot is needed.