Blog: Networking

A customer was unable to connect to the internet after returning from a trip. There was a plethora of items checked in trying to resolve the issue. Initially it looked like just a single client issue because all the other users could access the internet. It was discovered that the Barracuda Web Filter was not authenticating new users to the DC. The traffic showed in the weblog but only under the IP without a username and was always blocked. If an IP exclusion was added to the Barracuda, internet would work.

A new IP was requested from DHCP and internet worked. The traffic showed the right IP but a different user name. I requested a different IP and internet stopped working and weblog showed traffic was blocked with no username. It was realized that the Barracuda was working from cached settings. 

I came upon the Account View under the Users/Groups tab. It contains a list of usernames and IPs associated with those users.  The user in question was not listed. I click logout next to Conetrix’s administrator account  and could no longer access internet from any system. I checked the authentication and LDAP showed to be working; however, the DC Agent showed a status of unavailable "red". I checked the DC agent on DC1 and it was stopped. I restarted the service and still could not access internet.  I initiated a sync from the Barracuda and still nothing.  I then opened the DC agent on DC1 and initiated a sync from the utility and then was able to access internet from the user’s PC. The only reason users could still access the internet was because of the cached accounts in the Barracuda.  Had I logged all the cached accounts out no one could have accessed the internet while the DC Agent was down.

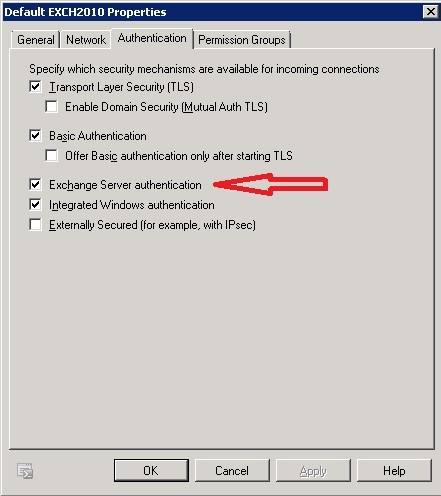
 

A while back when I was setting up a new Exchange 2010 environment, I had just finished getting the new Unified Messaging server online and had begun testing. One of the issues I ran into was when I tried to administratively reset someone’s PIN. As usual, I’d go into the EMC, find the mailbox, right-click, and choose Reset PIN. Then I’d let it auto-generate one and send the email. Except it wouldn’t send the email. In the application log, I would see something like:

"E:\Program Files\Microsoft\Exchange Server\V14\UnifiedMessaging\voicemail\048696bb-3475-41d8-b497-b839c9e1daa8.txt". Error details: "Microsoft.Exchange.UM.UMCore.SmtpSubmissionException: Submission to the Hub Transport server failed. The operation will be retried. ---> Microsoft.Exchange.Net.ExSmtpClient.UnexpectedSmtpServerResponseException: Unexpected SMTP server response. Expected: 220, actual: 500, whole response: 500 5.3.3 Unrecognized command

In the end user’s mailbox, they would not receive an email in the inbox with their new PIN; however, it occasionally would appear in the Drafts folder as if Exchange had composed the email, but had forgotten to hit Send. [more]

They say hindsight is 20/20. I believe it.

Turns out, none of the receive connectors in Exchange allowed for Exchange Server Authentication. Whoops!


Interner Explorer 9.0 will display a warning if the view a website over SSL that is using a certificate signed by an untrusted certificate authority (CA).  This is often the case for self-signed certificates and it can become annoying.  Here's how to eliminate the warning:

  1. Browse to the site whose certificate or certificate authority you want to trust.
  2. When told "There is a problem with this website's security certificate.", choose "Continue to this website (not recommended)."
  3. Select Tools->Internet Options.
  4. Select Security->Trusted sites->Sites.
  5. Confirm the URL matches, and click "Add" then "Close".
  6. Close the "Internet Options" dialog box with either "OK" or "Cancel".
  7. Refresh the current page.
  8. When told "There is a problem with this website's security certificate.", choose "Continue to this website (not recommended)."
  9. Click on "Certificate Error" at the right of the address bar and select "View certificates".
  10. (if it is a self-signed certificate, skip to step 13) [more]
  11. Click the Certification Path tab
  12. Click the root CA
  13. Click View Certificate
  14. Click on "Install Certificate...", then in the wizard, click "Next".
  15. On the next page select "Place all certificates in the following store".
  16. Click "Browse", select "Trusted Root Certification Authorities", and click "OK".
  17. Back in the wizard, click "Next", then "Finish".
  18. If you get a "Security Warning" message box, click "Yes".
  19. Dismiss the message box with "OK".
  20. Select Tools->Internet Options.
  21. Select Security->Trusted sites->Sites.
  22. Select the URL you just added, click "Remove", then "Close".
  23. Now shut down all running instances of IE, and start up IE again.
  24. The site's certificate should now be trusted.

The most common application I see is with SSL VPN users, but it is also useful for accessing management interfaces (such as an ASA or a McAfee ePolicy Orchestrator).


There was a customer that had been migrating printers from Windows 2003 SBS Domain Controller/Print Server to Windows 2008 and somehow in the process accidentally deleted all of the shared printers.  When this happened, all printing at the company came to a halt.  There were almost 20 different printers that had been deleted including all the share names, printer ports, specific settings, etc.  It was going to be next to impossible to try and recreate the printers exactly as they were within a decent amount of time.

The customer had VEEAM backups of the system drive, but we decided that restoring the entire drive would most likely be a BAD idea on a Domain Controller.  Our preferred plan at this point was to try and merge the printer registry keys from a backup into the current registry.  From VEEAM, we restored the C:\Windows\System32\Config folder to an alternate location.  This folder contains the registry files named SYSTEM, SOFTWARE, etc.  TIP: If you do not have backup of the files, you may be able to find copies of registry files in C:\Windows\Repair folder.  Just make sure and look at the timestamps of the modification dates to see if they might be usable. [more]

What we concluded before beginning was that local printers were stored in the registry at HKLM\SYSTEM\CurrentControlSet\Control\Print\Printers.  The actual printer shares and security settings were stored in HKLM\SYSTEM\CurrentControlSet\services\LanmanServer\Shares.  At this point make sure you backup the current registry by doing an export.

Using the LOAD HIVE method in the registry, we mounted our SYSTEM file as SYSTEM_Backup under HKLM.  However, the CurrentControlSet subkey was not there.  Instead it only had CurrentControlSet001 and CurrentControlset003.  Also, the Printers subkey was missing in both CurrentControlSet001 and 003.  The reason CurrentControlSet is not there is because it is simply a pointer to CurrentControlSet001.  You can verify this by looking at the HKLM\SYSTEM\Select subkey. 

The main problem was that we had no idea where the Printers subkey was.  I had a feeling that it was also dynamically linked from somewhere else in the registry, so I created a new printer with a unique name as a test and did a registry search.  I found what appeared to be all of the printer settings in HKLM\SOFTWARE\Microsoft\Windows NT\CurrentVersion\Print.  Now, I went back and loaded the SOFTWARE file as SOFTWARE_Backup under HKLM.  When I looked in the Print subkey, I saw all the missing printers.  It appears that this location is linked with the missing Printers subkey under Control\Print.

Now to get the data we need for all the printers and the shares, I exported HKEY_LOCAL_MACHINE\SOFTWARE_Backup\Microsoft\Windows NT\CurrentVersion\Print and HKEY_LOCAL_MACHINE\SYSTEM_Backup\ControlSet001\Services\lanmanserver from the loaded registry hives.  After that is done, unload the backup hives as they are no longer needed. 

Right click your two exported .reg files and open with notepad.  Do a replace on SOFTWARE_Backup with SOFTWARE and the same for SYSTEM_Backup with SYSTEM in the appropriate files.  After that, the registry files are ready for merging.  Right click the .reg file and select "Merge."

After we merged the registry files, we thought we may have to reboot to get the printers to appear, but simply restarting the Print Spool service made the printers reappear like magic.


From time to time our IT auditors sync offline files back to the server and a file gets corrupt.  The corrupt file is typically 0 KB and is impossible to remove/change permissions/take ownership/etc.  I did some research the other day on how to remove these files.  One of the first "solutions" I came across was to reboot the server into Safe Mode and remove the file that way.  That was incredible unpractical, so I continued searching.  The next solution I came across was so simple it seemed ridiculous… but I tried it anyway… and it worked.  :-)  The solution was to rename the file's parent folder, then rename it back to the original name.  This procedure allowed the file to safely pass over to Elysium.


We began receiving warnings 180 days after installation of Office 2010 that the software was not activated and would stop working in less than 30 days.  A volume license download from Microsoft licensing portal had been installed on about a dozen PCs, but I guess it had not asked for a CD key during the installation.  Queries using slmgr.vbs commands indicated that Office was using the default keys assigned at installation.

This customer had KMS license keys for Office 2010, so we needed to install the Microsoft Office 2010 KMS Host on one of our servers.  First of all, be aware that Microsoft Office 2010 KMS Host cannot be installed on a Windows 2008 server.  It can only be installed on Windows 7, Server 2003, or Server 2008 R2.  When you install the Office KMS host on Windows 2003, you’ll need to have KMS server software patched to 1.1 and then to 1.2 also in order for it to work with Microsoft Office 2010 KMS Host (see this article for details http://blogs.technet.com/b/odsupport/archive/2010/06/01/office-2010-kms-installation-and-troubleshooting.aspx).

During the installation of the Office KMS host, it asks for the KMS key to use and then activates it over the Internet.  The KMS key that I pulled from the licensing portal for the customer said that it successfully activated, so my KMS host was ready to begin processing client requests.

I tried first to go through the help menu of Microsoft Word and change the CD key, but when I entered the KMS key, it kept telling me that the CD key was not valid.  I knew that it was valid because the KMS host activated.  I then tried to use slmgr.vbs commands to change the keys that way, but it also told me that the key was invalid.  At this point, I was stumped until I ran across Microsoft’s Volume Management Activation Tool (VAMT) 2.0 (you can get it from http://www.microsoft.com/en-us/download/details.aspx?id=11936). [more]

After installing VAMT 2.0, I started poking around and saw that you could type in a manual KMS license key to use, assign the key to clients remotely, and request that the key activates with the KMS server.  I connected to all the PCs using VAMT 2.0 and then assigned the KMS key successfully to all the clients (no invalid key message).  After that, I told them to activate with the KMS server.  Now, when I queried the KMS server with slmgr.vbs commands, I was able to see that I had 15 clients listed for an activated Microsoft Office 2010 key.  The PCs immediately stopped saying that Office had not been activated.

At this time, I do not have an explanation why changing the license key on the client kept telling me that it was invalid, but it worked during KMS host installation and using VAMT 2.0.


Cisco IOS devices can use virtual tunnel interfaces (VTI) in order to create a GRE tunnel interface that is protected by IPSec.  Configuration of the encryption protection is performed from within the GRE tunnel interface.

You still need a pre-shared key, and other IPSec configuration options to match (such as ISAKMP policies and transform sets). 

I have not tested a VTI tunnel using NAT or PAT.  (I believe that PAT is incompatible with VTI connections, because all traffic uses GRE packets, which cannot be port address translated.)


We recently ran into an issue where one of our client's users locked himself out of PGP.  A gotcha was encountered entering the WDRT after pressing F4.  The shift key should NOT be used to enter letter characters.  The characters will show as capital without the shift key being pressed.  If the shift key is used, a different bit stream will be sent, but will look the same, and the token will not work. 


We have a customer who has a server that runs Windows NT4. One of the hard drives on the 15 year old server started failing, so we decided to virtualize the server. To add to the complexity, the server was on a workgroup and not on the domain like all the other servers. I installed VMware Standalone Converter on the server that would host the VM, but when I started the virtualization process, I received an error saying the remote agent could not be installed.
 
We figured out that the latest version of VMware Standalone Converter to support NT4 was version 3.0.3-89816, which is not available for download now. Luckily, we had a version of this file already downloaded. This version is a cold clone ISO. I created a CD and attempted to run the conversion from the CD. When you boot from the CD, you can only virtualize remote systems. I tried this process from the host server and the NT4 server, but both failed. Installing the v3.0.3 on the host server and then running the conversion also fails.
 
Here is the process you must go through to convert an NT4 server to a remote VM: [more] 
  • Create a bootable CD from the VMware Standalone Converter version 3.0.3-89816
  • Insert the CD in the NT4 server and browse the contents of the CD
  • On the CD, navigate to the VMWARE-CONVERTER folder and run the “VMware Agent.msi” file
  • After the install completes, run VMWARE-CONVERTER\converter.exe
  • After the agent is installed locally, you have the option to convert the local machine
  • Finish the wizard, inserting the necessary settings (VM host server, authentication, etc.)


We had problems getting to the Internet on one customer’s terminal server after removing Java 5 and installing Java 6.33.  All other terminal servers were working normally except for this one.  It appeared that the WPAD.dat file was not being utilized and all Internet traffic was trying to go out directly.
 
My suspicion was that this had something to do with Java, so I tried uninstalling and reinstalling Java.  This still did not fix the internet issue. [more]
 
I used procmon utility on a working system to review all of the file open/close functions that happen when IE tries to launch a website.   What I found in the process log was that on a working server, I would see the WPAD.dat file being opened and closed, then jsproxy.dll, and then later on jscript.dll.  On the server with the problem, I never saw jscript.dll being opened.
 
I used the command “regsvr32 c:\windows\system32\jscript.dll” to re-register the DLL, and Internet started working!