Blog: Networking

Like many companies, I’m sure, our VMware environment has been built and upgraded from early 3.x to the nearly current 5.0 with all sorts of VMware extras and features thrown in (such as Upgrade Manager, VMware Converter plugin, etc.).  A while back, we upgraded our entire environment to the 5.0 tree (starting with vCenter and finishing with the hosts). Everything upgraded smoothly and there were no problems reported after the upgrade was completed.

A short while ago, I had some extra time and checked on the service status view inside the VI Client to make sure everything was green. There were a few red items that I could quickly fix with service restarts (after the last reboot of the server, some services didn’t start up correctly – simple fix), but there was also one red item that I found out would take a little doing. The error message basically stated: [more]

com.vmware.converter alert unable to retrieve health data from https://vcenter_servername.domain:port/converter/health.xml

In troubleshooting, I found something that I missed during the upgrade to vCenter 5.0. vCenter Converter is not supported in vCenter 5.0 as VMware wants to move everyone to the more robust (and better) standalone version of the Converter application. Because of this, they strongly recommend uninstalling vCenter Converter BEFORE the upgrade to vCenter 5.0. Now if you were to miss this, like me, and upgraded anyway, there is a simple solution. The problem stems from the fact that old links to Converter are left behind in the ADAM database after the upgrade.

http://kb.vmware.com/kb/2006132

Resolution
To work around this issue, uninstall vCenter Converter from the Add/Remove Programs on the vCenter Server, then remove the remaining vCenter Converter attributes from the ADAM database.

To remove the remaining vCenter Converter attributes from the ADAM database:
1. Back up the vCenter Server ADAM database before proceeding.For more information, see Manually backing up and restoring the vCenter Server 4.x and 5.0 ADAM instance data (1029864).
2. Stop the VirtualCenter Server service. For more information, see Stopping, starting, or restarting vCenter services (1003895).

Note: Stopping the VirtualCenter Server service also stops the VirtualCenter Management Webservices service and the vSphere Profile-Driven Storage service.
3. Remove the Converter folder, which is located at:

C:\Program Files\VMware\Infrastructure\VirtualCenter Server\extensions\com.vmware.converter
4. Download the cleanup.bat.gz and cleanup.class.gz files which are attached at the end of this article.
5. Using the gunzip utility, unzip the files into this folder:

C:\Program Files\VMware\Infrastructure\VirtualCenter Server

Note: If the install directory of the vCenter Server is different in your environment, you must modify the _JAVA andPATH_ROOT variables in the cleanup.bat file. Update the variables to reference your vCenter Server install directory accordingly.
6. Open a command prompt and run these commands to remove Converter and Update Manager attributes from the ADAM database:

For Converter:

cd "C:\Program Files\VMware\Infrastructure\VirtualCenter Server"
cleanup.bat com.vmware.converter

You see output similar to:

Deleting components of type com.vmware.vcIntegrity from CN=FD75D28F-CC3A-4638-8185-EEBC998DA14F,OU=ComponentSpecs,OU=Health
7. Restart the VirtualCenter Server service, the VirtualCenter Management Webservices service, and the vSphere Profile-Driven Storage service. For more information, see Stopping, starting, or restarting vCenter services (1003895).
The moral of this story is to read the release notes, as they will provide valuable information regarding the product you are installing or updating. And if you haven’t yet upgraded to vCenter 5.0, be sure to uninstall the Converter plugin before performing that upgrade.

 

I have been working on migrating a customer from Exchange 2003 to Exchange 2010. I had already moved all the mailboxes, public folders, and all the inbound/outbound email routing to the Exchange 2010 servers. I enabled SMTP logging on the Exchange 2003 server so that I could detect any other devices out there on the network that may have been routing email through the old Exchange 2003 server. I reviewed it off and on for a week or so and noticed a small volume of SMTP traffic was being recorded inbound from the Exchange 2010 servers. I didn’t pay much attention to the actual to/from addresses or the payload at the time assuming it was probably public folder replication. [more]

A few days later, after removing all the public folder replicas from the Exchange 2003 server, I was still seeing this traffic so I started to look at it more closely. What I was seeing was inbound SMTP traffic from the Exchange 2010 servers with a from address being one of a handful of distribution lists. Then, the Exchange 2003 server would turn around and send email to the Exchange 2010 servers to each individual email addresses in the distribution list. After a fair amount of digging I discovered the issue. At some time in the past, the customer had manually designated distribution list expansion servers in the AD properties of the distribution list.

Using ADSI and one of the problematic distribution groups, I was able to find a property defined on the distribution group called msExchangeExpansionServerName. For all distribution groups getting routed back and forth between the Exchange 2003 and 2010 servers, this field was populated with the value of the old Exchange 2003 server. Why you would define this property on the distribution group in an environment with one Exchange server, I have no idea. However, a quick powershell script fixed the issue:

Get-DistributionGroup | where {$_.ExpansionServer -ne "$null"} | set-distributiongroup -ExpansionServer $null


The control-plane option is used to apply an access-list to traffic destined to the device itself.  Normally, access-Lists applied to interfaces control traffic flowing through the ASA.  When the “control-plane” tag is added, the access-list is used to control traffic that terminates on the ASA.  This can be beneficial if you want to limit the traffic that is permitted to terminate on the ASA (i.e. VPN related traffic). 

access-group device_access_in in inside control-plane [more]

One important thing to note is that access control rules for to-the-box management traffic (defined by such commands as http, ssh, or telnet) have higher precedence than an access list applied with the “control-plane” option. Therefore, such permitted management traffic will be allowed to come in even if explicitly denied by access list with the “control-plane” option.


We were experiencing a problem where, at random times, both HP and Xerox printers have had instances where the pages printed are missing characters. Bolded or special characters and words with double-consonants are the easiest way to reproduce it.

After much troubleshooting, it appeared this was caused due to updated font files as part of the installation of Office 2010, in particular the Calibri font (which is also the default font in Word). Office 2010 updates the Calibri font set to version 5.62. This version is also included as part of the font subsystem on Windows 7 and Windows 2008 R2. However, Windows 2003 and Windows 2008 have version v5. When printing through a print server that is running on Windows 2003 or 2008, the font version mismatch would cause the missing characters. 

In the past, failing the resource group over to the other node fixes the issue. Reinstalling the Universal Print drivers on the physical nodes of the print cluster also seemed to alleviate the issue, but did not fix the problem long term. Finally during one MW, none of these fixes seem to fix the issue whatsoever and the problem was no longer random.

However, we were able to update the fonts by completing the following steps:

1. Copy the Calibri font files from a system with the updated version (4 files – regular, bold, italic, and bold italic) to an accessible location
2. Open the control panel font applet from the system with the outdated font files
3. Delete the four files for the Calibri font
4. Reboot the system.
5. Reopen the font applet from the control panel and verify the files have been removed.
6. From the File menu, select install new font.
7. Browse to the location where the files were copied to in step 1.
8. Select all fonts and choose Install
9. Reboot the system
10. Reopen the font applet from the control panel and verify the files have been added. You can open each font file and verify the version. 


Recently, I was able to upgrade a vCenter environment from 5.0 to 5.1. One of the major steps in this is the installation of the Single Sign-On service. This is an interesting installation as there are potentially a dozen gotcha’s before you even get to the install button. One of these said gotcha’s is this:

I got to a step where the installation wanted to talk to the newly created database named “RSA” (that I had created in an earlier step using some scripts). I had to formulate a jdbc (Yes, java) connection string so that it could successfully authenticate. During this process, I found that the application wanted to install two new users, an RSA_User and RSA_DBA to the database and configure permissions so that everything was secured around those two users correctly.

The problem I kept running into was an error that stated “Unable to authenticate to db”. That’s all. I was able to connect to said “db” using the same credentials I (thought) it was using. This didn’t happen to be the case. [more]

http://kb.vmware.com/kb/2035449

In my case, this error occurred because when the SQL instance was originally set up for the vCenter installation, it was set to use Windows Authentication only. For a vCenter 5.0 or prior installation, this is fine; however, for a vCenter 5.1, we’ve got to enable Mixed Mode authentication. I made the change on the instance, restarted services, and my installation continued (sort of) smoothly (not really, but that’s a Gotcha for another time).


I had been helping a vendor install Cisco VPN Client and the installation kept failing with “Error 27850.  Unable to manage networking component.  Operating system corruption may be preventing installation.”

As it turns out, there was other VPN software installed and bound to the local network adapter.  Windows 7 has a default maximum number of 8 network filter drivers it can have assigned to the network adapter. 

The image at the following link shows a good example of adding more than 8 network filters to an adapter: https://supportforums.cisco.com/thread/2015629#3067225

The maximum number of filter drivers for Windows 7 can be set to 14.  To increase the value from the default, the change must be done in HKEY_Local_Machine\System\CurrentControlSet\Control\Network\MaxNumFilters.  Increasing the value to 14 allowed the Cisco VPN Client installation to complete.


While testing a honeypot solution on our network I noticed some interesting traffic.  I was seeing consistent UDP broadcasts (port 43440) from various ThinkPads on our network.  The packet showed "Lenovo ThinkPad" in clear text but nothing else helpful.  After more research I discovered these broadcasts were generated by the power management driver on the Thinkpad.  The only way to stop the broadcasts was to stop the power management service.

But it seemed odd the power management service would send UDP broadcasts.  More research indicated this was part of the Cisco EnergyWise initiative.  This is designed to allow hardware manufacturers a method to manage power settings on network-attached devices via a Cisco switch.  Several hardware companies are on-board but Lenovo appears to be the only PC or laptop manufacturer that's participating. [more]

Links:
http://forums.lenovo.com/t5/T61-and-prior-T-series-ThinkPad/ThinkPad-Power-Manager-3-52-pwmewsvc-exe-broadcasting-data/ta-p/439107
http://www.cisco.com/en/US/solutions/ns726/intro_content_energywise.html


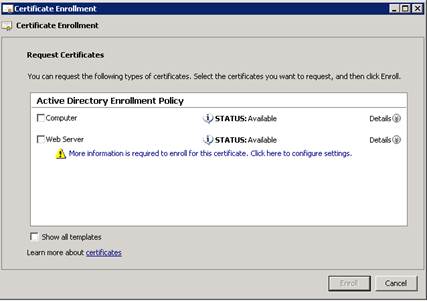
I setup a Remote Desktop Gateway for a customer a few weeks ago. During the setup, I was prompted to create a certificate for the server, but it was just a self-signed certificate. I need a certificate signed from my internal CA for testing with my laptop outside of the network. I originally created a computer certificate, but when I tried to connect it would not allow me to connect because the remote desktop gateway address did not match and name on the certificate. This was obvious because the internal domain is a domain.local address and I was trying to access ts.domain.com. Also, a computer certificate does not allow for subject alternate names. A web server certificate is the type of certificate to use when adding subject alternate names, but I was unable to create one for the computer account.
The solution is quite simple, change the permissions on the certificate template. [more]

  1. On your internal certificate authority, go to Start > Administrative Tools > Certificate Authority
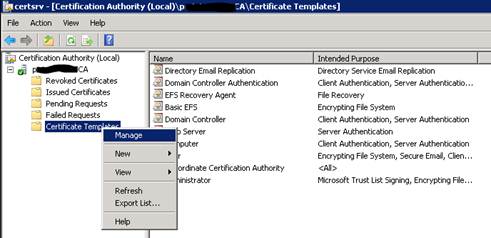
  2. Expand your CA from the list > Right click Certificate Templates > Manage
  3. Right click Web Server > Properties
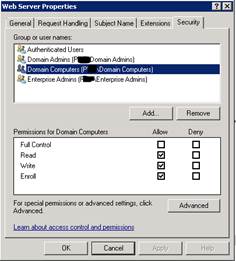
  4. Select the Security tab. Grant Domain Computers (or the specific computer) Read, Write, and Enroll permissions.
  5. Close all open windows.
  6. You can now request a certificate from the computer account based on the Web Server template.


You can install snap-ins to PowerShell in order to extend the functionality.  Examples include the PowerCLI for VMware and the Exchange snap in.  Basically, these snap-ins include libraries of additional commands that you can use to perform automation.  However, if you simply create powershell scripts (.ps1 files) with these commands, you will get errors because the default enironment does not include the snap in(s).

To add a snap in to the powershell environment automatically, you use a powershell script that is invoked every time you start powershell.  This is the profile.ps1 file, located in C:\Windows\System32\WindowsPowerShell\v1.0.  You may have to create the profile.ps1 file, as it is not needed for the default environment.

One syntax to add a snap in to the default environment is this:

$VMCore = Get-PSSnapin VMware.VimAutomation.Core -EA 0
if ( -not $VMCore ) { Add-PSSnapin VMware.VimAutomation.Core }

You can find examples of other syntax online, but the core behavior is this:  Check if the snap in is active, and if it isn't there use the Add-PSSnapin commandlet to add it.

Caveat:  You must download and install the snap in on your system before you can add it to your default PowerShell environment.  For example, the VMware.VimAutomation.Core is installed with the PowerCLI software from VMware.

Note:  I have added the VMware automation snap in to the default environment on the Security Bank management servers.  Additionally, I've put a script on these servers that will check for any VM snapshots.  (D:\cnx\scripts\List_Snapshots.ps1)


I was curious how I could stop a virus scan in progress from the Symantec Endpoint Protection management console.  It’s a little hard to find, but here’s what I found.

  • Go to Monitors > Logs > Computer Status
  • Select the computer on the top-left Command drop-down 
  • Select Cancel all scans 
  • Select the computer
  • Click Start