Blog: Networking

Simple erasure of a disk (or thumb drive). Windows 7 “full” format will overwrite each byte on the disk with zeroes.  This began with the Vista o/s and is true also with Windows 7.  This can cause problems for virtual machines running on a SAN.  Here is the statement from Microsoft KB 941961: [more]
 
The format command behavior has changed in Windows Vista. By default in Windows Vista, the format command writes zeros to the whole disk when a full format is performed. In Windows XP and in earlier versions of the Windows operating system, the format command does not write zeros to the whole disk when a full format is performed.

The new format behavior may cause problems for the on-demand allocation modes that a volume storage provider, such as a Storage Area Network (SAN), supports. Problems may occur because the new format behavior prematurely triggers allocation of the backing space.

In the on-demand scenario, zeros do not have to be written to the whole disk because the volume storage provider initializes the on-demand-allocated data. To avoid causing unnecessary on-demand-allocation, you must use the quick format option.


While installing a wireless network at a youth camp where I volunteer,  I was having issues getting the wireless distribution system to see the wireless access point in the building where the main router is located. If I place the WAP in the attic I could get a decent signal. So I moved the WAP to the end of the building, in the attic and mounted it inside the wood eave of the building. I was then getting a good signal to my other building. It wasn’t till after I had done this that I realized it never would of worked the first way I was trying. Most of the older buildings, such as the one the network originates from, have stucco exteriors. Part of the process of installing stucco (at least the old way) is to wrap the building in a wire mesh to help hold the stucco. It finally occurred to me that the wire mesh was creating a faraday cage around the building preventing the wireless signal from reaching outside.


I’ve been working on migrating an Exchange environment to 2010. This process includes an upgrade to the Unified Messaging role of Exchange to 2010 as well. We had purchased a UCC certificate to include all the Subject Alternate Names our Exchange environment would need and I had already applied it to the CAS server successfully. Since this certificate also included the FQDN of our UM server, I added the cert. and assigned the UM service to it so that Exchange could start processing voicemails through 2010 instead of 2007. [more]

After I had moved a couple of mailboxes (including mine) over for testing, I discovered that I could no longer receive voicemail. People were redirected to the Subscriber Attendant instead of my individual mailbox. There were events logged on the UM server saying the following:

Event ID: 1400 Source: MSExchange Unified Messaging
The following UM IP gateways did not respond as expected to a SIP OPTIONS request. Transport = TLS, Address = lync.ourdomain.com, Port = 5061, Response Code = 0, Message = This operation has timed out.

After considerable troubleshooting, I ran across a forum posting (http://social.msdn.microsoft.com/Forums/en-US/communicationsserversdk/thread/2733adf2-c91b-4b94-bf43-be93cdd2d5ef/) from someone who encountered the same issue and called for a support incident with Microsoft to figure out what was going on. In order for UM to work in a Lync phone system environment, the Subject Name of the certificate installed must be the FQDN of the UM server itself. It won’t work if it’s just included as a Subject Alternate Name; it must be the Subject Name.

I generated a new certificate from our internal CA with the UM server as the SN of the certificate, installed and assigned it to the UM roles (leaving our UCC cert running the remaining roles), and immediately started receiving voicemail notifications.

I found one other blog posting after the fact that backed this claim up even more (http://therealshrimp.blogspot.com/2012/03/multiple-exchange-um-servers-and.html).


Citrix XenApp has a feature called Client-to-Server content redirection. If content redirection is used, when a user double-clicks a file the corresponding application is started on the Citrix server. For example, a user clicks a document with a .xlsx extension from their PC and Excel is started on the Citrix Server. Content Redirection is set per published application through the Citrix Management Console. By default, most widely used applications (MS, Adobe) will add all known possible extensions to the registry during installation. Citrix pulls these registry settings (extensions and associated filetypes as shown above) from the HKLM portion of the registry. There is not a way to add extensions manually within the Citrix Management Console. [more]

Certain applications do not add all the necessary registry entries for all extensions that may be used by the application. With Windows 2008, there isn’t a way to add extensions via windows explorer as there was in Windows 2003. Users can add extensions by using the open with command and choosing a program to associate with the unknown extension. However, this adds the association to the HKCU portion of the registry which will not be read by the Citrix Management Console when extensions are imported. You can use the following steps to solve this problem:

  1. Using the following commands from the command prompt to set file associations globally on a server:
    • To display a list of file extensions and their associations, type assoc at a command prompt, and then press ENTER.
    • To display the association for a specific file extension, type assoc .<xxx> at a command prompt, and then press ENTER, where <xxx> is the file extension whose association you want to view.
    • To change the association for a specific file extension, type assoc .<xxx>=<file type> at a command prompt, and then press ENTER, where <xxx> is the file extension whose association you want to change, and <file type> is the program, dynamic data exchange (DDE), or OLE object you want to associate with the file extension.
    • To display the open command to use when launching a certain file type, type ftype <file type>  at a command prompt, and the press ENTER, where <file type> is the program, dynamic data exchange (DDE), or OLE object you want to associate with the file extension.
    • To change the program association for a specific file type, type ftype <file type>=<program path> at a command prompt, and the press ENTER, where <file type> is the program, dynamic data exchange (DDE), or OLE object you want to associate with the file extension and <program path> is the path to the executable used to open the application.
    • If the file type for the extension you are wanting to add already exists (for example Excel.Sheet.12), all you would have to do is associate the new extension with that file type. This would allow the new extension to open with the program associated with that file type.
    • If the file type for the extension you are wanting to add does not exist or you do not know what its file type is, you would have to add both the association and the file type. The example below associates the extension .tstx with the file type test.document. It the associates the file type test.document to open with the program test.exe. This would allow any documents with the extension .tstx to open with test.exe.
  2. Once the association has been added to the registry, complete the following steps in the Citrix Management Console to view the new file associations:
    • Within the console, browse to Citrix server from which you are running the console (this should be the same server on which you added the file extensions)
    • Right click server, select Other Tasks > Update file types from registry.
    • Browse to published application with which new association should use content redirection with.
    • Right click application and choose application properties and select content redirection menu.
    • Uncheck “show all available file types for this application” (if necessary), click apply, and then recheck the option. This should refresh the file extensions added to the registry in previous steps.


I was working on an SBS 2003 server that had e-mails for one user that would not deliver.  They were stuck in the Local Delivery Queue in Exchange 2003 in a retry state.  I tried to force connection, but they would never budge. 

I turned on diagnostic logging to get more information about what was going on in the Event Logs.  What I saw was “EcLocallyDiliverMsg to the store failed.  Error code: -1605, Event ID 327”. 

Some investigating seemed to point to a problem with the user’s mailbox, and that we would need to rebuild the user’s mailbox.  I exported all of the user’s mail to a PST file, deleted the mailbox, recreated the mailbox, and imported the PST file back in.  The mail remained stuck in the Local Delivery Queue.

While rebuilding the mailbox was the first part to resolving the problem, the second part came from a blog at www.thecyberwolfe.com/blog/?p=665.  This person explained that they had to recategorize the mail so that it would get to the new mailbox by doing the following in the registry of the server: [more]

  1. Stop the SMTP service.
  2. Open Regedit and navigate to the following key:
    HKEY_LOCAL_MACHINE\SYSTEM\CurrentControlSet\Services\SmtpSvc
  3. Create a subkey named “Queuing”
  4. Select Queuing and on right hand pane create new dword value with name “ResetMessageStatus” with value 1 in hexadecimal.
  5. Restart the SMTP service – check the queues and see if mail is being delivered. Also check the account mailbox at this point.
  6. Once all the mails are delivered to that user, stop the SMTP service and change the value for “ResetMessageStatus” to 0 and start the SMTP service.


A client recently needed to print a document to legal size paper. They selected the printer properties of their Xerox WorkCentre 7345 and changed it to the side feed. The next time the user tried printing an email it printed from the side feed. But when they printed from any other program the Xerox used the main tray. Initially I found that the user had saved an Outlook specific printer profile. I checked the settings when printing from Outlook and it showed the side tray. I changed it and saved and it would default back to the side tray. I deleted the outlook printer profile and it still defaulted to the side tray. I check printer defaults from other applications and the main tray was selected by default.

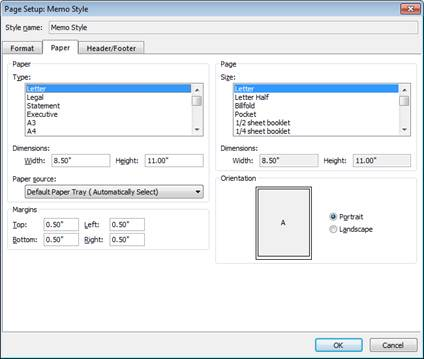
I changed the printer setting in Outlook to print Table Style and it printed from the main tray. I opened the print options in Outlook by selecting the Print Options button located below the printer selection. From there you can change settings specific to the Table or Memo Style.  I selected Memo Style and clicked Page Setup. [more]

In the Page Setup I selected the Paper table and the default paper source had been changed to the side tray. I changed it to automatic and exited the options menus. The Outlook Memo print jobs began using the main tray.

The user said they had never accessed that location when changing trays. So not sure how else that would have gotten changed. Anyway the print problem was resolved.


Robocopy that ships with Windows 7/2008 seems to have a bug. If you specify /MT (for multiple threads), it forces /E (copy empty directories).  This causes it to run much more slowly.  Even if all the destination directories have already been created, it still accesses each one.  If copying over a relatively slow connection,  it can be very slow if you use /MT. [more]

Some discussion is here: https://social.technet.microsoft.com/Forums/en-US/w7itprogeneral/thread/155d47ea-2523-4343-80dc-f0a987971b62


The need for SSL Certificates should be considered when utilizing a non-registered domain such as “.dom” or “.local”.

http://support.godaddy.com/help/article/6935/using-intranet-and-reserved-ip-addresses-as-the-primary-domain-or-subject-alternative-name-in-ssls
Using Intranet and Reserved IP Addresses as the Primary Domain or Subject Alternative Name in SSLs

The Internet security community is phasing out the use of intranet and reserved IP addresses as the Primary Domain Name or the Subject Alternative Name in SSL certificates.

This is an industry-wide decision, not one specific to our company...

As a result of this decision, on July 1, 2012, we no longer accept new requests, process rekeys or renewals, or allow any management of Subject Alternative Names for certificates that contain intranet names or reserved IP addresses, and are valid beyond November 1, 2015...


I had worked on a server that had corrupted NTOSKRNL.EXE and HAL.DLL files causing the server to be unable to boot.  With the Windows 2003 CD in the system, I could access the recovery console.  The files are compressed on the Windows CD in the i386 folder in files ntoskrnl.ex_ and hal.dl_ respectively.

*TIP* By typing the command "MAP" you can see which drive the cd-rom is mapped to as well as the local hard disks.

In order to extract the files, you are supposed to use the expand command like the following: "expand <cd-drive-letter>:\i386\ntoskrnl.ex_ c:\windows\system32".  Do the same for hal.dl_.

The problem that I had was that it said "access denied" when trying to expand the files or copy anything to the C drive.  I could rename the existing files as a backup without any problems.  In order to get around this problem to expand the files from the disk, you can use the SET command. [more]

Typing "SET" command in recovery console will show you the following four settings. By default all entries are set to FALSE.

allowwildcards = Turning this variable on will allow you to use wildcards (the asterisk) with certain commands.
allowallpaths = This variable, when enabled, will allow you to change directories to any folder on any drive.
allowremovablemedia = Turning on this variable will allow you to copy files from the hard drive to any removable media that Windows recognizes.
nocopyprompt = When this variable is enabled, you will not see a message when you try to copy over another file.

Type "set AllowRemovableMedia = TRUE" and then it will let you expand the files from the CD to the hard disk.


I had been troubleshooting a failed vCenter upgrade recently and trying to restart the upgrade process. Every time I would run the installer, it would fail on some piece and rollback the install. I had opened up several windows trying to figure this out, including Event Viewer, Services.msc, log files, etc. and wasn’t easily able to find a reason for the failures. At one point, the error that I was getting was something about permissions denied; which was strange, as the account I was using had full admin rights on the system and SQL server.

I found an obscure posting on some forum somewhere that suggested closing down the services.msc window and then running the install again. I did so and the install was successful! I’ve never seen an application that had to have the Services.msc window closed in order to add or remove services, but some portion of this install process seemed to require it.