Blog: Networking

We needed to clear disk space on a hard drive containing WSUS and other applications.  WSUS was taking up about 40 GB of the 50GB drive. 

WSUS has a cleanup wizard you can use to remove unneeded and superseded updates, but when we ran it only a few megabytes worth of data was cleaned.  The trick to clean up a lot of disk space and remove superseded updates[more] is to filter your view to see all the approved updates in WSUS, then select the approved updates marked as superseded (can be in the hundreds), and decline these updates.  The next time the cleanup wizard is run, it will remove the unneeded install files.

It appears, by default, the cleanup wizard does not touch approved superseded updates when it runs; however, by declining these superseded updates, we were able to remove over 17GB of unneeded installation files.

 

Recuva (they pronounce it "recover") is a free utility that can be run from a USB drive or installed on a system.  It's easy to use and has options to pick the type of file (pictures, email, music, documents, etc.) and file locations - or just show all undeletable files on a specific drive. [more]

There is a deep scan option, but if this is necessary, it may be difficult to restore the files.

This is a good way to restore files that may have been accidently deleted or files that have disappeared because of disk errors.  It may be a good thing to use in combination with SpinRite (not free, but a very useful utility when disk hardware errors occur).

http://www.piriform.com/recuva

http://www.grc.com/sr/spinrite.htm


While doing research on Cisco firewall logins, I stumbled on some information that discusses a Wireshark feature called “Follow TCP Stream”.  This feature allows you to follow a particular TCP conversation between two or more hosts. It finds all the TCP packets between a particular source and destination and reassembles the data that was transferred in that particular exchange into something parsable. In effect, the “Follow TCP Stream” feature acts as a filter, but is not limited to a single IP address or protocol.  It will pick up any packets sent to/from the designated host.


To get the feature to work, simply start Wireshark and select an already recorded packet you are interested in by right clicking and selecting “Follow TCP Stream”.  Users can also elect to follow UDP or SSL streams.


I recently had to update one of the certificates running on a few of our systems as the one I replaced was set to expire. Most of the updates went very smoothly and quickly, but there was one instance that I ran into that required a bit of extra work. One of our web servers runs on a Server 2008 system running Server Core instead of the full install. What this means is that there is no GUI to do your work and all of your maintenance takes place either through command line or remote tools.

For some reason, I was unable to make my certificate changes using IIS7 running on another system (which may be another issue entirely). Because of this, I had to learn how to make my certificate changes via the command line on the server itself. I used the following link as a guide on how to complete this process. http://www.awesomeideas.net/post/2008/05/18/How-to-configure-SSL-on-IIS7-under-Windows-2008-Server-Core.aspx


With the installation of the new Citrix receiver 3.0 (which includes the Citrix online plug-in 13.0) and subsequent versions (version 3.3 of the Receiver is currently available), the following issues have been encountered.

After installing Citrix Receiver 3.0 or newer, users cannot launch Published Applications from the System Tray Notification Area Menu.

In the previous PNAgent or Citrix plug-in, the list of published applications was displayed.

In the new version, when you click the Citrix Receiver icon from the Systray, the menu displayed is shown in the following screen shot (newer versions have even viewer options available from the system tray icon). [more]

Citrix published this statement as the reason for this change: "Receiver for Windows 3.0 Citrix has specifically deprecated support for the option of launching applications from the Notification Area menu to achieve a better and more intuitive user experience in Receiver deployments. This type of access on Windows 7 causes issues. Application access from the Notification Area is no longer consistent with Microsoft User Experience Guidelines."

Microsoft’s User Guidelines can be read here: http://msdn.microsoft.com/en-us/library/windows/desktop/aa511440.aspx . The Notification Area purpose and design is explained in this section: http://msdn.microsoft.com/en-us/library/windows/desktop/aa511448.aspx

The resolution provided by Citrix is to publish all applications to the start menu or desktop via the Deliver Console. While this is an acceptable solution, a lot of users are complaining because they are having to retrain users and dislike the lack of the availability of the ease of access. With the new version of the Receiver, the online plug-in is basically wrapped in the Receiver Experience package. This wrapper can be removed by deleting the following registry key: HKEY_LOCAL_MACHINE\SOFTWARE\Citrix\ReceiverInside. This will bring back the full functionality of the online plug-in to the notification area. Removal of this registry key also reverts the icon from the black square icon to the round blue icon users are used to seeing.

After installing Citrix Receiver 3.0 or newer, the receiver requires a server URL that uses SSL (https:\\). Any non-secure URL is not accepted within the configuration.

Citrix has designated the default configuration of the Receiver to require SSL for connections to the server store. Modifying this default configuration is not available through the client itself, however the following registry key addition will allow you to add non-secure URLs for the server path:

Under HKEY_LOCAL_MACHINE\SOFTWARE\Citrix\Dazzle

REG_SZ: AllowAddStore

Value: A

Note: Changing the value to A allows you to add non-secure URLs.


I was recently assigned a task to pull a list of users who use mobile devices for company email. I came across a neat website with several PowerShell commands listed to help generate the list.

http://www.msexchange.org/articles_tutorials/exchange-server-2010/management-administration/mobile-device-management-part2.html

There is a command to generate a device count of each type of device used.  There is also a command to generate six different .CSV files that can be used to see a list of users, emails received, type of device, device id, etc.


Gotcha 1:   An alternative to using TFTP for transferring files to and from network devices is SCP (secure copy).  SCP uses port 22 just like SSH.  I’ve encountered two “gotchas” with using SCP with Cisco equipment, though.  1) WinSCP is not compatible with Cisco equipment.  2) PSCP (PuTTy SCP) requires the use of the –scp switch, because it defaults to the SFTP protocol.

Gotcha 2:  ESXi 5.1 has new hardware requirements.  The requirements can be found here and the VMware Compatibility Guide allows you to search vendors and servers to see if they are compatible.  (In particular, the feature that was missing from Crowell State Bank’s servers was the NX/XD CPU feature.)

Note that ESXi 5 (Patch 4) or higher is required to run Windows Server 2012.


While setting up a new Windows 7 computer for a customer, the user had several programs that were very old. There was one program in particular that was written in the 1980s and was a DOS based program. This was a program that was custom written for this company to calculate the dividends for their partners, so no upgrade existed nor did they want to use another process. The program was very simple, click the appropriate DOS program and the report and checks print.

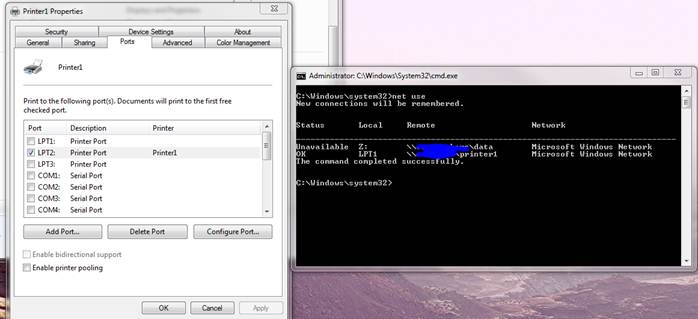
I found that the ports in the printer properties GUI do not correspond to the DOS printers. To print to a printer using DOS, you must use the following command to map the printer: net use port \\server\printer. You can run net use from a command prompt to see what devices are connected via command line. [more]

As you can see in the screenshot below, Printer1 is mapped to LPT2 from the GUI and LPT1 from the command line.


The solution for adding the printer so the DOS program could print was to place a batch file in the startup folder with the net use port \\server\printer command so the printer will be mapped each time the computer starts. This resolve this issue and allowed the DOS program to print to the printer on the new Windows 7 PC.


Environment:

  • Server: XenApp 6, Windows Server 2008 R2
  • XenDesktop Controller: XenDesktop 5.6
  • Client: Various (Windows 7 Embedded TC, Windows 7 PC)

Two types of redirection supported for imaging devices:

  • TWAIN redirection (XenApp, XenDesktop)
  • USB Redirection (XenDesktop only) NOTE: XenApp does support USB Redirection, but not for Image Scanners. For details on USB devices supported by XenApp, refer to CTX816193. 

TWAIN Redirection [more]

  • The imaging device must be connected locally to the user device and have the associated vendor-supplied TWAIN driver installed
  • Citrix online plug-in 11.x or later or the Citrix offline plug-in
  • XenApp\XenDesktop 32-bit and 64-bit OSes support TWAIN redirection for 32-bit TWAIN applications only. XenApp does not support 16-bit TWAIN drivers
  • Citrix Policies (XenApp\XenDesktop): The Client TWAIN device redirection policy setting must be added to the appropriate policy. To configure image compression, add the TWAIN compression level setting and select the appropriate compression level. 
    • User Policy
    • Enabled by default
  • PROCESS: To capture an image, users connect to a server from a client machine that has an imaging device and the associated vendor-supplied TWAIN driver installed locally. When the TWAIN application is run from within this session, the application detects and interacts with the client-side device using a DLL hook process that communicates with the driver on the local client.
  • TWAIN Redirection troubleshooting: CTX107411
USB Redirection
  • When redirecting USB devices, the endpoint client device must first recognize the USB device to have it mapped to the session. If the device requires a special driver, it must be installed on both the client machine, as well as the Virtual Desktop Agent (VDA) machine. The device can still be mapped without the driver as long as the endpoint recognizes it, but it will not function as expected until the driver is installed on the VDA machine.
    NOTE: In some cases, installing the driver locally can break USB redirection. If the driver does not allow the device to be released for redirection, the VDA may not be able to communicate with the device.
    • When a device is detected, you can view the properties of the device via device manager or 'Printers and Devices'
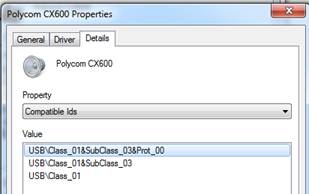
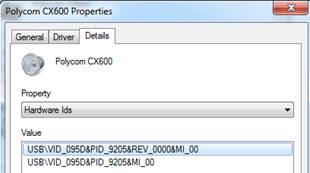
    • It is important to determine the devices vendor ID (VID) and product ID (PID) as well as the device’s Class. This information is usually found on the details tab of the properties of the device. 
    • Here is an example of a USB device and its defined properties:
      • Property = Hardware IDs (VID = 095D, PID = 9205)
      • Property=Compatible IDS (Class=01)
  • Certain USB classes are blocked by default because they are used mainly only on local workstations.  When some devices, such as a smartcard, Keyboard or Mouse, are connected, they will be connected by one of the predefined standard channels. Therefore, these types of devices are blocked by default for the USB channel as their functionality is required on the local endpoint
    • Communications and CDC Control (Classes 02 and 0a)
    • Human Interface Devices (Class 03)
    • USB Hubs (Class 09)
    • Smart Card (Class 0b)
    • Wireless Controller (Class e0)
  • Certain USB classes are allowed by the default USB policy rules
    • Audio (Class 01)
    • Physical Interface Devices(Class 05)
    • Still Imaging (Class 06)
    • Printers (Class 07)
    • Mass Storage (Class 08)
    • Content Security (Class 0d)
    • Video (Class 0e)
    • Personal Healthcare (Class 0f)
    • Application and Vendor Specific (Classes fe and ff)
  • Components of USB Redirection
    • Receiver – Citrix Client used to connect to XenDesktop\XenApp
      • Citrix Remote USB Device Driver (intercepts devices normal driver)
      • Configured by four methods
        • Desktop Viewer Toolbar (user)
          • Preferences must be set to Connect All or Ask each time to be presented with device on XenDesktop
        • Connection Center (user)
          • Session Security > USB Device must be set to Ask Permission or Full Access
        • GPO Computer or User policies (admin)
          • Configures settings mentioned above
          • Also setting for USB Device Rules
            • Allows for blocking or allowing devices based off VID, PID and Device Class
        • Registry (admin)
          • Devices can be automatically redirected by adding the VID and PID information into a registry key. See this article for details: CTX123015
    • VDA (Virtual Desktop Agent) – XenDesktop VM
      • Citrix Remote USB Host Controller (communicates with USB Device Driver)
      • Citrix USB Service (handles addition\removal of devices, monitors devices)
      • Configured by:
        • HDX Policy via XenDesktop Controller (admin)
          • Client USB device redirection policy must be enabled (disabled by default)
          • USB Device Rules
            • Allows for blocking or allowing devices based off VID, PID and Device Class
    • Troubleshooting
      • HDXMonitor Tool (runs on VDA) – Real time status on USB device connection, provides network performance stats, reports active USB rules in place, delivers USB filtered event log messages http://hdx.citrix.com/hdx-monitor
      • When using USB redirection for an imaging device, TWAIN redirection must be disabled. If the scanner is TWAIN compliant, the VDA will not be able to communicate with the device since the TWAIN redirection process is using the device. In my case, I received a message that it the device was “busy or in use”.
      • In my case, there also seemed to be an issue with Citrix Receiver 3.0 (online plug-in v13). Downgrading to v 12.3 of the online plug-in or upgrading to version 3.3 (online plug-in v13.3) fixed the USB redirection issue.


When Microsoft Exchange sends an e-mail, the message size may change due to the encoding used to package it. Messages with attachments can expand even more, since the only way to send e-mail attachments is to convert them from plain ASCII to MIME or UU-encode the message. Even if an attachment is smaller than the limits set in Exchange, it may not be accepted because its MIME-encoded or UU-encoded size is too big. This happens most often when limits are set for inbound SMTP mail. An incoming MIME-encoded e-mail with attachments can increase in size anywhere from 30% to 40%, depending on how many separate attachments, line breaks, MIME headers or other non-data elements are in the message. The exact size can vary enormously, especially since mail systems all behave a little differently when converting e-mail and attachments to MIME. The same problem exists in reverse, where messages sent from your domain will be constrained by message limit sizes on other hosts. Likewise, mail sent from your domain is going to expand anywhere from 30% to 40% in size when converted. [more]

A third-party program, such as UUDeview (http://www.miken.com/uud/), can help you find out just how much larger a MIME or UU-encoded version of a given file will be. (Note that this tool does not calculate things like message size overhead, but it can still be helpful.) The exact maximum incoming and outgoing message size is going to be up to the e-mail administrator, but should be set with these caveats in mind.

Also, take the time to explain to users that when they send attachments, they need to be mindful that messages will increase in size.