Blog: General

I recently helped a customer having trouble with FaceTime and iMessage not working with his iPod touch. He was able to browse the web and get to the App Store, but the FaceTime and iMessage applications would not work. I connected my cell phone and was able to use FaceTime, a WiFi only application. I assumed this meant the problem was with his iPod, not his wireless Internet. However, his iPod worked correctly when he connected to a different wireless network. The problem fixed itself for about a week at his house, then started happening again. I did some reading and found that this could have been caused by DNS. I changed the DNS servers on his router to use different DNS servers. Immediately the problem was fixed.

Thinking back on my testing, I did not take into account that my phone could have been using 3G DNS servers during the first test. The lesson here is to be careful when using cell phones to test wireless connectivity.

 

A while ago, I was flying back into Lubbock after a weeklong trip and realized, when I got onto the plane headed for Dallas, that I had left my Kindle in a seat back pocket of the previous plane. After getting over that initial shock, I started looking for what I needed to do. I called Amazon Kindle support and they kindly deactivated my Kindle (so that others couldn’t make purchases using my credit card) and even put a flag on the account so that the device was unable to be used by anyone else. I then called the airline’s lost and found service and filed a claim for my missing Kindle. They told me it would be a couple of weeks before I probably heard anything so I figured that was all I could do. [more]

Fast forward to last week and I had purchased a new Kindle Fire to replace the one I had left behind (and to play with the new Fire) when I get a phone call from Josh H. with Amazon Kindle Lost & Found. Apparently, someone had found my Kindle and sent it back to Amazon. He called me up and verified my shipping address and email address and informed me that they would be shipping my Kindle back to me, free of charge, via UPS ground. A few minutes later, I get the tracking number and everything is good in the world again.

Moral of the story is: Amazon Customer Support is really quite astounding in how they take care of their customers. If you have a legitimate problem, they seem to go out of their way at times to take care of you.


Below are the steps to reset the passcode on an iPhone.

Warning: this will wipe all files, settings, and apps from the iPhone, including the passcode 

  1. Need computer (with iTunes) and USB cable
  2. Make sure iTunes in running on your system
  3. Press and hold the Home and Power button at the same time until the iPhone turns off
  4. Release the Power button, but continue to hold the Home button
  5. Plug the USB cable into the computer & iPhone (while holding the Home button)
  6. Continue to hold the Home button until an alert message in iTunes appears that reads “iTunes has detected an iPhone in recovery mode.  You must restore this iPhone before it can be used with iTunes.” – click OK
  7. In iTunes, under “summary” tab, click the “Restore” button to restore the iPhone


Ever since upgrading my iPhone 4 to OS5, my battery doesn't seem to last as long as it used to. When I find suggestions for extending battery life, I try it, but it doesn't seem to help. I found another solution, and for some reason, this seems to have helped more so than any other suggestions.

As most iPhone users know, when you double click the home button, it brings up the most recently used apps. If you hold your finger on one of those apps to make it wiggle, they will do that "jig" that they typically do. The difference is there is a minus sign instead of an x. If you click on the minus sign and close each of these apps out, it helps to extend your battery life. MAKE SURE IT'S A MINUS AND NOT AN X, or you're going to delete your app completely from your phone rather than just from your recently used apps.


I was working in Word when it crashed and only presented me with the options to restart the program or close the program.

I closed the program and checked the document to see the last save time had been an hour or so earlier. When I opened the file, the “recovered document” options were not available and I could see the last hour’s work was not there.

I began to search for a solution which I found in http://support.microsoft.com/kb/316951 “How to recover a lost Word document.”

There were several recommendations which I tried in sequence with no success. Finally I came down to the suggestion to search my entire hard drive for *.asd files. I did this and found several files, one was my a copy of my crashed document. I opened the *.asd file with word and found all my information in place with nothing lost. [more]

By the way the file was located in C:\Users\<username>\AppData\Roaming\Microsoft\Word, which is the default location Word uses to store all “AutoRecover” files. And also by default on my computer, Word was set to autosave every 10 minutes and was set to keep the last autosaved version if Word is closed without saving.

Searching your entire drive for *.asd files, is a good idea if, for some reason, the default settings have been changed and as a result, you don’t know where the *.asd files might be saved.

You can double check the AutoRecover and Autosave settings in Word 2010 by going to Files>Options>Save. These features are also available in Excel and Powerpoint. The AutoRecover file locations are different for each application, but are easy to find by looking in the appropriate folders.


When I'm working on Word 2010 documents located on a file share, particularly when they are included in folders I have synched for offline use, I often receive an error message when trying to open the document.  The message tells me the document is locked for editing by 'another user' and asks if I want to:

  1. Open a read only copy
  2. Create a local copy and merge changes later
  3. Receive notification when the original copy is available

I usually select the last option and wait a minute or two and then receive a message when I can change my access from read only to read/write.  However, this is inconvenient partly because the 'another user' error dialog box almost always ends up displaying underneath the explorer window I am using to open the documents since I usually am opening several related documents at the same time.  There is no indication the dialog box is there until I try to open another Word document and receive a message I must close an open dialog box, etc.  Once I dig around and find the open dialog box, I can respond to receive notification when the original copy is available. [more]
 
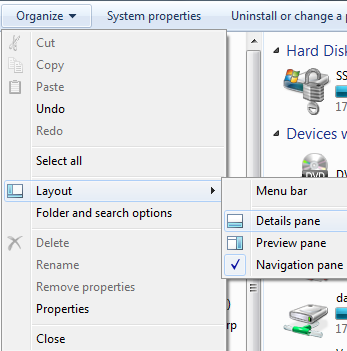
I found numerous notes about this type of problem others are having and found one that suggested I turn off the Windows explorer Details pane to see if that helped.  In fact, it fixed my problem.

http://social.technet.microsoft.com/Forums/en-AU/word/thread/307d3e8d-914f-4e11-972d-59717098419b

However, I kind of like the information provided in the Windows explorer Details pane.  There was also a mention about applying the following hotfix if turning off the Details pane didn't work but I wasn't too excited about a hotfix unless it was absolutely necessary and the description of the hotfix didn't seem to exactly fit my problem.  In particular, it's for non-DFS errors and these files are on a DFS share.

http://support.microsoft.com/kb/2434932


For those who really like to tinker, iOS5 for the iPhone introduced the ability to change the default vibration pattern for each address book contact.  Here are the steps:

  • Go to Settings->General->Accessibility and turn on Custom Vibrations
  • To change a vibration pattern for a contact, edit the contact entry and select the vibration setting (just below ringtones).  You can select a different pattern or select "Create New Vibration".
  • Use the screen to tap out a new pattern and select Save.
  • You can create a new pattern directly from the Sounds section under Settings.


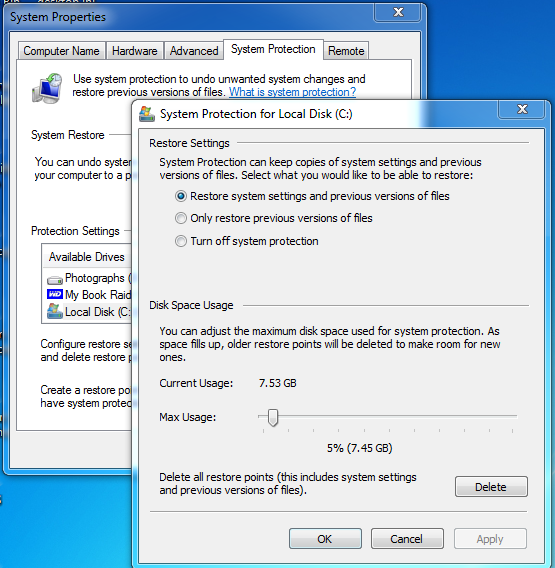
You assume, that both Microsoft and Lenovo will create a restore point before applying updates to your computer. I did… and it cost me dearly!  I had to rebuild my machine from scratch!  Restore points require disk storage, and there is a screen (see below) where the amount of the disk to be used for restore points is specified.  In my case the amount was set to “0” (zero), and then when the Lenovo updater tries to create a restore point, it failed. There was no warning that it failed! [more]


After installing a new computer and upgrading to Adobe Reader 10.1, a user was unable to print PDFs in portrait orientation to a Xerox printer. The documents printed correctly to an HP printer. When printed to a Xerox printer, two portrait pages were shrunk and printed to one landscape page (like a book). To fix this error, you must follow the steps below on each printer affected. This will make the printer print exactly what is seen on the screen, just like it was a picture. 

  • Click Print
  • Click Advanced
  • Click Print as Image


I had been trying to record some audio of about 4 minutes in length or so with Windows 7.  After about a minute in, the sound would become muffled and degraded quality.  I tried adjusting microphone level balance and boost levels to no avail.
 
After a while looking through the recording options, I later looked at the Communications tab of the sound options.  It was set to “Reduce the volume of other sounds by 80%” when Windows detects communications activity.  I changed it to “Do Nothing” and tried again to find that it did not suffer from any sound degradation.  I also noted that the degradation was in the actual recording itself and not just during playback. [more]