Blog: General

This applies to any e-mail accounts setup to get e-mail using POP3. 

A customer that uses an e-mail account provided by their ISP for work was frequently having new e-mail rejected because the mailbox was full.  Looking at the storage space on the ISP’s website, they were limited to only 20 MB of e-mail storage.  They usually would have to delete e-mails on the ISPs website in order to receive new e-mails again.  The customer also had been setup to connect to the ISP’s server using POP3 in Microsoft Outlook, and Microsoft Outlook was configured to save e-mails to a local PST file on the hard drive.

In Microsoft Outlook, open the “Account Settings” for your e-mail account.  Click on “More Options” to view more settings and select the “Advanced” tab. [more]
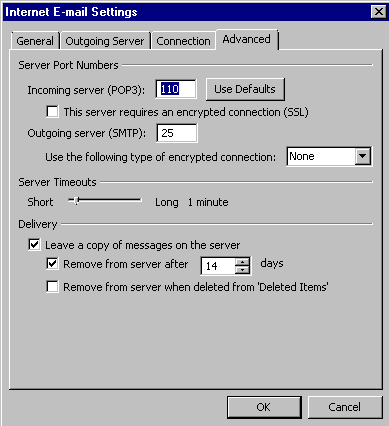
With POP3, you can give Microsoft Outlook the option to “Leave a copy of messages on the server”.  If this is unchecked, new e-mails received at the ISP remain there until Microsoft Outlook downloads them.  After it downloads the e-mail, the e-mail is deleted on the ISP’s mail account.

An important thing to remember is that the local PST file needs to be backed up regularly because all e-mails will be lost if the PC crashes, PST file becomes corrupt, or you want to change PCs.

 

iPhone screen captures:  If you want to capture the iPhone screen, hold down the power/lock button on the top of the phone, then press the “menu” button. The screen will flash white and the screen capture will be added to the Camera Roll.  Earlier incarnations of this feature said you need to hold down the menu button then press the power/lock button. This sequence does not work on the newer 4 and 4s models.


You can edit existing emails, although usually this would not be a good idea since you probably want to preserve the exact email you received.  You can add something to the subject line without even choosing to edit it.  Categories are fine for a preset list, but sometimes I like to make a comment and save it with the email to make it easier to find later.  Sometimes the subject is blank or created programmatically with little relevance (like voicemails).  So I add something to the subject, marking it with something identifiable so I can clearly see what was added.  It was pointed out in the meeting that changing the subject line will break the default behavior for the built in search for “messages in this conversation” since it has to match the subject exactly (well, except for RE:, etc.).  Keep this in mind if you use that feature.  I usually just use the regular search feature, which just finds anything that includes that string.


Recently, I was working with someone who receives a lot of email. Because of the sheer amount of email she receives, she must prioritize what messages she can read in order to continue working effectively. The request came in to see if it were possible to auto-categorize emails in Outlook based on the sender of the email so that one could simply glance through the inbox and see (by color) what emails had come in. After looking at it for a bit, we set up a Outlook Rule to color categorize an email as soon as it came in if the email was on a list of senders manually added to the rule. This worked fine until we reached the size limit of the Outlook Rule.

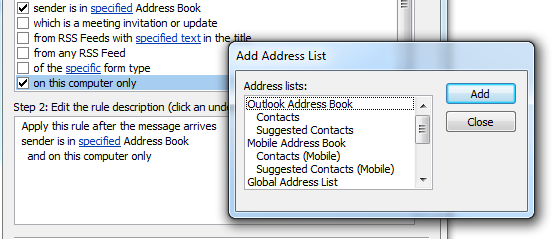
The fix is quite simple. Create a new local Address Book with all the recipients you’d like to color code. Then, set your Outlook Rule to scan the address book for a sender to color code the email. [more]


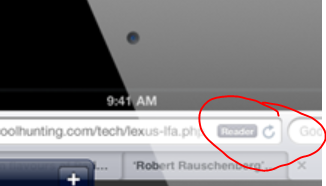
Read Articles without Clutter:  There is a new “Reader” button on Safari, under IOS 5 (ipads, iphones), that allows you to read the web page textual data without the surrounding clutter (advertisements).  This button is located in the url window as shown below.  There is similar functionality for other browsers supplied by Readability:  http://www.readability.com/. [more]


When opening an attachment directly from within Outlook you could get an error message saying that it can’t create the file and to that you need check the permissions on the folder you want to save it in. In most cases the permissions on the folder isn’t the issue but the fact that the folder is “full”. When you open an attachment directly from within Outlook it will first save a copy to a subfolder of the Temporary Internet Files folder. Cleaning out the folder will solve the issue.

How to Empty Outlook Secure Temp folder

The subfolder name Outlook creates (on installation of Outlook) in the Temporary Internet Files folder is quite random. In Outlook 2003 and previous, the name starts with OLK and is followed by up to 4 random numbers or letters. In Outlook 2007 and Outlook 2010, this folder is called Content.Outlook and then has a subfolder which is named with 8 random numbers and letters. Getting to the Temporary Outlook Folder can still be accomplished in 2 easy steps though. [more]

Step 1: Locate the folder
The folder location is stored in the registry in the following key;
• Outlook 97
HKEY_CURRENT_USER\Software\Microsoft\Office\8.0\Outlook\Security
• Outlook 98
HKEY_CURRENT_USER\Software\Microsoft\Office\8.5\Outlook\Security
• Outlook 2000
HKEY_CURRENT_USER\Software\Microsoft\Office\9.0\Outlook\Security
• Outlook 2002/XP
HKEY_CURRENT_USER\Software\Microsoft\Office\10.0\Outlook\Security
• Outlook 2003
HKEY_CURRENT_USER\Software\Microsoft\Office\11.0\Outlook\Security
• Outlook 2007
HKEY_CURRENT_USER\Software\Microsoft\Office\12.0\Outlook\Security
• Outlook 2010
HKEY_CURRENT_USER\Software\Microsoft\Office\14.0\Outlook\Security

Step 2: Get to the folder and delete content
1. Open the OutlookSecureTempFolder registry key from the location provided in Step 1.
2. Copy the path from the key.
3. Open Explorer.
4. Paste the address in the Address Bar and press Enter.
5. Delete the content of the Outlook Secure Temp Folder.


Office 2010 applications have a Quick Access Toolbar at the top left of each window (default location).  You can right click on this and choose "Customize Quick Access Toolbar" to add additional buttons.  There are some items that are not in the ribbon at all.  One example of this is the Message Options in Outlook.  It is not in the ribbon on the main Outlook window.  Adding this to your Quick Access Toolbar in your Outlook main window will allow you to look at the Internet headers and other information without opening the message.  You can also customize the ribbon, adding new tabs and anything you want, but that is a little more complicated.


A user was having problems printing out of Adobe X.  Anytime she would trying printing, Adobe X would crash, and the File ->Print option was greyed out. After doing some research, I found out that if you go to Edit ->General Tab, and uncheck “Enable Protected Mode at startup” it fixed the problem and the user was able to print again.


We often find the need to document the steps we take towards solving a particular problem – whether that solution be to help a customer with a similar problem, or to keep track of how to make tricky changes we don’t want to have to “re-figure out” in the future.

These HOWTO documents are invaluable to have and maintain, but are very often a hassle to make. It looks like Microsoft ran into the same problem and decided to create an application called “psr.exe” (Problem Step Recorder) to help one create these documents with minimal effort, but with excellent formatting.

To use this tool, just click “Start” and search for “psr.” Then, you can run the executable and start recording. This tool records every mouse-click and keyboard input, capturing a screen shot at every step. You also have the ability to add your own comments to each step of the process.

Then, we you are finished recording, you can click “Stop Record,” and you will be asked to save the recorded steps as a zip folder. Then, just open up the folder to find the MHT document (that contains all the steps you took) that will open in a web-browser.

This document can then be saved or distributed as needed. Needless to say, this tool can save everyone time since you just have to follow the steps once and the application will create the HOWTO document for you. As mentioned above, this tool can create HOWTO documents, but can also be used for other purposes, such as having a customer show you exactly what they do to create a software issue.


In my opinion, ClearType text looks fuzzy and I like my text crisp and sharp. I have found that just turning ClearType off does not always really keep it turned off. On Windows 7 there is a ClearType Text Tuner dialog where you keep selecting which box of text looks best. Even though clearing the checkbox immediately seems to turn off ClearType, it does not stay off. You have to go through all the dialog boxes and select that last Finish button. You may need to close and reopen some applications or even log out and back in again.