Blog: Networking

If you experience a hardware failure with a VMware host, run the following commands to create a plain-text diagnostic file which will help you determine where the failure exists: [more]

  1. Connect to the host via SSH
  2. Log in as “root”
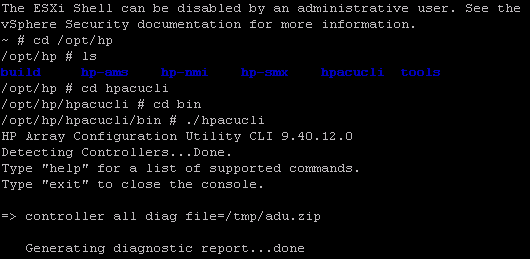
  3. Type: “cd /opt/hp” and press ENTER
  4. Type: “ls” to list the contents of this directory. Verify hpacucli is listed
  5. Type “cd hpacucli/bin” and press ENTER
  6. Type “./hpacucli” and press ENTER
  7. Type “controller all diag file=/tmp/adu.zip” and press ENTER
  8. Once the diagnostic report has been generated, use WinSCP (or a similar application) to connect to the host
  9. Browse to the tmp directory
  10. Copy the adu.zip folder locally
  11. Extract the files and open the “ADUReport.txt” file to view the results
The diagnostic result file can be large, so you may have to do some searching before you find where the failures exist. Also this documentation is specific to HP products so commands/file paths may for different hardware manufacturers. 


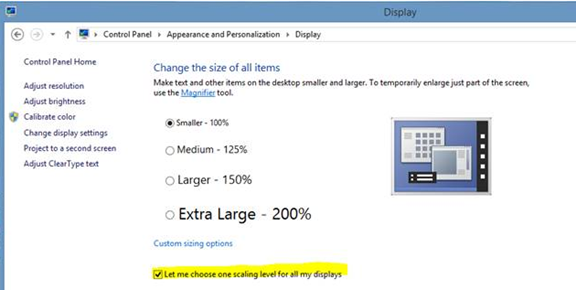
There is a known issue when connecting to a Citrix server when the Windows 8.1 DPI scaling function is enabled. The user may experience a flickering screen when connected to a Citrix published application. [more]

To disable DPI scaling, open display settings on the client and check the option ‘let me choose one scaling level for all my displays’. After changing the setting, the user must log off of their system and log back in for the setting to be applied.


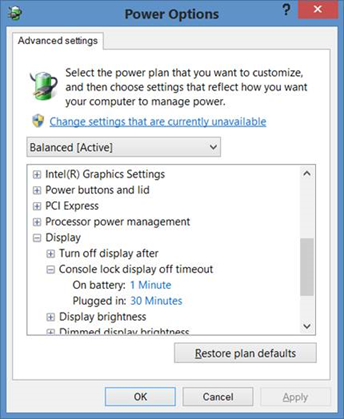
By default in Windows 8 and 8.1 after you lock your screen, the display will timeout and power off after 1 minute of no activity, requiring you to wake the screen to login again. [more]There is no way to modify this through the GUI by default. You can, however, add a registry key to enable control of this setting. The reference site below has .reg files you can download and use to make the registry change or you can make the change manually if you are familiar with modifying the registry. If going the manual route, set the DWORD value Attributes to 2 (a value of 1 hides the entry). This value controls the visibility of the option ‘Console lock display off timeout’ under Advanced Power Settings.

HKEY_LOCAL_MACHINE\SYSTEM\CurrentControlSet\Control\Power\PowerSettings\7516b95f-f776-4464-8c53-06167f40cc99\8EC4B3A5-6868-48c2-BE75-4F3044BE88A7\Attributes

To modify the timeout setting, go to Power Options, choose ‘Change Plan Settings’, and then choose ‘Change advanced power settings’. Under Display, you will now see the option ‘Console lock display off timeout’.

Reference: http://www.eightforums.com/tutorials/8267-power-options-add-console-lock-display-off-timeout.html 


When enabling most roles and features in Windows Server 2012 R2, you can simply add the roles or features and the server will pull the installation files from the C:\Windows\WinSxS folder. However the installation files for .NET Framework v3.5 are not included in this folder and must be downloaded from the operating system installation ISO or from the Internet.[more] On the last page of the “Add Roles and Features” wizard, there is an option for an alternate source for the installation files. You should be able to set this to the drive where the ISO is mounted or attached, and point to the “DriveLetter:\Sources\SxS” folder.

When I used the alternate installation path to D:\Sources\SxS on a server I was building, I received a message saying it could not find the installation source. The solution in this case was to create a Group Policy Object that was scoped to the new server and set the installation file location in the GPO. The settings I used in the GPO are below. After applying this GPO, I was able to install .NET Framework 3.5 from the mounted Server 2012 R2 installation CD.


At some point there was a bug in Lync 2013 causing records to be duplicated in the contact list. I ended up with hundreds of duplicate records including a few records with more than 100 duplicates each. [more]

Initially Microsoft’s solution was to use Outlook Web Access (OWA), find the Lync contacts folder and delete it. I did this a couple of times, but eventually, access to the Lync contacts folder became protected and could not be deleted.

After a couple of months, when I circled back to the problem, I found a Microsoft knowledge base article KB2916650 which indicated an update would fix the problem, however I was running the updated version. This meant no new duplicates were being created, but the existing duplicate records remained. The only solution aside from the update was to contact Microsoft support.

I contacted Microsoft and they provided a hotfix, the “Lync Contacts Mailbox Cleaner.” There are versions for both 32bit and 64bit systems. The Cleaner needs to be copied to the local system, unzipped and installed. Then launch the Cleaner, choose the email address of the account you want de-duplicated and click the “Cleanup…” bar. You will be able to watch as the duplicates are discovered and deleted.


If you want to capture network packets on a Windows machine, but can't install Wireshark for some reason, there is an alternative. [more]

Use "netsh trace" to capture packets.  This creates a Microsoft proprietary format ".etl" file. The only tool to covert to regular PCAP format is the Microsoft Message Analyzer.  Download from https://www.microsoft.com/en-us/download/details.aspx?id=44226

For more details see https://isc.sans.edu/diary/19409 and https://technet.microsoft.com/en-us/library/dd878517


Microsoft updated the online images in April 2014 to include the ‘Update 1’ (KB2919355) for Server 2012R2 and 8.1. It is probably best to use these updated images where possible because there have been issues installing this very large update as a stand-alone patch. Also note that Microsoft has begun periodic updates to the online images of their current product versions. The current 2012R2 image is now over 5GB and includes updates thru Nov 2014.


Since the Poodle vulnerability resulted in SSL v3 to be disabled in web browsers, it broke connectivity to APC devices configured to use SSL. [more]

Using Firefox, you can type in about:config in the web path to enter an advanced configuration mode. The default value of security.tls.version.fallback-limit and security.tls.version.min is “1”. Setting this to “0” will allow you to be able to connect again, but be careful about having SSL connectivity enabled.


I recently migrated a pair of ATMs from behind a Microsoft Threat Management Gateway to a Cisco ASA.  During this cutover, the change was done very quickly so the VPN traffic for the ATMs was not interrupted. [more]

A few weeks later the ATMs started having problems when the Internet connection was disrupted. The VPN tunnels were connected, but the ATM provider was receiving reset packets from the ATMs. I discovered the ATMs were communicating with the ATM provider using TCP port 2000.

Normally TCP 2000 is used by the Cisco Skinny Client Control Protocol (SCCP) and traffic inspection for SCCP is enabled on the ASA by default.  The packet resets stopped after removing SCCP inspection from the global policy list.

To disable SCCP inspection on the ASA:

CiscoASA# conf t

CiscoASA(config)# policy-map global_policy

CiscoASA(config-pmap)# class inspection_default 

CiscoASA(config-pmap-c)# no inspect skinny