Blog: Windows 7

Upon receiving my new Lenovo ThinkPad laptop, I set up fingerprint authorization through the Lenovo software.  After ensuring all my fingerprints were scanned properly, I rebooted the machine.   I tried to the use my fingerprint to login and the light flashed green.  Unfortunately, the machine wouldn’t proceed any farther in the process.

It appears you have to go into Windows 7 itself and enable ‘Domain Login’ under the Windows Biometric section in order to actually allow domain authorization.  Otherwise, the software will just let you access local accounts.


We ran into a problem recently where users on a Windows 2008 R2 terminal server would lose their connection to SMB shares.  Fully-qualified domain names do not get disconnected.

There is a Hotfix from available from Microsoft that fixes this problem:  http://support.microsoft.com/kb/2194664.  The Hotfix is integrated into into Windows 2008 R2 SP1 and the next Windows 7 service pack.


I had to recreate a terminal server user’s profile recently and they asked me if I could put the “show desktop” shortcut next to their start button.  Usually the icon is there by default as long as the quick launch toolbar is showing.  It was turned on, but the icon wasn’t there. 

I searched for a way to put it back in the quick launch, but I couldn’t come up with anything quick.  I found that you can recreate the icon yourself using notepad.

Open notepad and type the following: [more]

[Shell]
Command=2
IconFile=explorer.exe,3
[Taskbar]
Command=ToggleDesktop

Save the file as Show Desktop.scf to a location such as their documents folder.  Drag the file down to the quick launch toolbar, and it works.


To re-execute a recently typed command, retype the first few letters of the command and press F8. The command will expand to the latest command in the history that matches those letters. Press F8 again to keep going back in time. Note that the matching is case sensitive.

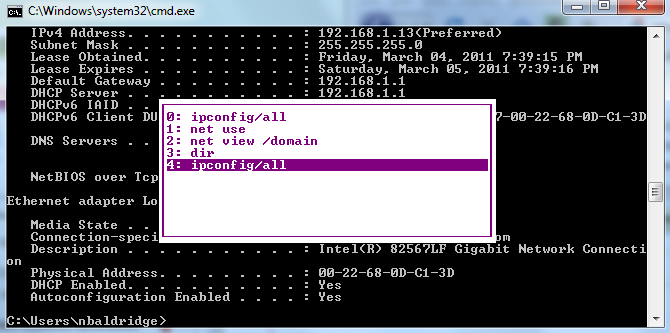
If you want to see a list of commands previously typed, just press F7 in the command window to get a menu of selectable commands. [more]


I was having some problems with my laptop's Bluetooth radio turning itself off when I reboot without powering off. I found an online posting indicating resetting the BIOS to defaults would fix the problem. I went into the BIOS setup and reset it then rebooted. However, that changed the system enough to make Bitlocker to ask for the recovery key. I put in the recovery key then suspended Bitlocker on the C drive after Windows came up (as the Bitlocker message instructed). I then resumed Bitlocker and it seemed to work after another reboot. [more]

However, when I rebooted the laptop at home later that day, Bitlocker asked for the recovery key again. I found another Microsoft support entry that indicated the problem might be that the boot order was changed. That made sense because my configuration at home involved an external USB device that wasn't connected at the office.

I suspended Bitlocker then rebooted and went into the BIOS setup and made sure the first (and only in this case) boot device listed was my C drive.

After rebooting, I resumed Bitlocker protection and haven't had a problem since.


When out of town on an audit there are times when I need to shutdown my laptop (rather than just letting it go to sleep) but I don't want to take the time or chance any problems when installing Windows updates. For example, I needed to get to a bank for a meeting and installing updates first thing in the morning wasn't what I need to happen (especially when one was Windows 7 Service Pack 1 which would take a long time to install).

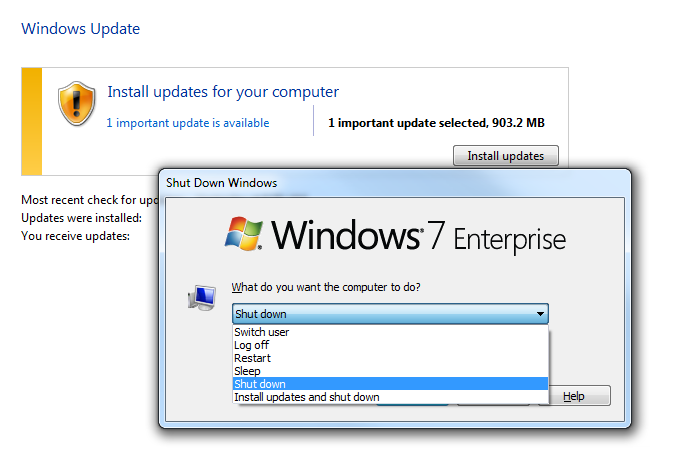
The problem is when I use the Start button to select shutdown, the only option I have is install updates first then shutdown. A co-worker showed me there is a plain shutdown option available if you use Alt-F4 - easiest if all windows are minimized. That's a good one to know! [more]


When installing or making changes to the Symantec Endpoint Protection client, be aware that the SEP firewall policy can cause Windows Firewall to 'reset' or change its configuration.  I've seen several versions of Windows OS change to an active firewall config with no exceptions under the following 2 conditions: [more]

  • SEP client with an enabled, default firewall policy is installed for the first time
  • Existing SEP client has its applied firewall policy withdrawn

This has been seen with several 11.0.6x builds of SEP, although it may be applicable to other builds as well.  This occurs even though the SEP firewall module (Network Threat Protection) is not installed.  When a Windows desktop has its firewall enabled with no exceptions and there is no group-policy in place to re-apply a previous config, it may become unreachable remotely via any protocol, while at the same time the user may notice no change and continue working normally.  If the Windows client happens to be a server, all connectivity to that server may be lost, except via console.

I suggest rolling out new SEP clients after the firewall policy in that group has already been withdrawn.  For existing clients where the firewall policy needs to be withdrawn or disabled (ie overriding Win7 firewall config), test a small subset of clients in a separate group before making the change to normal production groups.


I recently ran into a problem with Windows 7 UAC where we had a VBS file that was calling the application SETACL.  In order for SETACL to run properly, it must be “Run as Administrator”.  I could set the option in SETACL to “Run as Administrator” in the applications properties, but when the script called the application, UAC would not prompt the user to elevate privileges.

I wanted to see about right clicking the VBS file to select the “Run as Administrator” option, but Windows does not include that option in the context menu by default.

In order to add the option, you can add it to the registry.  Copy the following into a .reg file and then merge the file into the registry: [more]

[HKEY_LOCAL_MACHINE\SOFTWARE\Classes\VBSFile\Shell\runas\Command]
@=hex(2):22,00,25,00,53,00,79,00,73,00,74,00,65,00,6d,00,52,00,6f,00,6f,00,74,\
  00,25,00,5c,00,53,00,79,00,73,00,74,00,65,00,6d,00,33,00,32,00,5c,00,57,00,\
  53,00,63,00,72,00,69,00,70,00,74,00,2e,00,65,00,78,00,65,00,22,00,20,00,22,\
  00,25,00,31,00,22,00,20,00,25,00,2a,00,00,00

After merging the key, I was able to select “Run as Administrator” when right clicking the VBS file and the call to SETACL also ran correctly. It's a good idea bo backup your registry before making manual changes.


While configuring a new Windows 7 laptop I attempted to setup a new VPN connection.  It kept defaulting to a dial-up connection. I verified the steps I was taking on my own Windows 7 laptop and then repeated it again, but it had the same results. I tried copying the VPN connection to the system and it still would try to use dial up. I tried setting up the VPN using the local administrator account, domain administrator account, and domain user account only to find the same results each time.  I even disabled and uninstalled the modem and it still default to dial up.

After some research, I opened the device manager, enabled the “Show hidden devices” option, and under “Non-Plug and Play Drivers” I found NDProxy with a yellow exclamation mark. [more]

NDProxy, according to Microsoft is "a system-provided driver that interfaces NDISWAN and CoNDIS WAN drivers (WAN miniport drivers, call managers, and miniport call managers) to the TAPI services" - see http://msdn.microsoft.com/en-us/library/ff568322.aspx for more details.  NDProxy has been linked to slow boot, BSOD and other issues in Vista.

To fix the problem right click on NDProxy and select properties, go to the second tab (Driver) and look at the “Current Status” section, it says it is “Stopped”. Choose the option to start it then reboot. (Do not change the startup type) After the reboot NDProxy will no longer have an exclamation icon (i.e. it started OK) and it shows “Started” in the “Current Status”.


At some point my system icons disappeared from my system tray (the little tray at the left edge of the Windows task bar).  Here is what I wanted it to look like:

I found may posts and complaints about this problem spanning XP, Vista and now Windows 7.  Most said, try this fix (a variety of suggestions)…it may or may not work.  Most folks said they could restart their systems and the icons would come back.  However, restarting did not work for me.  And besides, restarting a system is a disruptive and time consuming process.  I wanted and needed a better solution. [more]
 
At this point I have restored my icons and they have remained visible for 3 or 4 days.  In those days, there have been a couple of restarts and a shut down – I hope they are fixed.
 
I actually did a couple of things, reconfigured local group policies and also made a couple of registry changes.  It appears that it took both fixes together to restore my icons.
 
To change local group policies, enter gpedit.msc in "Run" or as a command line entry.  You will see the local group policy window:

Notice, in the screen shot above, you navigate down to "User Configurations," "Administrative Templates," and "Start Menu and Taskbar."  There the "Remove Clock…," "Remove network icon," "Remove batter meter (my icons are for a laptop with a battery)," and "Remove volume…," were all listed as Not configured.  According to the information I found I changed all the settings to "Disabled."
 
I also changed two Registry entries.  [All the normal warnings apply about being careful as you click around in the registry.  Any false moves while in the Registry can really mess things up.]  Having said that, use Regedit (entered in "Run") to be able to edit the Registry as follows.
 
Locate and click the following registry subkey:

  • In the Details pane, click the IconStreams registry entry.
  • On the Edit menu, click Delete, and then click Yes.
  • In the Details pane, click the PastIconsStream registry entry.
  • On the Edit menu, click Delete, and then click Yes.
  • Exit Registry Editor.

Restart the Explorer.exe process. To do these, follow these steps:

  • Press CTRL+SHIFT+ESC.
  • On the Processes tab in Task Manager, click the explorer.exe process, and then click End Process two times.
  • On the File menu, click New Tasks (Run), type explorer, and then click OK.
  • Exit Task Manager.

Then if you are using Windows 7 you need to be sure the icons settings are set to ON.  So follow these additional steps:

  • Open the Control Panel "Taskbar and Start Menu."
  • Under the Taskbar tab, in the Notification area section click on the "Customize" button.
  • In the Notification Area window notice the link "Turn system icons on or off." Click on the link and make sure the icons your prefer are turned ON.

Hopefully my icons will stay visible and this will be helpful for any others who have some system icons which disappear.