Blog: Windows 7

One of our customers was having problems connecting Outlook to exchange accounts hosted with Microsoft through their Office365 program. The machines in the domain running Windows XP with Office 2007 had no problem connecting, but none of the Windows 7 machines with Office 2010 were able to connect. Since the email accounts were hosted at Microsoft, Outlook was using port 80 web traffic to establish a connection. After exempting the source IP of the test machine from filtering in the Barracuda, the connection immediately worked. This proved that something was not working correctly inside the Barracuda.

The domain outlook.com was whitelisted prior to these changes. After talking to Barracuda tech support, they found several IP addresses that Outlook was trying to contact. They suggested adding those IP addresses to the list of IP addresses that bypass the Barracuda, which is the proxy server, and opening port 80 for those IP addresses on the firewall. We made the suggested changes and it worked correctly. The Barracuda engineering department found that the traffic to outlook.com was being redirected to live.com, and therefore being dropped by the Barracuda. Barracuda suggested we add an expression to the Barracuda to allow port 443 traffic to live.com, but they later said we would probably have to whitelist live.com for this to work properly. We chose to just leave port 80 open to those IP address on the firewall and have clients bypass the proxy for those addresses.
 
When troubleshooting issues that might be related to the Barracuda, it is often helpful to temporarily exempt the source IP of the machine on which you are working. When the Barracuda is in Forward Proxy mode, this can be done by going to Advanced > Proxy. Add the IP to the Source IP group under the Proxy Authentication Exemptions.


 

I had been trying to record some audio of about 4 minutes in length or so with Windows 7.  After about a minute in, the sound would become muffled and degraded quality.  I tried adjusting microphone level balance and boost levels to no avail.
 
After a while looking through the recording options, I later looked at the Communications tab of the sound options.  It was set to “Reduce the volume of other sounds by 80%” when Windows detects communications activity.  I changed it to “Do Nothing” and tried again to find that it did not suffer from any sound degradation.  I also noted that the degradation was in the actual recording itself and not just during playback. [more]


A while back we blogged about how you should disable the disk defragmentation scheduled task in Windows 7 if you are using solid state drives (SSD).  I would also like to recommend that Superfetch and Prefetch be disabled.  This is done by changing EnableSuperfetch and EnablePrefetcher from 3 to 0 in the registry under HKEY_LOCAL_MACHINE\SYSTEM\CurrentControlSet\Control\Session Manager\Memory Management\PrefetchParameters.  The Superfetch service should be disabled.

Briefly (and probably a little incorrectly), Prefetch copies frequently accessed files together into a contiguous area on the disk so they can be located and loaded faster.  There is no need to be copying these around – access times are basically the same regardless of where the file is.

Superfetch learns what programs you run when Windows first comes up and gets them loaded into memory before you run them.  In my opinion, the overhead in using this feature outweighs the performance gain, since loading times are so fast with an SSD.  And besides – it’s my own private business what programs I am going to run.

I have read second or third hand that Windows 7 will automatically detect an SSD and disabled these, but depending on the history of your Windows 7 installation, or if it’s a virtual machine, then this might not have happened.  I have also read that if you run the performance troubleshooter, it will may set these values back. [more]

If you want to understand more about Windows 7 and SSDs:

https://blogs.msdn.com/b/e7/archive/2009/05/05/support-and-q-a-for-solid-state-drives-and.aspx


I was recently trying to factory reset a Cisco Express 500 switch for use at a customer site.  I researched Cisco’s website and other websites, but nothing I tried would work.  The basic steps are these:

  1. Hold down the mode button while applying power to the switch.
  2. After the mode lights turn amber, let go and the switch will reset to defaults.
  3. After a short time a port (usually port 1) light will start blinking.  Plug your workstation/laptop into that port.  Your workstation/laptop should then acquire a DHCP address from the switch.
  4. You should then be able to access the web GUI using the default IP address.

Unfortunately, none of the online documentation I read mentioned the fact that this only worked when Windows XP was the operating system.  Windows Vista or Windows 7 will not work.  I did not find this out until after the fact when another engineer, who had also struggled with this issue, informed me that this was the case. 


Recently, a large audit required the use of a spare laptop to help with the scanning. We decided to use a quad-core laptop because CPU utilization is one of the bottlenecks for our LanGuard scans. While prepping the laptop, I wanted to make sure the quad cores were being utilized, but instead found out that two of the cores were “parked” and sitting idle. It turns out this is a feature built into Windows in order to conserve power and extend battery life. Windows can dynamically park CPUs when the system load is light and bring them back on line when the system load increases. If you have a quad-core processor, you can test this by opening Resource Monitor (open Task Manager, go to the Performance tab, click on the Resource Monitor button), clicking on the CPU tab, and looking at the individual cores on right hand side of the screen. If you don’t have anything running, you should see one or two cores go into a “parked” state and be greyed out. As you open applications, they will be reactivated. The feature also works with dual-core CPUs, but the system load doesn’t have to be as high to bring both cores online. [more]
 
During the audit we were preparing for, performance was much more of a concern than battery life, so I wanted all four cores to be active all the time. To accomplish this, you have to edit the registry using the following steps:

  • Open regedit and search for  0cc5b647-c1df-4637-891a-dec35c318583
  • Everywhere you find that key (there will likely be more than one instance), change the ValueMin and ValueMax keys to ‘0’
  • Reboot the system


I had a recurring issue months ago with Acronis causing my laptop to shut down during some backups (an occasional backup would succeed).  The shut downs were not blue screen crashes but rather, an abrupt shut down, with no warning, as if the power button were pressed and held down.

In the past 10 months or so, I’ve received a new laptop, and rebuilt it (to move to Windows 7 Enterprise and BitLocker), so I don’t remember if uninstalling/reinstalling Acronis, installing a new build of Acronis or one of the other changes to my laptop made the issue go away…temporarily.  Unfortunately, the issue apparently returned a few weeks ago.  I recently discovered by scheduled backups to an external hard drive had not been working for a couple of weeks.

A coworker suggested I use Windows 7 native Backup and Restore and, so far, it appears to be working well.  While not offering the granular backup configuration options Acronis offers, it allows for system image backups in addition to standard backups which provide for easy restoration of individual folders and files.  That, and, it doesn’t shut down my laptop.  :D


I recently needed to recover a long forgotten WPA encryption key from a friends Windows XP laptop.  Unfortunately the wireless router password and the ISP credentials were MIA also, so changing the key or resetting the router were not options.  After some searching I found WirelessKeyView from Nirsoft (http://nirsoft.net/utils/wireless_key.html).  This is a simple EXE download that displays the WEP or WPA key for all networks on the laptop.  For Windows XP it can only get the 64 digit hex key because XP doesn't save it in clear text.  However this will work fine when joining the network.  On Windows Vista and Windows 7 it will retrieve the key in ASCII.


I had been working with a customer to move all their file shares to a new server and implement Distributed File System (DFS). All looked to be working as it should, except one user’s My Documents was still pointing to the old file share. It was also taking approximately 7-8 minutes to login. I ran the Group Policy Results wizard against the terminal server she was accessing and her user account. I verified that group policy was applying to her account but it was failing to apply folder redirection. I made sure no other users were having the same issue. [more]

I started reviewing the Group policy events and found the error causing the problem redirecting her userdocs. I opened the path that was shown in the error message and found a Word document named  "A Hot Site is defined as a fully operational offsite data processing facility equipped with both hardware and system software to be used in the event of a disaster or for disaster rec.doc".  I was able to copy the file to another location and remove it from the path. I then attempt to connect as the user, the login process completed quickly and the My Documents redirection was working as should. I renamed the file and placed it back in the users My Documents.


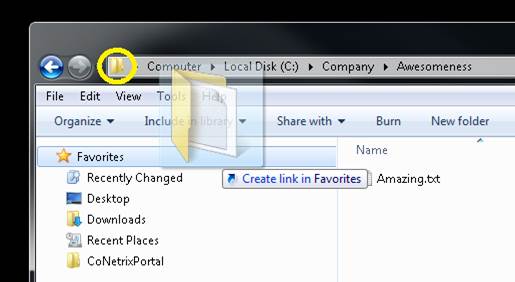
I wanted to add a Favorite to my Windows 7 Explorer.  I didn’t see an obvious way to do it.  I expected to find an “Add to Favorites” or “Send to Favorites” menu option, but they are not available.  Then by accident I found a simple drag and drop method.

  • Navigate to the folder you want to add to the Favorites and then click and drag the icon in the Address bar down to the Favorites heading. If you release the icon in the Favorites listing, a new shortcut will be created.
  • To delete a Favorite, right click on the shortcut and then select [Remove] from the popup menu.

Here is a screen shot demonstrating this: [more]


I recently had a task to help a user save their BitLocker Recovery key to a flash drive, but the option to save to a flash drive was greyed out.  I tried logging on as the local administrator and several other things, but nothing worked.  Eventually, I used the “manage-bde –status” command to see what kind of protectors were on the drive.  Then, I added my own protector by using the “manage-bde –protectors –add C: -recoverykey z:”, where C: is the BitLocker system drive and Z: is the drive the USB is in.  Don’t forget: the recovery key will be saved to the USB as a hidden file.