Blog: VMware

We are continuing to work through issues with a new VMware View v4 deployment and we had another weird problem come up the other day. I had created a new linked clone desktop pool and View Manager had completed the automatic deployment of several desktops. However, when we would try to connect to the newly created desktops with the View client via PCoIP, we would get a very small (400x600) resolution window as the display instead of the full screen that we had requested. When we requested that PCoIP use multi-monitor display, this small display window would show up in the middle spanned across both monitors in the same small window. Right off I remembered one of a coworker's former gotchas about adjusting the resolution via the .vmx file and that seemed to fix it…however, it kept happening every time a new VM was created by the linked clone pool. I finally found after a VM is created, it must be restarted via the View Manager using the VM reset feature in order for the display settings in the VM to display correctly in PCoIP. Here is another article regarding this issue -> http://www.thatsmyview.net/2009/12/18/how-to-get-pcoip-with-view-4-to-work-every-time/


I’ve never been a fan of (nor seen much reason in) splitting VMDKs into 2GB chunks… though that is often the default setting when creating a virtual machine. However, the other day I found a pretty good reason. When you split your VMDK, VMware creates a single VDisk.VMDK meta file, and several VDisk-s001.VMDK files (which actually contain the data). The meta file is a pretty simple text file with contents that look something like this: [more]

# Disk DescriptorFile
version=1
encoding="windows-1252"
CID=9fb33447
parentCID=ffffffff
isNativeSnapshot="no"
createType="twoGbMaxExtentSparse"

# Extent description
RW 4192256 SPARSE "vdisk-s001.vmdk"
RW 4192256 SPARSE "vdisk-s002.vmdk"
RW 4192256 SPARSE "vdisk-s003.vmdk"
RW 4192256 SPARSE "vdisk-s004.vmdk"
RW 4192256 SPARSE "vdisk-s005.vmdk"
RW 4192256 SPARSE "vdisk-s006.vmdk"
RW 4192256 SPARSE "vdisk-s007.vmdk"
RW 4192256 SPARSE "vdisk-s008.vmdk"
RW 4192256 SPARSE "vdisk-s009.vmdk"
RW 4192256 SPARSE "vdisk-s010.vmdk"
RW 4192256 SPARSE "vdisk-s011.vmdk"
RW 4192256 SPARSE "vdisk-s012.vmdk"
RW 2121728 SPARSE "vdisk-s013.vmdk"

# The Disk Data Base
#DDB

ddb.deletable = "true"
ddb.virtualHWVersion = "7"
ddb.toolsVersion = "8259"
ddb.longContentID = "0bdf39e8f7c80d6f09a431949fb33447"
ddb.uuid = "60 00 C2 9e da ee dc 72-7f ba f5 58 c8 a7 75 58"
ddb.geometry.cylinders = "3263"
ddb.geometry.heads = "255"
ddb.geometry.sectors = "63"
ddb.adapterType = "lsilogic"

The nice thing about this is you can edit the paths to the SPARSE files. This can allow you to put the SPARSE files in a “template” directory for VM clones (preferably read only), then just edit the meta file to point to your template directory. Whenever you want to create a clone, just copy the meta file VMDK to the new VM directory, edit the paths (can be relative or full), and then snapshot your new clone (to make sure it doesn’t change the template files… which would break all your linked clones!).


Here's how you can convert from a VMWare virtual machine to a VPC (Microsoft) virtual machine:

  1. Microsoft’s System Center Virtual Machine Manager will perform V2V conversions.  It converts to Virtual Server 2005 and Hyper-V.
  2. The other way is as follows: [more]
    1. Back up/clone the virtual machine.
    2. Remove VMWare tools from the virtual machine.  (VMWare tools are incompatible with VPCs.)
    3. Run sysprep on the virtual machine.  (This removes hardware-specific information.  Supposedly, the newer Windows OS’s are hardware-independent, and do not require this step, but I could not find an references to people who did it successfully without running Sysprep.)
    4. Copy the virtual disks (VMDKs).
    5. Convert the VMDKs to VHD files.  There are a number of tools which claim to be able to do this.  The one I found that actually completed the process is the StarWind converter.
    6. Create a new VPC and use the VHD files.

 On another note, the Windows 7 virtual PC requires a certain level of processor.


Here is a case where I wish I would have read the instructions better. I attempted to install the VMware view connection broker on a Windows 2008 R2 machine. I had read enough of the release notes to find out that the 2008 AD was supported… so I thought that meant that a 2008 version of Windows was an acceptable o/s to install the connection broker. However, if I had read the full instructions, I would have found out that the only o/s supported were 2003 based operating systems.


I have been working on a proof of concept install of VMware View v4 at a customer location. One of the challenges that we ran up against was trying to get the USB redirection to work with HP USB printers. Technically, all that is necessary is to have the printer plugged in USB and have a driver loaded on the virtual machine that you are connecting to using the VMware View client. However, in practice what we found...

HP printers are usually installed using a DOT4 USB port driver. DOT4 port types have been around a while and basically provide a bi-direction information flow between multiple devices on a single physical channel. Its most commonly seen for devices that support multiple functionality like scanning and printing, but can be used for any USB connected printer. There is an option to NOT use the DOT4 port types and in our situation it was essential because….well, the VMware View USB redirection just simply didn’t work with the DOT4 ports. The problem is that once the printer was installed it was IMPOSSIBLE to change the port type from DOT4 to USB…the printer would stop working. After about 2 days of struggling with this and not being able to remove the DOT4 port type, I finally found that the port type could be altered after the printer was installed. Heres how: [more]

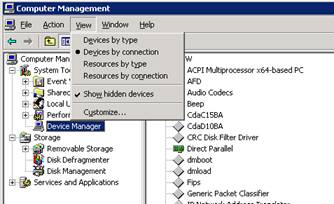
  1. Open device manager on the PC and change the view to by connection and show hidden devices
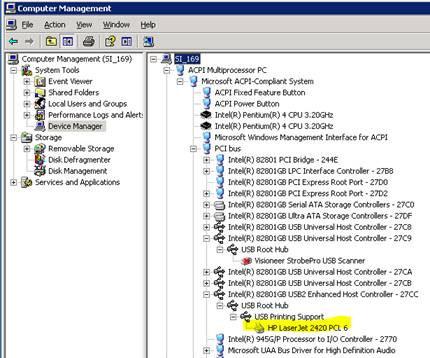
  2. Search through the USB host controllers and USB Root Hubs until you find the hub with the printer installed…It will look like the following:
  3. Next, right-click on the USB Printing Support and select properties.
  4. Select the drivers tab and select upgrade driver
  5. Choose to “Install from a specific location” and then choose “Don’t search. I will choose the driver”
  6. Then you will be give the option to choose the driver used for the USB printer support. Choose USB Printer support.
  7. Click Next and it will install new drivers and change the port type of the printer from DOT4 to USB

It is yet to be tested if this USB printer support method works with multifunction printers, but the change worked on every LaserJet USB printer that we set up. Obviously, if you have a choice, just set up all the printers as network printers and avoid the problem altogether.


I had an issue come up with using GUID partition table disks in Windows 2008 VMs. The issue involves doing a file-level restore from image-based backups made using 3rd party VMware backup utilities such as Veeam Backup, Vizioncore vRanger, or esXpress. In Windows 2008, the disk containing the system partition is always MBR, but disks with non-system partitions I had been using GPT. I found specifically with Veeam, file level restore functionality does not work because when the vmdk is mounted to the recovery host during the process, the partition table cannot be read. The partitions on the system disk show up fine, but all partitions on GPT disks are not available. A VERY close look at the Veeam documentation shows that GPT disks are not supported, only MBR disks. So, if one of these products will be used for backup, it would be best just to go with the MBR disks.


We have a VMWare ESXi 4 infrastructure that we wanted to have VM’s with two separated networks: DMZ and Internal. This was accomplished by using the VLAN tags within the virtual switches to separate the traffic. However, when the VLAN tags were implemented on the separate switches, then we could no longer access the host itself at it’s ip address. The reason was that we did not assign a VLAN ID to the host itself. This can be done at the configuration option of the ESXi console (F2). Alternatively, one could have a completely isolated NIC card that is just for servicing the host machine that is independent of the NIC card(s) for the embedded VM’s.


I installed a 64bit version of Windows 7 as a virtual machine and when trying to startup, it would hang in a loop of start and restart.  Amongst the loops as the vmware machine would cycle, an error would appear and disappear.  After watching closely I could read enough to see it referred to a bios setting.  That led me to the fix below.

I found out “Virtualization Technology” (VT) must be enabled in the bios settings of my laptop.  VT is an option for Intel CPUs.  This is a requirement VMware implemented for running 64bit virtual machines.  VT is not required for running 32bit virtual machines.

To enable VT, access the Bios Setup Utility on the computer which will host the virtual machine.  Typically, to get to the Bios Setup Utility you press the F1 key when you see the manufactures start up screen when starting or restarting the machine.  When the Bios Setup Utility starts, you will enter Config > CPU.  There you will see the option to Enable VT. [more]

Also, it is documented you must power down the host machine again after enabling VT.  Enabling VT, saving the configuration and continuing with the start up will not enable VT.  It takes and additional cold boot to enable VT.

After the second start, I launched the VMware workstation and powered on the Windows 7 without a problem.


I created a virtual machine with an “independent persistent” disk.  This prevents VMware from being able to take snapshots.  Since the method for backing up an entire virtual machine on a stand-alone ESXi server is to take a snapshot and then copy the snapshot to a network location, this prevented me from being able to back up the server.  (I could only back up the virtual machine if I shut it down.)

I was able to correct the configuration by powering off the virtual machine and editing the virtual machine settings.


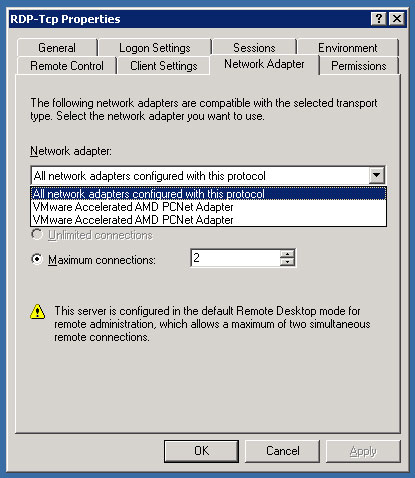
Working on an ISA server the other day I had to change the LAN IP addresses.  I was RDP’d into the server from the internal network when I made the change and applied it.  I waited a few seconds and tried to reconnect to the server (by name).  DNS has updated properly with the correct IP address, and I could ping the address, but I couldn’t RDP back to the server.  The server was virtual, so I used VI to connect to the server console.  I didn’t see any issues, but rebooted the server to be sure.  When the server came up, I still couldn’t RDP.  I checked the Terminal Services service and it was not running.  I tried to start it, but it failed.  I checked the event log and it mentioned something about the service binding.  I ran the Terminal Services Configuration console, checked the Properties of the RDP-Tcp object.  On the Network Adapter tab, the “All network adapters configured with this protocol” was selected (which is the default, but wasn’t working).  I manually selected the LAN NIC and hit Apply, and RDP started working again. [more]