Blog: Networking

Recently I wanted to test a dual factor authentication solution on my Windows VM, so I took a snapshot to revert to later if needed. After testing for several days I reverted to the snapshot, but started getting an error about an expired computer account password. Apparently the machine password expired and automatically renewed while testing, so this was lost when I reverted to the old snapshot.

Rather than disconnect and rejoin the computer from the domain, I found a Powershell command to reset the machine password. Details about this command are at:

https://msdn.microsoft.com/en-us/powershell/reference/5.1/microsoft.powershell.management/reset-computermachinepassword


I came across an issue where two ESX servers that had been running for approximately 8-9 months without a reboot suddenly showed offline status in VCenter.  Looking at the events in vCenter, it showed that the ramdisk 'TMP' was full  and could not write to file /tmp/.SapInfoSysSwap.lock.LOCK.#####.


I got consoled into the ESX hosts and saw that there was a log file that had consumed most of the space at /tmp/mili2d.log.  From what I read, this file would have been removed upon rebooting the ESX Host, but that was not something I wanted to have to do if I could help it.


I reviewed the log file and determined there to be nothing of significance inside, but it had been filling up for months until reaching the limit on both hosts.  I thought I would just remove the file and reclaim the storage space, but that didn't reclaim the space. 


You can check the space allocation with command "vdf -h".  Here you can see the space left on the RAM Disk.


In order to get the ESX host to rescan the RAM Disk, restart the management services with "services.sh restart".  After I did this, the space allocation showed available, and the ESX hosts showed online again within vCenter without having to reboot the servers.


I recently built new Exchange 2016 servers for a customer and needed to move all of the users' mailboxes to the new servers. When I initially issued the moved requests, the migrations were running about 10Mbps and only moving about 5 mailboxes at a time. There were about 700 users and 1.5TB of email, so obviously this was going to take a very long time I began researching how to increase the speed of mailbox migrations and found several settings that could be changed. Disabling content indexing allowed the migration to occur between 150Mbps and 200Mbps.

  • Disable content indexing on the target database
    • Set-MailboxDatabase "DatabaseName" -IndexEnabled:$False
      • Wait a few minutes for the content index to be disabled.
      • Verify content indexing is disabled by running Get-MailboxDatabaseCopyStatus
    • After mailboxes are migrated, the content index will need to be rebuilt
      • Set-MailboxDatabase "DatabaseName" -IndexEnabled:$True
      • Invoke-Command -ComputerName GES-EXCH1 {Stop-Service MSExchangeFastSearch; Stop-Service HostControllerService}
      • Delete old content index file from mailbox database folder
      • Invoke-Command -ComputerName GES-EXCH1 {Start-Service MSExchangeFastSearch; Start-Service HostControllerService}
      • Verify content indexing is enabled by running Get-MailboxDatabaseCopyStatus
        • Mail will need to be reindexed, so the status will be Crawling
  • Change the number of mailboxes that can be migrated at one time
    • Edit C:\Program Files\Microsoft\Exchange Server\V15\Bin\MsExchangeMailboxReplication.exe.config
    • Set the MaxActiveMovesPerSource and Target, and MaxActiveJobsPerSource and Target to desired values
    • Restart the Microsoft Exchange Mailbox Migration service
  • Create a new throttling policy

Resource: BitTitan Article - How do I disable the throttling policy on Exchange?


I was updating ESX with a customer a few weeks ago and ran into issues. We successfully upgraded from ESXi 5.1 to 5.5 Update3 using the custom Dell ISO. We then attempted to update to the latest version of ESXi 5.5, but the host purple screened upon reboot. We decided to call VMware support to create a trouble ticket. The VMware engineer provided a simple solution for our issue, which was to press Shift+r when the Hypervisor progress bar starts loading. This takes you to a menu where you can select the previous build. The VMware article can be found here: https://kb.vmware.com/selfservice/microsites/search.do?language=en_US&cmd=displayKC&externalId=1033604. We followed these instructions and were able to successfully boot the ESX host again.


I believe what caused the purple screen was that vSphere Update Manager tried to install HP updates on Dell hardware. It turns out that vSphere Update Manager does not detect what updates are actually needed, just what isn’t installed. The fix for this is to create different baselines for each brand of hardware in mixed hardware environments.


HP has a handy new “feature” on some of their newer model home and office printers that allows you to print wirelessly when a wireless network is not available. The printer does this by broadcasting its own SSID with a name something like “DIRECT-B7-HP ENVY 4520 Series”. This seems like a harmless (and pointless) feature, but it can wreak havoc on your wireless network.


The issue with this feature is that the printer appears to only have one wireless radio, which is likely already connected to your wireless network using the channel your wireless access point or router is broadcasting. The printer then starts broadcasting a second SSID (the one mentioned above) on the same channel are your wireless network, essentially causing interference. This occurred at my house and at a customer site recently. My first thought at my house was to change the channels my router was broadcasting. After about 30 seconds, the printer switch to the same channel. You can set a static channel on the printer, but then you are unable to connect to your printer over the wireless network because it is listening on a different channel than you wireless network is broadcasting.


The solution is quite simple, all you need to do it disable Wi-Fi Direct Printing. AirPrint and wireless printing will continue to work with this feature disabled. To disable Wi-Fi Direct Printing do the following:

  1. Open a browser and enter the URL IP of the printer
  2. On the Network tab, Click Edit Settings
  3. Under Wi-Fi Direct, change the status to Off then click Apply

Details on HP Wi-Fi Direct Printing can be found here: http://www8.hp.com/us/en/ads/mobility/wireless-direct-printing.html


We were having issues with screensaver security locking not working on Windows 8 clients.  At first we kept zeroing in on the GPOs being applied to the PCs.  After further evaluation and verification that the settings were configured in the registry from the GPOs appropriately, we began to look at application interference.

Turning off Citrix Receiver client software allowed the screensaver to come on as it normally would during idle period.  It was discovered that the application refresh interval had been set to 15 minutes (default is 1 hour), the same amount of time as the screensaver settings.

Manipulating the registry keys below and testing a 1 hour value allowed the idle timer to function correctly and initiate the screensaver.  We believe that the application refresh was causing the idle time to reset itself. 

" RefreshMs " controls the interval for subsequent refreshes. By default the value is 1hr (3600000 ms ).

64-bit Windows Location: HKLM\Software\Wow6432Node\Citrix\Dazzle
Name: RefreshMs
Type: REG_SZ
Value: 3600000

32-bit Windows Location: HKLM\Software\Citrix\Dazzle
Name: RefreshMs
Type: REG_SZ
Value: 3600000 


If Outlook says "This file cannot be previewed because there is no previewer installed for it" when you are trying to preview an attachment, this means that file type has no default program associated with it.  Try saving the attachment and then choose Open With... to associate a program.  After that, Outlook will use that program to preview attachment of that file type.


This demonstrates that previewing attachments is the same as opening them, so caution is advised.


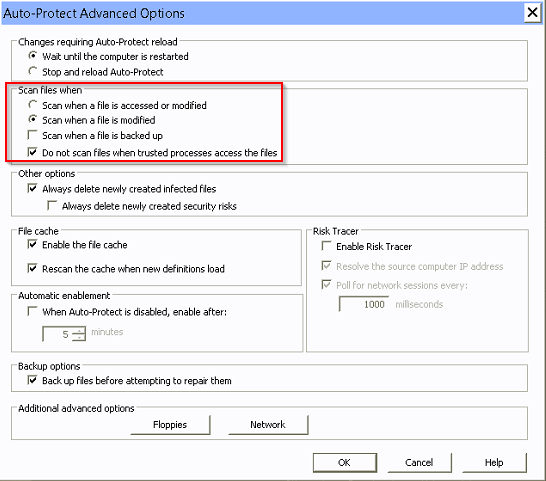
We had a customer who was experiencing slowness on their terminal servers and the slowness was keeping some reports in their core banking application from running.  We found that when we excluded the entire C: drive of the terminal server from all Symantec Endpoint Protection scans, the errors would not occur. Through trial and error, we tracked down the setting in SEP that was causing the performance problems. We changed the “Scan files when” setting from “Scan when a file is access or modified” to “Scan when a file is modified”. This solved the performance issues and reports in their core banking application are running properly now.


The Cisco-Linksys SRWxxxx series of switches have a simple web interface for management purposes. The interface lacks the ability to see the MAC address table. You can SSH or telnet to the switch, but the menu you get is no better. However there is a hidden CLI (called the lcli, I assume that stands for Linksys CLI) you can access that will allow you additional management capabilities. Once you are logged into an SSH or telnet session and are at the menu, do the following:


Type Ctrl+Z

Hit Enter once

Type in your username and hit Enter


It will not prompt for the password but it will give you a <hostname># prompt. From here, you can type ? see the available commands. To see the MAC-address table, type show bridge address-table.


Windows 10 ships with the OneNote app. If you also have OneNote 2016 installed on your computer, you will end up having two OneNote applications installed. The Windows 10 OneNote app is quite often set as the default version, so when attempting to follow a link from someone else, the Windows 10 OneNote app opens and asks you to log in. People who are familiar with OneNote 2016 are completely lost and stuck at this point.


To change the default version to OneNote 2016, go to your Start Menu, then choose Settings. Select System, choose ‘Default apps’ and then scroll to the bottom of the list to find ‘Set defaults by app’ entry. Click on this link and in the list under ‘Set your default programs’, find the OneNote (desktop) version, and select ‘Set this program as default’. Click OK to save your changes.