Blog: Networking

Windows 7 by default installs the Universal Print Driver for HP device and uses the native Windows scanning options. Which is not as robust as the previous versions that came with the All-In-One systems. The user was complaining that the scanning was not usable and needed the same functionality that was there before Windows 7. This method will allow you to install the same software options previously available on Windows XP and Vista. After installation of the software on a Windows 7 PC in Compatibility Mode the following software components are installed:

  • Print Driver
  • Send Fax
  • Uninstall Utility
  • User Guide
  • Twain and WIA Scan Drivers
To run the Windows Vista software on a Windows 7 PC in Compatibility Mode follow the steps below:
  1. Copy the entire product CD for Windows Vista 32 bit to the hard drive of the Windows 7 PC.
  2. The Windows Vista Full Software Solution on hp.com can also be used. Download the Full Software Solution for your product for Windows Vista from hp.com. Unzip/extract to the hard drive of the Windows 7 PC.

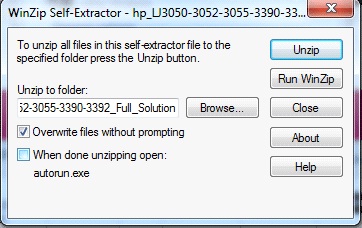
    Uncheck the checkbox "When done unzipping open: autorun.exe" before Unzipping the hp.com download bundle. [more]

    Figure 1: WinZip Self-Extractor

  3. There are 4 executable (.exe) files in the full solution software bundle that are included in the copied/extracted software bundle on the Windows 7 PC hard drive that need to be run in Compatibility Mode for a successful install on a Windows 7 PC.

    These 4 files are:

    • Autorun (.exe)
    • Hpzsetup (.exe)
    • Hpzstub (.exe)
    • Setup (.exe)

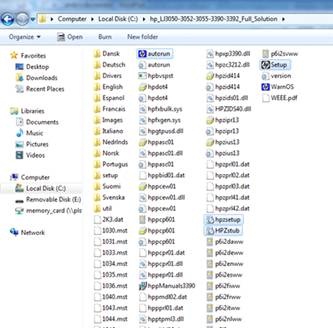
    Note: These 4 files may not show the file type extensions (.exe) when listed in the Full Software Solution folder.

    Figure 2: Files listed in the Full Software Solution folder

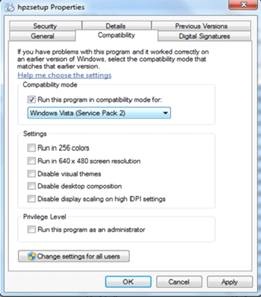
  4. 4. Each of these 4 files (autorun, hpzsetup, HPZstub, and Setup) need to be modified to be run in Compatibility Mode on the Windows 7 PC. Right click on each file and go to Properties. Click on the Compatibility tab and checkmark the box Run in compatibly mode for: and select Windows Vista (Service Pack 2) from the dropdown box. Click on Apply or OK . Repeat this step for EACH of the 4 files listed above.

    Figure 3: Selecting the compatibility mode

After the 4 files have been set to run in Compatibility Mode, double click the autorun.exe file and allow the installation to begin. Click on Install Software from the top of Begin Setup screen and follow the installation prompts.


I needed to turn on NTFS file system auditing for two specific application EXE files on 30+ servers.  I didn’t want to have to touch each server individually, so I decided to look into applying the audit settings centrally using group policy.  Using the Security Templates snap-in for MMC on one of the systems I wanted to set up auditing for, I was able to configure a custom file system security policy.

 Security Templates Snap-in:

Within the Security Templates MMC: [more]

  1. Define a new, empty security template
  2. Expand the new Template
  3. Right click on the File System section
  4. Select "Ad File..."
  5. Browse to the file you want to ad a group policy enforced ACL to
  6. Configure your desired access controls/audit settings
  7. Set appropriate inheritance options
  8. Once the policy settings you want are complete, right click the security template name
  9. Select "Save As..."
  10. Save the INF file somewhere
  11. Delete the security template

In my case, I only wanted to apply the audit policy portion of the ACL (not the file system permissions), so I opened the INF file and removed the permission settings that started with “D:PAR” and just left the “S:AR” settings.

Then, using the Group Policy Management console, I was able to create a new group policy object and import my file system auditing settings from the INF.  I then applied the group policy to the proper OUs and waited for the new settings to get applied.  Everything worked like a charm.  The completed policy looks like this (in the Group Policy Management HTM view):


Setting up additional accounts in Outlook is handy to get email from different servers.  You can use additional accounts to send email from those different mailboxes also.  But did you know that you can use this feature to send email from different email addresses that are set up on your Exchange server?  For example, if email messages you send come from [email protected], but you also want to be able to send email from [email protected].  Here is a step by step guide on how to do this in Outlook 2007:

  • Go to Tools->Account Settings
  • E-mail tab
  • New...
  • Next >
  • Manually configure server settings...
  • Next >
  • Internet E-mail
  • Next >
  • Enter your name, email address such as [email protected]
  • Account type POP3
  • Incoming mail server exchserver1.example.org
  • Outgoing mail server (SMTP) exchserver1.example.org
  • Enter username as <your domain>\<your username> and your domain password
  • If you save the password, you will have to update it here when you change it
  • You can choose the Test Account Settings...
  • It will get an error retrieving email using POP3, but we don't need that
  • Next >
  • Finish

At the bottom of the Accounts Settings window, be sure it is using your inbox for receiving messages. [more]

Go to Tools->Send/Receive->Send/Receive Settings->Define Send/Receive Groups
Edit the All Accounts group (and possibly any other groups) to exclude this account
This will prevent it from trying to retrieve email using POP3 all the time

Now, to send email from that email address, select that account from the Account dropdown under the Send button.


We recently encountered a problem where users were unable to type in the password or username box after locking Terminal Server sessions from their Thin Clients. Their keyboards were responsive (pressing CAPS Lock key initiated the notification on the Terminal Server) but the cursor or any keys entered would not show up.

It is suspected that one of the multiple windows updates that were released for the month of June may have caused this. Users started complaining the day after the updates were applied. However, testing was not completed to determine which one of the updates caused this or if removal of the update fixed the issue.

Here is the workaround we found:  The problem does not occur if the user locks their screen using the left CTRL+ALT combination. This issue only presents itself if the user locked their session using the right CTRL+ALT key combination. If the user does lock their session using the right CTRL+ALT key combination and is presented with the problem, pressing the left CTRL+ALT keys simultaneously will allow the user to enter their information into the password\username boxes to unlock their session.


We began to see the autocreation of printers (or redirected printers) starting to fail for users when logging in to a customer's Terminal Servers lately.  On the same server we also start seeing the printers that were autocreated not being deleted (orphaned session printers) when users logged off a Terminal Server.  The cause turned out to be two outdated DLLs installed on the Terminal Servers:

Hpmini.dll - This issue occurs with HP model driver versions 60.x.x.x and 4.x.x.x. containing hpbmini.dll version 1.0.0.18 or older. Version 1.0.0.19 and newer has the fix. The memory leaks and memory corruption possible with the 1.0.0.18 (or older) dll will not cause a spooler crash, but can degrade performance of the server.  Version 4.x.x.x print drivers have an issue unloading hpbmini.dll which will likely cause a spooler crash when the server has a heavy load of connected users.

hpcdmc32.dll - This issue occurs with 60.x.x.x and 4.x.x.x HP print drivers containing hpcdmc32.dll version 1.0.2.30 or older. Version 1.0.2.31 and newer has the fix. The most recent version of hpcdmc32.dll is 1.0.2.35. The memory leaks possible with the 1.0.2.30 (or older) dll will not cause a spooler crash but may cause performance degradation.

Here is what turned out to be the solution for us: [more]

  1. Upgrade to latest driver available for printer model(s) causing issue – verify that the two DLLs above are updated during this process. If the files are in use while the driver is updated, they will not be replaced.
  2. Manually replace the two DLLs above with updated versions.
  3. Install and use HP Universal print driver


I was trying to post a job on Yahoo hotjobs (using a new ThinkPad running Windows 7), but after I would choose a location & select "Post Job", it would take me back to select a location.  After trying several times across two days, I finally tried to submit a "help form", but I was unable to determine if the form was actually being submitted and I never heard back from Yahoo.  After about a week (and I tried several different days through the week), I was going to sing into Google Analytics.  When I tried to log in with our account credentials, I received the error message “Your browser’s cookie functionality is turned off. Please turn it on.”  I knew it was not turned off, but followed their help and went to Tools, Internet Options, Privacy, Advanced, and verified "First-party Cookies" were not blocked.  While trying to discover what the problem was, I looked under websites to see if it was listed as a blocked site.  I found more than 100 sites listed as blocked including all the major search engines (I did not add them, so they must have come from the factory).  When I removed Yahoo.com, I began to be able to post jobs.


I was installing Exchange 2007 SP2 Update Rollup 4 the other day at one of our network support client's sites. This particular customer has 6 exchange servers that needed the update. The first couple of servers took forever to install the update rollup. It really shouldn’t take 30 minutes to install a 50 MB download. After two servers the other guys working the maintenance window were already waiting on me so I had to make up some ground. After some searching (I didn’t have to look far…its posted on the “how to install exchange updates” page -> http://technet.microsoft.com/en-us/library/ee221147%28EXCHG.80%29.aspx) I found that during the install, if setup can’t connect to the CRL web site, the installation takes an abnormally long time to finish.

The reason is that each time the installer compiles an assembly, it has to check the code signing certificate used to sign the assembly against the CRL. If that connection can’t be made, each attempt must time out before moving on to the next assembly. Ok, so why can’t the CRL be downloaded? At this particular customer location, the problem was due to a Barracuda web filter that requires authentication. The attempts to download the CRL come across as anonymous and are blocked. It could also happen if an ISA server is in place and only certain groups of users are allowed internet access via security group membership. Whatever the reason, the work around is to turn off “Check for publisher’s certificate revocation” option in Internet Explorer. There is a registry key you can change, but I found the option in IE.  [more]

  1. Start IE
  2. Go to Tools -> Internet Options
  3. Click on Advanced -> Security
  4. Click to clear the “Check for publisher’s certificate revocation” check box
  5. After the update is installed, reverse your change


I needed to have access on a branch PC on another subnet (192.168.2.0) from the main site’s subnet (192.168.1.0). 

Using remote desktop, I turned off Windows Firewall on the PC and could access the C$ share on the remote PC from the main subnet. 

Looking at the Windows Firewall exceptions, I could see that File and Printer Sharing was already checked.  I clicked edit and saw the required ports defined here.  When I clicked “Change Scope”, I saw that it was set to “My network (subnet) only”.  For all four entries, I changed the scope to use a custom list that encompassed all 192.168.x.x networks and was able to browse the C$ share from all subnets. [more]


When entering commands at the Windows command prompt or creating Windows batch files that run under cmd.exe, you can use the caret character (^) to quote special characters.  This means it can be used at end of a line to continue commands.  This makes batch files much more readable and maintainable.

You can also use an ampersand (&) to separate multiple commands on the same line and every command will be executed.  If you use && between commands, the second command will only be executed if the first command completes with a successful status.  You can also use two vertical bars (||) between commands and the second command will only be executed if the first command completes with a unsuccessful status.


A coworker and I ran up against a very interesting situation at a virtualization consulting customer's site the other day. We got an after-hours call from the customer that said he was working on the console of a new Windows 2008 virtual machine. He was trying to set the IP address on the NIC and accidentally choose the “bridge network adapters” setting. Afterwards, he was unable to get to anything in the internal network from this server and several other VMs could not communicate with the internal network either. My coworker connected via VPN just fine, but was unable to ping the vmhost2. He could ping the SBS server, one terminal server, and the ISA server. We discussed over the phone that the particular ESX server that those servers were on must have somehow gotten isolated from the network. Sure enough, when my coworker checked the NIC status on vmhost1, it showed that all NICs connected to the LAN network were disconnected. We decided to go onsite and check out what was going on. On the way out, I realized what had happened. When the two NICs got bridged on that VM, it created a loop and must have looped a BPDU and err-disabled the port. Once onsite we confirmed that the port was down and portfast was NOT enabled on that port.

So, the warning here is two fold…yes, a VM can take down the whole ESX server. And second, its best to turn on portfast for ports connected to ESX servers. They don’t understand STP anyway.