Blog

I needed to create a command line script that could remove the local users access from sensitive log folder in Windows XP/7.  You can use a built in command "cacls" with many different switches to get the desired results.  However a word of caution when you do not use the /E "edit" switch.

I had tried to remove the local users account from the folder with command "cacls C:\<folder> /D users".  The /D switch is used to Deny a specified user access.  When I went back to look at the folder permissions, ALL of the other accounts had been removed.  The only thing on the folder was Deny all for Users.  Make sure and use the /E "edit ACL" switch so that all of the other account permissions are retained.

Also, after I removed the permissions for local users, I logged in as a test user and was still able to access the directory.  The reason was that there was another security account called "Interactive" that had read access.  This is a local system account and will apply to anyone logged into the system.  Removing the Interactive account achieved the desired results.


While doing research on Cisco firewall logins, I stumbled on some information that discusses a Wireshark feature called “Follow TCP Stream”.  This feature allows you to follow a particular TCP conversation between two or more hosts. It finds all the TCP packets between a particular source and destination and reassembles the data that was transferred in that particular exchange into something parsable. In effect, the “Follow TCP Stream” feature acts as a filter, but is not limited to a single IP address or protocol.  It will pick up any packets sent to/from the designated host.


To get the feature to work, simply start Wireshark and select an already recorded packet you are interested in by right clicking and selecting “Follow TCP Stream”.  Users can also elect to follow UDP or SSL streams.


There are times when I’m on the road and need to print a document such as a boarding pass on a hotel’s public computer.  I’d rather not take a perfectly healthy flash drive and plug it into a computer that might be infected with something just so I can print a file on the flash drive.

If you have a Dropbox account, you will find a “Public” folder in your Dropbox folder tree.  You can place files in this Public folder and allow others (including you on another computer) to access these files without the need of credentials.  This is quite suitable for things like boarding passes you want to print from a hotel’s business center computer.

You just need to drop the file into your Public Dropbox folder and then get the associated external URL by: [more]

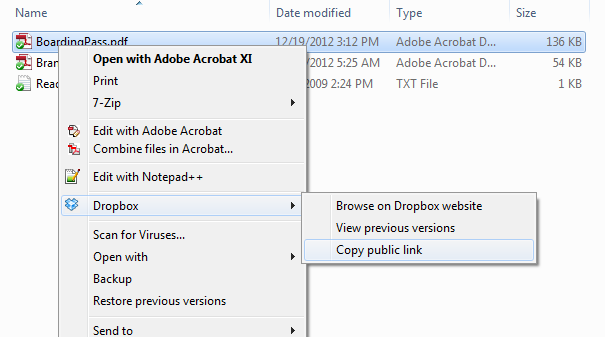
1. Using the Dropbox Windows explorer context menu by right-clicking on the file and selecting Dropbox -> Copy Public link then paste the link into something that will allow you to remember it so you can open a public computer’s Internet browser and type in the URL to get to your file.


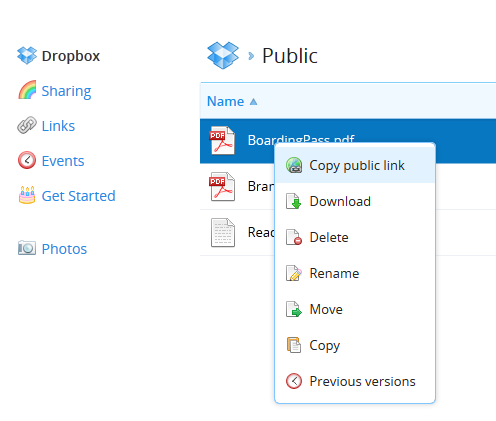
 2. Or – if the Windows explorer context menu isn’t available, you can log into the Dropbox website, navigate to your Public folder and right-click on the file and select Copy public link – and proceed.


 he public link is of the form http://dl.dropbox.com/u/<number unique to your account>/BoardingPass.pdf and just needs to be typed into a browser.


I recently had to update one of the certificates running on a few of our systems as the one I replaced was set to expire. Most of the updates went very smoothly and quickly, but there was one instance that I ran into that required a bit of extra work. One of our web servers runs on a Server 2008 system running Server Core instead of the full install. What this means is that there is no GUI to do your work and all of your maintenance takes place either through command line or remote tools.

For some reason, I was unable to make my certificate changes using IIS7 running on another system (which may be another issue entirely). Because of this, I had to learn how to make my certificate changes via the command line on the server itself. I used the following link as a guide on how to complete this process. http://www.awesomeideas.net/post/2008/05/18/How-to-configure-SSL-on-IIS7-under-Windows-2008-Server-Core.aspx


I needed to move a database from a SQL 2005 server to SQL 2008 server.  I had no problems backing up and restoring the database to the other server, but the database had a local user account created for services on the application server with which to authenticate.  I did not know the user’s password to manually recreate the user on the new database server.  [more]

What I found from this helpful article http://www.techrepublic.com/blog/howdoi/how-do-i-transfer-logins-from-one-sql-server-2005-instance-to-another/140 is a script that you can run to get all of the user accounts displayed in a nice SQL syntax that you can copy and paste into the new database server.

After you recreate the user account, the next step is to resynchronize logins to fix permission settings.

Even if you do not have the password for local SQL user, you can recreate the user on another server using this method.


Extended Control Panel:  There is a special hidden feature in Windows 7 (Vista and Windows 8 also) that allows you to show an extended control panel (so called “God” mode). Here you will find a detail list of most things you can imagine and some things you never heard of… about your operating system. [more]

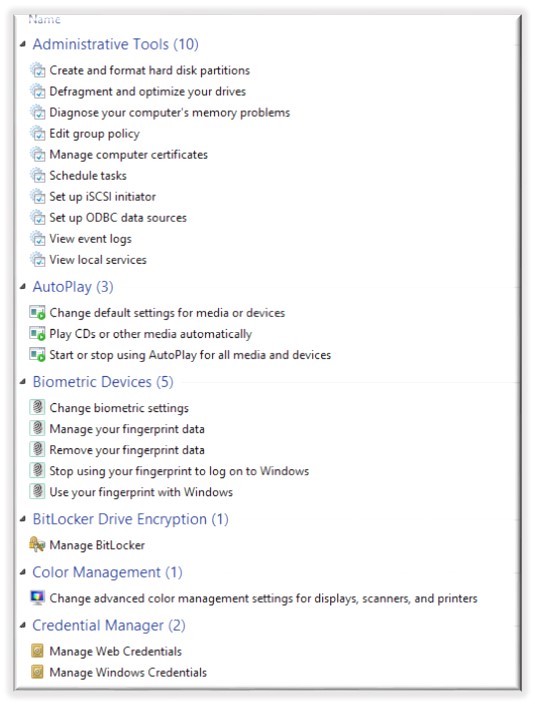
Create a NEW Folder, and rename the folder to “Extended Control Panel.{ED7BA470-8E54-465E-825C-99712043E01C}”

The folder will then change to a blue icon and you will see a list of items to control/administer your operating system.


With the installation of the new Citrix receiver 3.0 (which includes the Citrix online plug-in 13.0) and subsequent versions (version 3.3 of the Receiver is currently available), the following issues have been encountered.

After installing Citrix Receiver 3.0 or newer, users cannot launch Published Applications from the System Tray Notification Area Menu.

In the previous PNAgent or Citrix plug-in, the list of published applications was displayed.

In the new version, when you click the Citrix Receiver icon from the Systray, the menu displayed is shown in the following screen shot (newer versions have even viewer options available from the system tray icon). [more]

Citrix published this statement as the reason for this change: "Receiver for Windows 3.0 Citrix has specifically deprecated support for the option of launching applications from the Notification Area menu to achieve a better and more intuitive user experience in Receiver deployments. This type of access on Windows 7 causes issues. Application access from the Notification Area is no longer consistent with Microsoft User Experience Guidelines."

Microsoft’s User Guidelines can be read here: http://msdn.microsoft.com/en-us/library/windows/desktop/aa511440.aspx . The Notification Area purpose and design is explained in this section: http://msdn.microsoft.com/en-us/library/windows/desktop/aa511448.aspx

The resolution provided by Citrix is to publish all applications to the start menu or desktop via the Deliver Console. While this is an acceptable solution, a lot of users are complaining because they are having to retrain users and dislike the lack of the availability of the ease of access. With the new version of the Receiver, the online plug-in is basically wrapped in the Receiver Experience package. This wrapper can be removed by deleting the following registry key: HKEY_LOCAL_MACHINE\SOFTWARE\Citrix\ReceiverInside. This will bring back the full functionality of the online plug-in to the notification area. Removal of this registry key also reverts the icon from the black square icon to the round blue icon users are used to seeing.

After installing Citrix Receiver 3.0 or newer, the receiver requires a server URL that uses SSL (https:\\). Any non-secure URL is not accepted within the configuration.

Citrix has designated the default configuration of the Receiver to require SSL for connections to the server store. Modifying this default configuration is not available through the client itself, however the following registry key addition will allow you to add non-secure URLs for the server path:

Under HKEY_LOCAL_MACHINE\SOFTWARE\Citrix\Dazzle

REG_SZ: AllowAddStore

Value: A

Note: Changing the value to A allows you to add non-secure URLs.


I was recently assigned a task to pull a list of users who use mobile devices for company email. I came across a neat website with several PowerShell commands listed to help generate the list.

http://www.msexchange.org/articles_tutorials/exchange-server-2010/management-administration/mobile-device-management-part2.html

There is a command to generate a device count of each type of device used.  There is also a command to generate six different .CSV files that can be used to see a list of users, emails received, type of device, device id, etc.


Gotcha 1:   An alternative to using TFTP for transferring files to and from network devices is SCP (secure copy).  SCP uses port 22 just like SSH.  I’ve encountered two “gotchas” with using SCP with Cisco equipment, though.  1) WinSCP is not compatible with Cisco equipment.  2) PSCP (PuTTy SCP) requires the use of the –scp switch, because it defaults to the SFTP protocol.

Gotcha 2:  ESXi 5.1 has new hardware requirements.  The requirements can be found here and the VMware Compatibility Guide allows you to search vendors and servers to see if they are compatible.  (In particular, the feature that was missing from Crowell State Bank’s servers was the NX/XD CPU feature.)

Note that ESXi 5 (Patch 4) or higher is required to run Windows Server 2012.


While trying to SHARE a Calendar in Outlook a user received: “Calendar sharing is not available with the following entries because of permission settings on your network”.  [more]

If the user typed the recipient’s email address in or used the address from your cached addresses.  It will not work and you will get this error every time. 
What they need to do is click the “TO…” button and select the intended recipient(s) from the global address book.