Blog: Security

I upgraded from Vista to Windows 7 about three weeks ago.  I decrypted my PGP encrypted drive before the upgrade and, after the upgrade, PGP recognized my disk wasn't encrypted and prompted me to encrypt my drive.  I started the encryption process but wound up pausing the process because of slow performance, intending to resume it after hours.  I installed some Windows and Lenovo (ThinkDamage…probably my 2nd mistake) updates which required a reboot.  After the reboot, PGP started trying to install itself and produced this error message…

"You cannot upgrade or remove PGP while a whole disk is processing. Installation terminated." [more]

I was unable to access the PGP console in order to resume the encryption, decrypt, etc.  An attempt to uninstall PGP produced the same error.  This was not good since I was scheduled to leave town on an audit within 24 hours and thought I might have to abandon the upgrade to Windows 7, restore a backup and re-encrypt the old Vista image before I left town.

A coworker suggested I log a ticket with PGP.  After doing so, I was poking around their site, searching for various terms from the error message and stumbled across a reference to a command line command.  About that same time, I received an auto-response from PGP which included several links, the last of which led me to information about the same command line command, pgpwde.

Here is the relevant section from the page above:

SECTION 2 - PGPWDE Command Line

The following commands will help diagnose and decrypt the disk. Other commands can be listed by typing pgpwde --help.

  1. To begin working with the PGPWDE interface open a command prompt and change to the PGP installation directory (default directory shown) C:\Program Files\PGP Corporation\PGP desktop.
  2. To list all installed hard disks in the system type: pgpwde --enum. Entering this command will give us a list of disks with numbers we will use in the next few steps.
  3. Now type pgpwde --status --disk 1. Substitute the PGP WDE disk number listed in the previous step for the number 1 in the command if different. The output of this command will tell us whether the disk is still encrypted.
    • If the disk is not encrypted, "Disk 1 is not instrumented by bootguard" will be the output.
    • If the disk is encrypted, the output will display:
      • "Disk 1 is instrumented by Bootguard."
      • The total number of sectors.
      • A Highwater value (number of sectors encrypted).
      • Whether the current key is valid.
  4. Type pgpwde --list-user --disk 1. This will tell us the user information contained on the disk. This will help in multi-user environments to determine which user passphrase was used to implement WDE.
  5. Type pgpwde --decrypt --disk 1 --passphrase {mypasswordhere}. This will start the decryption process. To view progress, type the status command listed in step 3 and note the Highwater number, this number will get smaller and smaller as the number of sectors encrypted decreases.

This command line command allowed me to decrypt the partially encrypted disk.  I then uninstalled PGP to be safe, reinstalled PGP and encrypted my disk without further incident.

 

I was trying to use Cisco’s Adaptive Security Device Manager (ASDM) to connect to our ASA in the office.  I was getting an authentication error but I knew my credentials were correct and it was working for another engineer.  The Java console contained the error “java.io.IOException: Authentication failure”.  I found several references to proxy issues related to this error, so I went to the Network Settings section of the Java app in the control panel and manually specified our proxy server (including the local bypass addresses) and it started working.  The proxy setting was set to “use browser settings” but obviously this wasn’t working.


I created a new tool to add to my arsenal of PGP recovery items. This came up when I really needed to do some file level work on a PC that wouldn’t boot and I couldn’t conduct a repair or get to the files because of the PGP whole disk encryption. I was able to take the Automated Installation Kit for Windows 7 and create a WinPE recovery ISO. From there, I found a PGP document (https://support.pgp.com/?faq=1526) that gave the steps as to how to inject the PGPWDE drivers in order to get authenticated.

Essentially, you can boot to this disk, run the command "pgpwde --disk 0 --auth -p <passphrase>" and from there, you can determine the encryption status, decrypt/encrypt disks, perform file level actions, add/remove passphrase users. One potential use for this, that I did not test, would be to boot to this disk, become authenticated, eject the disk and insert a Windows 7 installation disk, and perform a repair on the OS. The only potential problem I could see with this is if the Win 7 installation wrote over PGP’s MBR, but I’m sure that’s not too difficult to fix. In either case, it could potentially save a few hours of rebuilding time.


The Federal Financial Institutions Examination Council (FFIEC) issued an updated Retail Payment Systems Booklet.  The booklet is part of the IT Examination Handbook series and provides guidance to examiners, financial institutions, and technology service providers (TSPs) on identifying and controlling risks associated with retail payment systems and related banking activities.  To download the booklet and associated workprogram, visit http://www.ffiec.gov/ffiecinfobase/html_pages/it_01.html


The American Bankers Association (ABA) has published a news release warning its members of a fraudulent email attack, an attack commonly referred to as phishing.  According to the ABA, the emails inform recipients that an “unauthorized transaction” has been charged to their account using their “bank card.”  The amount of the transactions is typically between $3,000 and $7,000.

In the news release, the ABA states they would never contact a consumer and ask for financial information.

To read the news release from the ABA, visit http://www.aba.com/Pressrss/012610FraudulentEmails.htm


I installed Intel Turbo Memory driver update - but it also updated the Intel Matrix Storage Manager & Turbo Memory driver.  After the installation there were two entries in Programs and Features - one just for the Turbo Memory driver and one for the Matrix Storage Manager & Turbo Memory.

After this installation, my PGP single sign-on stopped working.  I would enter a pass phrase at boot and then credentials again when Windows started.  I changed my password to get things synched back up and it still didn't work. [more]

I uninstalled the Turbo Memory driver, after which there is only one related Intel entry in Programs and Features and now it doesn't mention Turbo Memory.  Then I rebooted and still had to use the old Windows password in the PGP boot loader and the new one when Windows started up.  However, this time, when booting into Windows, it gave me a password error before asking for the correct one (i.e., PGP had passed the old one through this time - I could have saved a password change).  After I entered the correct password things worked correct at the next boot.


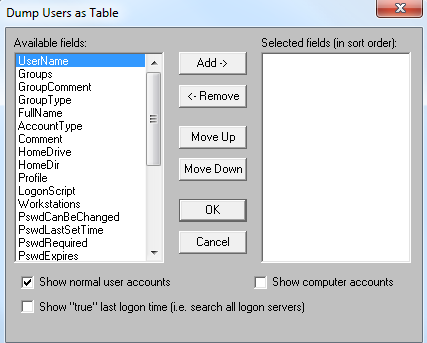
On a recent IT audit, the bank was using a Samba directory instead of Microsoft’s Active directory for user authentication on their workstations.  We use an audit tool called DumpSec to dump the user accounts out of Active Directory.  However, when I tried to use it on the Samba directory, I got an error message and a partial list of users (about 6 accounts out of 85).  After trying several fixes, including joining a VM to the domain and running DumpSec using the root credentials, I unchecked the “Show computer accounts” option in DumpSec (see screenshot below) and it worked. [more]


A user a one of our client's site was experienc an issue where a Symantec Antivirus full scan was started when the user logged in every morning.  The scan was scheduled to run at 1:00 AM, but it seemed to be ignoring the schedule.  The problem was caused by the computer being in sleep mode during the evening when the scan was scheduled to run.  The scheduled scan would not bring the computer out of sleep mode to run the scan at the scheduled time.  As soon as the started to login the computer would come out of sleep mode and the scan would start.  The power saving options are a per use setting.  Without group policies in place, this setting must be completed for each user on each computer.


Many people received a phishing e-mail with the Subject "FDIC has officially named your bank a failed bank" yesterday appearing to come from the FDIC.  The text from the fraudulent e-mail would appear something like:

You have received this message because you are a holder of a FDIC-insured bank account.
Recently FDIC has officially named the bank you have opened your account with as a failed bank, thus, taking control of its assets.

You need to visit the official FDIC website and perform the following steps to check your Deposit Insurance Coverage:
  • Visit FDIC website: (a fraudulent link was provided here)
  • Download and open your personal FDIC Insurance File to check your Deposit Insurance Coverage

It appears this is a new phishing attack where the intent is to attempt to collect personal or confidential inforamtion.  Recipients of this e-mail should be warned of its nature and encouranged NOT to follow any of the links from the e-mail.

Here is the link to the FDIC Consumer Alert published October 26, 2009 - http://www.fdic.gov/consumers/consumer/alerts/


I was testing a new VMware security application (Tripwire ConfigCheck).  I downloaded it to a virtual machine and followed the instructions to run the application (a cmd file), but it didn’t run – I edited the cmd file & added a pause to see if I could tell where it stopped & it appeared to be before calling a .jar file – I did not have Java installed, so I installed Java & tried again – still failed – I read the instructions & found it supports JRE 1.5 or higher, but just in case, I installed the older version (1.5) to see if it would work – still didn’t work – finally, I opened up a command prompt & ran the cmd file from there & received an error that stated your display settings must be at 1024 X 768 for the application to run – my virtual system resolution was too low ...