Blog

One of our customers is running Symantec Mail Security for Microsoft Exchange 5.0.  We were having trouble with the service hanging up in a "Starting" state when the server started up.  [more]See below the picture below.


I wanted to delay this service from starting up until the server boot process was further along.  Using the command “sc query”, I was able to see the Service Name: SMSMSE that matched up with the Display name in the services list.

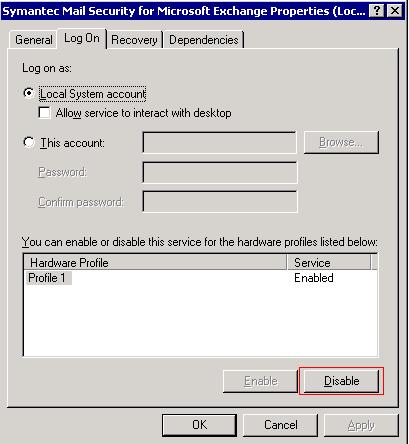
Since the service was hung up, I could not set the service startup type to disabled or manual.  In the service properties, Log On tab, click the disable button to disable the service from starting up for the hardware profile, and reboot the server.  After the server has rebooted, make sure to go back and “Enable” the hardware profile.
While the server was booting up, I connected to the services list of the server from another PC.  This way, I could see which services were starting up towards the end of booting.  One of the last services to start was “Microsoft Exchange Information Store”.  Knowing that, I needed to find the Service Name to match the Display Name.  Using “sc query” again, I found the service name to be MSExchangeIS.

In order to get the SMSMSE service to startup AFTER the MSExchangeIS service started, you have to specify that SMSMSE depends on MSExchangeIS to be started before it can start.  To do this, open regedt32.  Regedit will not work in this case because we have to edit a REG_MULTI_SZ key.  Go to the following location in the registry: HKEY_LOCAL_MACHINE\SYSTEM\CurrentControlSet\Services\<Service name>.   The key to edit or add is “DependOnService”.  In this case, I added “MSExchangeIS” to this list so the service would not try to start until this service was started.
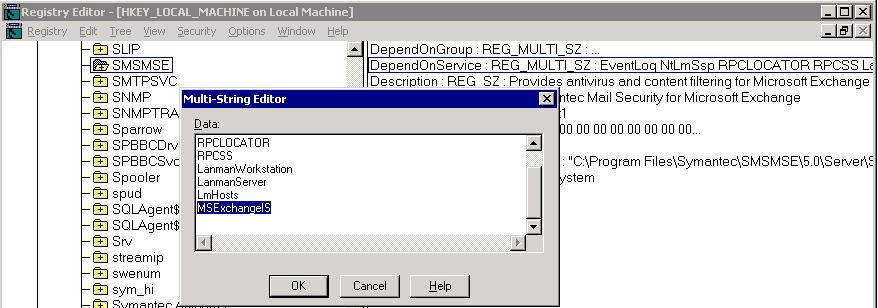
 

After this change was made, the SMSMSE service was delayed long enough for it to be able to startup automatically.


In the past, we had removed the Firewall Client Management Tool (fwcmgmt.exe) from the Startup folder for All Users during Terminal Server setup. This was done to prevent the icon from showing up in the system tray for all users.

It appears that this tool must be running in order for firewall configurations to be pushed out from ISA. Recently we configured the firewall client to disable web proxy in order to force all applications (IE, etc) to use the firewall client. However, these settings were not pushed out for users because the Firewall Client Management Tool was not running. [more]

Adding this tool back to the All users Startup folder enables this process to run for all users. In addition, you can modified an ini file (Documents and Settings\All Users\Application Data\Microsoft\Firewall Client 2004\management.ini) on a server so that the system tray icon will be hidden for all users.


When creating or using a custom ADM file in group policies, some options may not be visible.  This is because the setting is considered a "preference" and the settings will not revert if the group policy is removed.  You must uncheck "Only show policy settings that can be fully managed" under the group policy editor's context menu.  (View->Filters).


SurfControl doubles the number of licenses for the SurfControl Web Filter so that computer IP and Username entries may be recorded.  Once all of the licenses are used up, it will place any new entries (users, IP Addresses) into an unmonitored list.  What I have noticed is that there were three types of entries: usernames, IP addresses, and computer DNS names.  I found that unmonitoring the IP Addresses would cause the username to stop recording if they were using the computer with that IP Address, and computer DNS entries did not appear to be required to log user activity. Some tips to help keep licenses under control are to set ex-employees and computer DNS entries to be "Unmonitored".  This will immediately free up another license while retaining the history of the unmanaged items.


A client of ours frequently uses a web application to manage customer data and print various documents in PDF format. Users started to complain that they would try and produce a PDF document that was populated with unique costomer data, but there were 'strange words' (they were actually variable names) where the customer data should have been. Normally when our client clicked the "Print" function from within the web application, the webapp would open a new browser window, then opened a PDF  document with the cutomer info merged into a PDF form. This problem was happening only when users accessed this webapp from a Terminal Server session. A similar behavior was happening with a webapp on a different website as well (also only happening on the Terminal Server). [more]

To use this particular web app, the user has to have a unique certificate installed on their machine. Initially I thought that the XML data was not being retrieved properly due to a problem with the certificate, thus the PDF was being merged with an empty data set. After confirming that the certificate was in order, I spending a significant amount of time investigating the Permissions and Trust Manager settings within Acrobat Reader 7 on the Terminal Server. Editing these settings did not alter the behavior of these webapps.

About the time I was considering a re-installation of Acroat Reader on this Terminal Server, I noticed within Acrobat 7's "Internet" preferences a check box labeled "Display PDF in Browser". This option was checked (as it should have been) but I decided to toggle this setting off, apply, then toggle it back on, and apply. This restored the web apps XML-PDF form merging functionality. It appears that the PDF form was unable to access the XML data from the IE pop-up window that initially launched the PDF document. It is still unknown why this particular Adobe setting stopped being enforced (when previously it WAS being enforced). The broken functionality did not coincide with any system event. The web app techinal support team was unable to explain WHY this happened, but they did confirm that they had seen this happen before. The moral of the story... even if everything looks correct on the surface, that doesn't mean it really is.


During an information security audit I was working with a file from a regulating entity containing audit procedures.  The file had several  tables with form fields and was protected.

The "form fill" restriction was too limiting as I worked to record audit information in the document.  The longer I worked the more frustrated I became.  It would have been much more useful if I could “unprotect” the file.  I had heard others talking about scripts that could be used to discover the password, but I didn’t have access to any password discovery applications. [more] 

I did remember that Word 2007 was using xml as the source code to format it’s documents.  It made me wonder if there would be anything in the xml code that could be used to unprotect the file.  I made a copy of the file, saved it as xml, and then opened it with WordPad to view the xml code.  I searched until I found something about document protection.  Here is what I found within the documentProtection command.
 
<w:documentProtection w:edit="forms" w:enforcement="1" w:cryptProviderType="rsaFull" w:cryptAlgorithmClass="hash" w:cryptAlgorithmType="typeAny" w:cryptAlgorithmSid="4" w:cryptSpinCount="50000" w:hash="D+Y7lSKVquz/6NisDVadZtFS31g=" w:salt="J6dnbwcKHV7Gn4bMQjXoUA=="/>
 
In the w:enforcement field I changed the "1" to "0".  I saved the document.  Then I opened my altered copy in Word and the document was intact, with proper formatting, but now it was unlocked.


The VMware Virtual Disk Manager (vdiskmanager) is a handy command line tool that will allow you to expand the size of a vmware virtual disk, and many other things. For more information about using the vdiskmanager command visit the VMware Server Online Library. [more]

VMware Virtual Disk Manager - build 59824.
Usage: vmware-vdiskmanager.exe OPTIONS <disk-name> | <mount-point>
Offline disk manipulation utility
  Options:
     -c                   : create disk; need to specify other create options
     -d                   : defragment the specified virtual disk
     -k                   : shrink the specified virtual disk
     -n <source-disk>     : rename the specified virtual disk; need to
                            specify destination disk-name
     -p                   : prepare the mounted virtual disk specified by
                            the drive-letter for shrinking
     -q                   : do not log messages
     -r <source-disk>     : convert the specified disk; need to specify
                            destination disk-type
     -x <new-capacity>    : expand the disk to the specified capacity

     Additional options for create and convert:
        -a <adapter>      : (for use with -c only) adapter type (ide, buslogic or lsilogic)
        -s <size>         : capacity of the virtual disk
        -t <disk-type>    : disk type id

     Disk types:
        0                 : single growable virtual disk
        1                 : growable virtual disk split in 2Gb files
        2                 : preallocated virtual disk
        3                 : preallocated virtual disk split in 2Gb files

     The capacity can be specified in sectors, Kb, Mb or Gb.
     The acceptable ranges:
                           ide adapter : [100.0Mb, 950.0Gb]
                           scsi adapter: [100.0Mb, 950.0Gb]
        ex 1: vmware-vdiskmanager.exe -c -s 850Mb -a ide -t 0 myIdeDisk.vmdk
        ex 2: vmware-vdiskmanager.exe -d myDisk.vmdk
        ex 3: vmware-vdiskmanager.exe -r sourceDisk.vmdk -t 0 destinationDisk.vmdk
        ex 4: vmware-vdiskmanager.exe -x 36Gb myDisk.vmdk
        ex 5: vmware-vdiskmanager.exe -n sourceName.vmdk destinationName.vmdk
        ex 6: vmware-vdiskmanager.exe -k myDisk.vmdk
        ex 7: vmware-vdiskmanager.exe -p <mount-point>
              (A virtual disk first needs to be mounted at <mount-point>)


Use caution when installing and SSL certificate for OWA or OMA on a clustered Exchange server. When you configure Microsoft Outlook Web Access to use a Secure Sockets Layer (SSL) connection to a Microsoft Exchange Server 2003 computer, you may notice a dramatic increase in CPU usage by the Lsass.exe process and by the Resrcmon.exe process. The only way to get the process back in check is to reboot the server. This problem occurs on an Exchange 2003 computer that is running in a Microsoft Windows Server 2003-based cluster. [more]
 
Additionally, an Error event that is similar to the following is logged in the Application log:
Event Type: Error
Event Source: MSExchangeCluster
Event Category: Services 
Event ID: 1014
Date: Date
Time: Time
User: N/A
Computer: Computer Name
Description: Exchange HTTP Virtual Server Instance - (GENESIS): IsAlive checking for this resource failed due to timeout

The solution is to install Exchange 2003 SP2 or you can call MS for the hotfix. I actually like the SSL termination on the ISA server approach a little better. If the SSL tunnel is terminated on the ISA server, you can reinitiate another SSL tunnel with another internal certificate OR you can redirect the traffic to port 80 on the inside interface. Terminating the SSL connection on the ISA server offloads processing from the Exchange server, which is usually a good idea.


While onsite for an IT audit this week, I had to connect to a bank's network from three separate locations. 

At the first location, I got a couple of DHCP addresses (one for my host and one for VMWare workstation) and had no trouble getting connected to the Internet (via browser, RDP, etc.).

When I connected at the second site, I was able to get Internet connectivity from my host but not from within VMWare.  I fiddled with it for a while and finally made do.

When I connected at the third site, they told me they needed to give me static IPs since they had IP tables in their Checkpoint firewall to define what systems had Internet access.

That got me to ask why I had no problems at the first site and half a problem at the second site.  The root cause of all this was their lack of reviewing the IP table in their Checkpoint firewall.  The whole bank subnet at the first site was allowed access to the Internet (this was leftover from a merger about six months ago).  The IP address DHCP gave my host at the second site just happened to be in their list on the firewall (nobody could remember why that random address was in the table).  It's good to review your configurations or have someone else look over them, because mistakes won't necessarily be obvious.


Printing from an AS400 causes a prompt on the printer display to select an available tray.  This is a known problem on the following models HP LJ 4250, HP LJ 9050, and HP M3035 printers.  This is caused by the limited driver selection on AS400. Printing directed through this server directs print to Tray 1. Since Tray 1 is not loaded, the printer prompts for user intervention to redirect print to loaded tray.  To fix this, you can modify printer settings to automatically try another tray, preventing prompt and user intervention during print. [more]

Steps for modification:

  1. From web interface, select settings Tab
  2. Browse to the following Menu: Configure Device>System Setup> Tray Behavior
  3. Set Use Requested Tray to First (default is Exclusively). This will allow print coming to tray one to be redirected to the next available tray without user interaction.

NOTE: The actual menu options may be different for different models. The menu names above were taken from the 9050 model.