Blog: VMware

I was installing a 64bit VM in ESX Server 3.0.2.  When attempting to load the ISO file to install the OS, I got a cryptic ‘Host CPU’ error in VI client.  Searching a number of forum posts, I decided to check the BIOS setting on that DL380-G5 for the CPU Virtualization Technology.  Sure enough, it was disabled and enabling let me get past the ‘host CPU’ error and load the OS.  I noticed in the posts that many people were saying older Proliants had this setting enabled, while newer models had the setting disabled.  This setting should be enabled for systems acting as VM hosts (ESX, ESXi, Hyper-V, etc), so be sure to check that setting, regardless of how new the server is, before installing your VM guests.

Also, a quick note that these CPU BIOS settings (VT, No-Execute memory protection, etc) should be consistent across any systems being used for V-Motion.


A while back, before the recent VMware ESX upgrade, I was having problems logging into the VC server. As soon as the main console window would pop up, I’d receive “Exception has been thrown by the target of an invocation”. The fix, which I found in the VMWare forums, is to open regedit, go to HKEY_CURRENT_USER/Software/VMWare and delete both entries (Virtual Infrastructure Client and VMWare Infrastructure Client). Doing this, and making sure the compatibility setting was set to Windows XP, let me in successfully.  [more]

http://communities.vmware.com/thread/119422


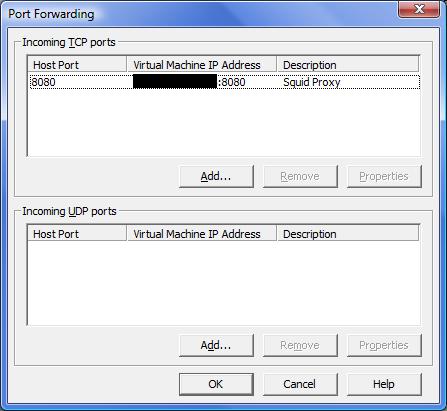
I came  across a neat thing in VMware Workstation the other day when messing with the NAT networking.  I have a local VMware machine that is configured as a Squid Proxy server (nice for Ad blocking and caching of Windows Updates, etc.).  At first, I had it bridged to our main network, but I decided I wanted to have it available to matter what network I connected to, so I decided to try to figure out how to get it working well with VMware NAT.  Getting everything working and accessible locally was easy enough, but one of the main things I wanted a caching proxy for was downloading Windows updates to all my Windows virtual machines.  So, I need all my bridged virtual machines to be able to use the virtual machine that was in my VMware NAT network.  The solution, port forwarding.  On the NAT tab in Virtual Network Editor, click Edit… -> Port Forwarding.  Here you can set up TCP/UDP ports that you want to publish on your primary NIC used by NAT.  Mine looks like this: [more]

So, now I can access my VMware Squid Proxy in my VMware NAT network from my primary network using <my IP address>:8080, <my hostname>:8080, or locally by using localhost:8080.  I can point all my bridged VMware machines to this location as well.  (Anyone on my local network can actually access the proxy.)


In my VMware Windows XP machine (after I upgraded to SP3), I tried to defrag the hard drive (as I was cleaning up and preparing to compress the VMware drive file, etc.).  When I pulled up the Computer Management console and selected the Disk Defragmenter option, I pressed the Analyze button and nothing happened.  The button is active but nothing seemed to happen.  The same thing happened (or didn't) when I pressed the Defragment button.  When I tried to defragment from command line, I got the following message:

Windows cannot connect to the Disk Defragmenter engine.

When I googled this message, it indicated the defragmenter wasn't installed and I should install it.  However, the Microsoft article (http://support.microsoft.com/kb/922379) also indicated the defragment now button in the tools tab of the drive properties would be disabled - which it wasn't.

Regardless, I found the dfrg.inf file in the Windows\inf folder and right-clicked on it and selected Install.

After a few seconds, things seemed to be finished and now the defragmenter works.


The Vista firewall can only apply one profile (either Domain, Public, or Private) at a time.  So if you have one network interface that Vista has identified as connected to the domain and another network interface (a VMWare interface, for example) that Vista cannot identify, it applies the most restrictive firewall profile (Public) to both interfaces.   Obviously, this can break applications if your Public profile is locked down.

In order to fix this issue, you can either: [more]

  1. Disable the VMWare network interfaces if you don’t use them.  They are not needed in bridged mode.
  2. Tell Vista to ignore the VMWare network interfaces when deciding which firewall profile to apply.
    • Disable the VMWARE NICs (VMNET1 and VMNET8 in my case)
    • Run regedit and go to HKLM\CurrentControlSet\Control\Class\{4D36E972-E325-11CE-BFC1-08002BE10318}
    • Here you will find a list of numbers (0000 to 0024 in my case)
    • Click through these keys until you find the one with value VMnet=the name of your VMWare NICs (\DosDevices\VMNET1 and \DosDevices\VMNET8 in my case)
    • Add the key *NdisDeviceType with a DWORD value of 1 for each NIC
    • Enable the VMWare NICS
    • While connected the Compu-Share domain and with the VMWare interfaces enabled, verify the fix worked by going to Control Panel->Windows Firewall.  The Network Location should be listed as “Domain network”.
    • Note: Some people on the Internet said that these registry keys are removed when you upgrade VMWare to a new version.  If so, you will have to add them back manually.


Do not install Vmware tools with the complete option on ESX guests to prevent possible problems with your backups.  This installs the shared folders feature which is not available on ESX.  This causes the VMware tools to keep a file (hgfs.dat) open and can cause backup errors.  To disable the shared folders feature, remove hgfs from the registry key ProviderOrder under KEY_LOCAL_MACHINE\SYSTEM\CurrentControlSet\Control\NetworkProvider\Order\.  [more]

See http://kb.vmware.com/kb/1317 for more information.


When trying to use VMware’s Physical to Virtual (P2V) converter, I kept getting an error about “too many drives”.  I thought the message was related to my disk partitions, but after much troubleshooting and Googling, I found that the problem could be related to Daemon Tools (which I did have installed and running).  Daemon Tools allows you to create virtual CD drives for mounting ISO images.  I was also running the XP ISO Recorder Power Toy to have a few ISO’s permanently mounted, as well as VFD Control Panel (for virtual floppies).  Once I removed all my virtual drives, I was able to P2V the host without any problems.


I recently ran into an issue using VMware Converter to move a VM from VMware Server to VMware ESX v3.0.2. I had already successfully converted two other VMs in this manner, every time I started the conversion it would bomb out during the creation of the VM on ESX. The log files in my profile at …\<username>\Local Settings\Temp\1\vmware-temp indicted the following error. [more]

'P2V' 5748 error] [task,295] Task failed: P2VError UFAD_SYSTEM_ERROR(Invalid response code: 400 Bad Request)

I did some research and found that this can often be caused by invalid ASCII characters in the VM name or path. I looked and I didn’t have anything unusual in there; all standard alpha characters. Then I got to looking around and found that the “Notes” section of the VM Summary did have some double dashes ( -- ) and periods ( . ) in it. I didn’t think that should cause an issue, but I decided to just take out all the text in the Notes section anyway. When I fired off the conversion again it worked! There must have been something in that text that was causing an issue. Here is the notes section is was choking on.

Package Testing Server – Windows Server 2003 SP2 – TS – Windows 2003 server template. Setup to match production TS Cluster.


Somehow directories get set with a read-only attribute that cannot be changed with the GUI.  Use attrib -r to remove the read only attribute.  If a directory where VMware stores snapshots is set to read only, VMware cannot restore snapshots from that directory.  See http://support.microsoft.com/?id=326549 and http://www.vmware.com/community/message.jspa?messageID=339508.  It seems if you customize the folder to get the fancy VMware icon on it, then Windows sets the read only attribute on the folder.  Then at some random time in the future, VMware will not be able to restore a snapshot.


With VMware Server (and most likely Workstation), you can connect a USB device to the VM.  I was using a USB flash drive to transfer a file because I didn’t want the VM on the network.  However the USB drive can’t be mounted to the host and VM at the same time.  If you connect the drive to the VM (using the VM->Removable Devices menu), it appears to the guest VM from disappears from the host.  After you disconnect from the VM it’s available again to the host system.  In hindsight this makes sense but it wasn’t immediately obvious to me when I was trying to copy the file.