Blog: VMware

When using the Advanced Open File Option with Backup Exec, make sure you check the Job Log to see if it is actually getting used correctly. I wanted to use it to back up VMWare Server virtual machines at CITBA. The job was running successfully, so I thought it was working correctly. We started getting calls that VMs running on that server could not be reached by users trying to RDP to them. Once the OSE connected to them via the VMWare Server console, the app would show an "access denied" error (only once) and then go away and stuff would start working. [more]After research, it was discovered that Backup Exec was actually using standard backup (not AOFO) to backup the VM vmdk files thus causing a file lock issue with VMWare Server. Note the very inconspicuous log below.

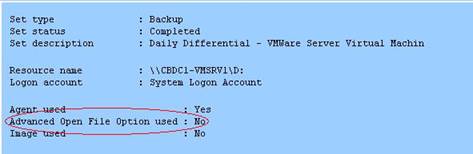
You can find this is the "Job History" tab of the job log. The reason was that no AOFO licenses were installed. So, the moral of the story is Backup Exec will let you select the AOFO option in a backup job and let you deploy the Backup Exec agent with the AOFO option even in you don't have the license installed. Thus, making you think AOFO will actually work, but don’t be fooled. It doesn't.


The VMware Virtual Disk Manager (vdiskmanager) is a handy command line tool that will allow you to expand the size of a vmware virtual disk, and many other things. For more information about using the vdiskmanager command visit the VMware Server Online Library. [more]

VMware Virtual Disk Manager - build 59824.
Usage: vmware-vdiskmanager.exe OPTIONS <disk-name> | <mount-point>
Offline disk manipulation utility
  Options:
     -c                   : create disk; need to specify other create options
     -d                   : defragment the specified virtual disk
     -k                   : shrink the specified virtual disk
     -n <source-disk>     : rename the specified virtual disk; need to
                            specify destination disk-name
     -p                   : prepare the mounted virtual disk specified by
                            the drive-letter for shrinking
     -q                   : do not log messages
     -r <source-disk>     : convert the specified disk; need to specify
                            destination disk-type
     -x <new-capacity>    : expand the disk to the specified capacity

     Additional options for create and convert:
        -a <adapter>      : (for use with -c only) adapter type (ide, buslogic or lsilogic)
        -s <size>         : capacity of the virtual disk
        -t <disk-type>    : disk type id

     Disk types:
        0                 : single growable virtual disk
        1                 : growable virtual disk split in 2Gb files
        2                 : preallocated virtual disk
        3                 : preallocated virtual disk split in 2Gb files

     The capacity can be specified in sectors, Kb, Mb or Gb.
     The acceptable ranges:
                           ide adapter : [100.0Mb, 950.0Gb]
                           scsi adapter: [100.0Mb, 950.0Gb]
        ex 1: vmware-vdiskmanager.exe -c -s 850Mb -a ide -t 0 myIdeDisk.vmdk
        ex 2: vmware-vdiskmanager.exe -d myDisk.vmdk
        ex 3: vmware-vdiskmanager.exe -r sourceDisk.vmdk -t 0 destinationDisk.vmdk
        ex 4: vmware-vdiskmanager.exe -x 36Gb myDisk.vmdk
        ex 5: vmware-vdiskmanager.exe -n sourceName.vmdk destinationName.vmdk
        ex 6: vmware-vdiskmanager.exe -k myDisk.vmdk
        ex 7: vmware-vdiskmanager.exe -p <mount-point>
              (A virtual disk first needs to be mounted at <mount-point>)


I was trying to copy a VMware folder to the server's VMware share and I went offline.  After I finally rebooted to get things straightened out, I couldn't determine why my synchronization was taking a long time - well over 30 minutes.  I finally paid enough attention to see that it was trying to sync an offline copy of the main VMware disk image (about 4GB in size).  The problem is offline files was trying to keep a temporary copy of the file synched up until I deleted the temporary offline files.  When I deleted temporary offline files, it told me it deleted one file of 167MB but it freed up about 4GB on my C drive.


Shared folders can be used in a VMware Virtual Machine (VM) to map a VM folder to a Host folder. However, this capability is a "special feature" and not installed by default. If you try to use it and it is NOT installed, it just doesn’t work… no error and there is no reason given for not working.


There is an order of operations to defragment the disks of a (VMware Workstation) VM.

  1. First, use the defragmentation utility in the operating system running on the VM to defrag… just like a real machine.
  2. Use the Utility provided by the VM software to defragment(machine must be powered down). VM->Settings->Hardware->Hard Disk->Utilities(Button).
  3. Use the defragmentation utility in the HOST operating system to defrag the disk files of the virtual machine.


When upgrading VMware Workstation from a previous version (in this case, version 4) to version 6, snapshots can prevent the virtual machines created under the old version from being upgraded to version 6.  There are two solutions: [more]

  1. Prior to installing version 6, remove all snapshots from the virtual machines.  Also, it is a good idea to make sure all the virtual machines have been shut down gracefully and there are not any .lck files associated with them.
  2. If you have already upgraded to version 6 and still have snapshots, you may get an error message when attempting to upgrade the virtual machine that says something along the lines of, “this virtual machine cannot be upgraded because it has a legacy snapshot.”  When you go to remove the snapshot, the option is grayed-out.  It fix this issue without reverting the old version of Workstation, do the following steps:
    1. For the virtual machine you want to upgrade (vmware1, as an example), rename the file vmware1.vmx.sav to something else.
    2. Open the file vmware1.vmx in WordPad and delete these lines:
      1. undopoints.seqNum = "0"
      2. ide0:0.mode = "undoable"
      3. undopoint.restoreFromCheckpoint = "FALSE"
      4. undopoint.checkpointedOnline = "FALSE"
      5. ide0:0.redo = ".\VM1- XP Pro.vmdk.REDO_a05076”
    3. Save and close vmware1.vmx
    4. Open the virtual machine in Workstation 6 and choose the menu item “VM -> Upgrade or Change Version” to update the version.


After completing a P2V migration of a server, I was having a problem bringing the server into the cluster using the NLB manager.  I traced it down by manually adding the cluster IP address to the new virtual NIC, and receiving an error message stating cluster IP was already assigned to an HP network adapter.  Since this was running as a Virtual Machine, there clearly was not a HP NIC installed, and it did not appear in device manager.  I found http://support.microsoft.com/kb/315539, which describes a procedure for showing hidden devices.  After doing this, the HP NIC appeared and I was able to remove it.


Running virtual machines cannot be moved from host to host unless the processors on the host machine are very similar, e.g. you cannot move an guest from an AMD host to an Intel host without shutting down the machine.  However, if you shutdown the guest, then there are no such restrictions. [more]

I had a guest machine and it was shutdown. It would not move from and Intel host to another Intel host. The machine was a 64bit machine and I had remembered from the VMware conference that 64bit machines used the virtualization technology (VT) available on the more recent chips whereas they do not use it with 32bit hosts. VT is turned on and off with settings in BIOS.  I checked the BIOS settings on the two machines and sure enough, the VT was set on one machine and not the other.

Summary: An incongruous VT state will prohibit the movement of a 64 bit guest machine from one host to another … even in the shutdown state.