Blog: HP

I had come across a user that was unable to print to their local printer.  The printer was situated underneath the desk in a dark corner so it wasn’t very visible.  I decided to check the USB cable first to make sure it was connected.  Unplugging it and plugging it back in showed the USB connected message in the system tray.

As I pulled the printer out a little further, I saw that it had a LCD panel that said “Select your language”.  I hit OK to select English, then selected the Country.  After the selections were confirmed, all of the jobs in the print queue started printing.

The user had replaced the toner cartridge recently, so that could have been when the prompt started.  If you're working on a printer problem in the future it's probably worth asking the user if it has an LCD screen and to check that it is not waiting on some kind of response.


The order of shutdown on a multi-shelf SAN is important. This is especially so for situations where there are Vdisks that span the shelves in the SAN. There is apparently a timestamp (specifically on the MSA 2000 series) that the controller keeps current on each of the drives in the Vdisk set and these must match for the controller to bring the Vdisk online after a power cycle.

You should power off the main controller shelf first, then any secondary shelves so that the timestamps written by the controller will be consistent.

When powering on, power on the secondary shelves first and then the main controller shelf.


After installing Windows updates a customer’s HP 6000 Desktop, running Windows 7, would not POST (Power On Self Test). After powering on it would display a HP logo and go no further. I had access to another identical system so I switched the memory, then hard drive and got the same problem both times. I decided to just put the other system in place of that original one. I connected all the cable and got the same problem on the second desktop. At that point I unplugged all but the display and power, since I have seen keyboards cause this type of problem, this time it booted without hanging. I reconnected the mouse and keyboard and it booted fine. I then reconnected the USB printer and it would not POST. I put the original system back in place, without the USB printer connected and it worked fine.

The HP 3005 printer that was connected was bought refurbished and apparently had started affecting the boot process. The decision was made to replace the defective printer so it was retired.


I was adding a new SCSI/SATA controller card to an HP MSA 1510i. I had shut down the unit to perform the work and after rebooting I could not connect to the management interface. I checked the small interface on the front and the system was attempting to get a DHCP address. I reset the address for management and was able to connect but the password had reset to the default. At that point I determined it had dumped its configuration. [more]

The LUNs were fine just could not communicate over iSCSI. If you have ever configure a MSA 1510i you know they are not very straight forward. I was able to get everything back communicating and the VMware servers back online without too much trouble. Lesson learned was to make sure and document the configuration of a device or back it up. Unfortunately the MSA 1510i does not allow configuration backups. It’s also good to document because I had lost access to information at our office, such as passwords and IPs, because the ISA server (which is a VM) was offline.


I recently worked on a problem where a user had a PC with a network printer added utilizing HP’s Univeral Print Driver. The user RDP’s to a Terminal Server and this “local” network printer is redirected through to their Terminal Server Session. When the user attempted to print to the redirected network printer, they received the following error message:

"The selected printer 'HP Universal Printing PCL6' is not a supported HP device"

Printing from the PC to the network printer as well as printing from the TS directly to the network printer worked. [more]

Knowing that the UPD utilizes bidirectional communication when printing, it is my best guess that this was not working via the TS port that was created when the redirected network printer was auto-generated at login. This behavior does not occur with all model printers.

I enabled and configured SNMP with an established SNMP community name on both the network printer port on the print server as well as through the Web Interface on the network printer. Once that was done, printing via the redirected network printer worked.


We had an ongoing issue with a customer’s HP server where the internal fans continually ran at full RPM. We had to move the server to a new location because the noise was too much for the employees. The HP monitoring software would shut down the server occasionally because it senses it over heating, but there was never any real sign or indication that there was an overheating issue. The problem typically occurred when backups were running so we thought it was possibly the tape drive was causing a faulty temperature reading.

We went as far as to purchase a USB temperature logger which I placed on the server to monitor the environment for a week.  All readings came back normal. I opened a case with HP Support and their recommendation was to update the firmware and the drivers and everything else they could think of. But nothing they suggested made a difference. [more]

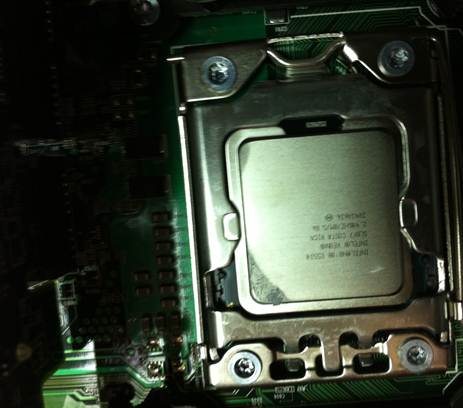
I decided to take the server down and look at the internal parts for possible obstructions in air flow that would cause it to think it was overheating. I was checking the second processors heat sink I noticed it was not seated exactly right but was clamped down. I removed the heat sink and found dust under it. That’s right... dust between the CPU and the silver paste. As you can tell from the picture below the silver paste had never contacted the CPU, except on one corner. I grabbed some canned air, blew the dust off, and reseated the heat sink.  Closed up the server and started it up. Since that time the server has run super quite with no thermal issues to this day. However, HP did have to replace an internal fan that failed from running so long at high RPM.


A customer that had been printing duplex documents to a HP LaserJet 8150 had to send the printer off for repairs.  When they got it back and reconnected it to the network, they were unable to print duplex.  Printing test pages from the printer’s console came out duplexed and the settings on the display showed that duplexing was enabled. 

When I went to look at the printer properties on the printer server, I found a setting under the Device Settings tab for Duplex Unit.  It was set to Not Installed.  As soon as I changed it to Installed, users were able to print on both sides of the page.  I’m not sure what caused the printer to lose this functionality while it was being repaired, but this was the solution. [more]


A couple months ago I bought a new HP desktop at home and it was working great except I kept noticed letters were missing after I typed sentences, passwords, etc. It seemed to happen at random and out of a couple sentences there was usually one letter that would be skipped. I thought it was me at first and maybe I just wasn’t used to the new keyboard, but after I started paying attention and made sure I was striking all the keys I realized it wasn’t me. I reinstalled the keyboard drivers and unplugged the keyboard and plugged it into a different USB port. The problem persisted. I was to the point where I was going to buy a new keyboard when I realized it was only happening in Internet Explorer. I found that disabling the Windows Live add-ons fixed the problem (i.e. Microsoft Live Search Toolbar, Windows Live Sign-in Helper, and Microsoft Live Search Toolbar Helper). I didn’t install those add-ons myself, so they must have came preloaded from HP. To manage your IE add-ons go to Tools -> Internet Options -> Programs and click the Manage add-ons button.


We ran into a problem where the print properties or preferences of a shared printer being accessed on a Microsoft Windows client PC would cause the print driver to be re-vended (downloaded/installed) from the server and an Event ID: 20 entry to be logged in the Event Log. Event ID: 20 indicates that a print driver has been added or updated. Slow client UI response and/or slow server performance was also reported. In some instances, the driver would generate over 100 Event ID: 20 entries in the Event Log. Selection of the printer from an application may freeze up the application and printing to printer was reported to take up to 15-20 minutes.

This issue can occur if the privileges on the print server are set such that users with print access also have manage permissions on the print queue. [more]

My Solution 

Disable queue manage permissions for users. NOTE: In my situation, the user was a domain admin. Removing manage permission for domain admins would prevent further access to the printer. I had to add a separate group to allow management permission before removing administrator permissions.

To change permissions:

  1. From the print server, right-click the printer queue (object) in the Print & Fax window.
  2. Select Properties.
  3. Select the Security tab.
  4. Click the User Group used for printing permissions.
  5. Deselect the check in the box next to Manage Printers under the Allow column.

HP's Solution

Upgrade to UPD version 5.1 or later.


Windows 7 by default installs the Universal Print Driver for HP device and uses the native Windows scanning options. Which is not as robust as the previous versions that came with the All-In-One systems. The user was complaining that the scanning was not usable and needed the same functionality that was there before Windows 7. This method will allow you to install the same software options previously available on Windows XP and Vista. After installation of the software on a Windows 7 PC in Compatibility Mode the following software components are installed:

  • Print Driver
  • Send Fax
  • Uninstall Utility
  • User Guide
  • Twain and WIA Scan Drivers
To run the Windows Vista software on a Windows 7 PC in Compatibility Mode follow the steps below:
  1. Copy the entire product CD for Windows Vista 32 bit to the hard drive of the Windows 7 PC.
  2. The Windows Vista Full Software Solution on hp.com can also be used. Download the Full Software Solution for your product for Windows Vista from hp.com. Unzip/extract to the hard drive of the Windows 7 PC.

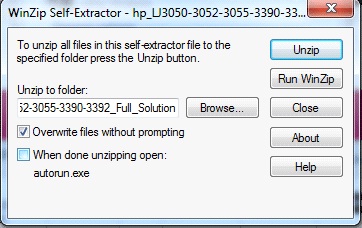
    Uncheck the checkbox "When done unzipping open: autorun.exe" before Unzipping the hp.com download bundle. [more]

    Figure 1: WinZip Self-Extractor

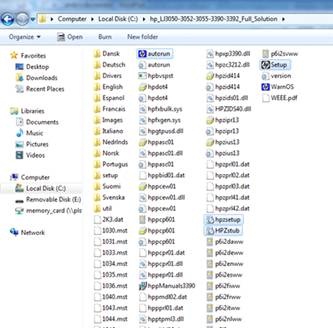
  3. There are 4 executable (.exe) files in the full solution software bundle that are included in the copied/extracted software bundle on the Windows 7 PC hard drive that need to be run in Compatibility Mode for a successful install on a Windows 7 PC.

    These 4 files are:

    • Autorun (.exe)
    • Hpzsetup (.exe)
    • Hpzstub (.exe)
    • Setup (.exe)

    Note: These 4 files may not show the file type extensions (.exe) when listed in the Full Software Solution folder.

    Figure 2: Files listed in the Full Software Solution folder

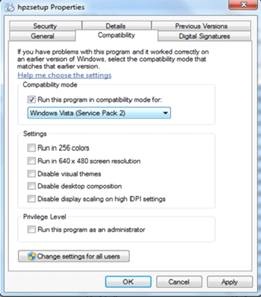
  4. 4. Each of these 4 files (autorun, hpzsetup, HPZstub, and Setup) need to be modified to be run in Compatibility Mode on the Windows 7 PC. Right click on each file and go to Properties. Click on the Compatibility tab and checkmark the box Run in compatibly mode for: and select Windows Vista (Service Pack 2) from the dropdown box. Click on Apply or OK . Repeat this step for EACH of the 4 files listed above.

    Figure 3: Selecting the compatibility mode

After the 4 files have been set to run in Compatibility Mode, double click the autorun.exe file and allow the installation to begin. Click on Install Software from the top of Begin Setup screen and follow the installation prompts.