Blog: Networking

Imaged clients with a duplicate WSUS Client ID will only appear once in the WSUS Admin Console. Each auto update client must have a unique id which is created for each individual install. The WSUS admin console will only display one client for each unique ID. If you have multiple clients created from one image which are sharing the same ID, only one will appear in the WSUS admin console. All clients will check in and download updates, but only one will appear and display status in the WSUS admin console. Even if it the machine were imaged the proper way with SYSPREP, with a new Name and SID, the WSUS Client ID is not being stripped. In cases where clients are not checking in, and they were created from images, the following steps will reset the existing duplicative client IDs. [more] 

  1. Run regedit and go to HKEY_LOCAL_MACHINE\SOFTWARE\Microsoft\Windows\CurrentVersion\WindowsUpdate
  2. Delete the PingID, SUSClientID and the AccountDomainSID values
  3. Stop and start the Wuauserv Service
  4. From the command prompt run: wuauclt /resetauthorization /detectnow

Or you can create a batch file using the sample below:

rem Fixes problem with client machines not showing up on the server due to imaging method

reg delete HKLM\SOFTWARE\Microsoft\Windows\CurrentVersion\WindowsUpdate /v AccountDomainSid /f
reg delete HKLM\SOFTWARE\Microsoft\Windows\CurrentVersion\WindowsUpdate /v PingID /f
reg delete HKLM\SOFTWARE\Microsoft\Windows\CurrentVersion\WindowsUpdate /v SusClientId /f
cls
@echo Triggering detection after resetting WSUS client identity
net stop wuauserv
net start wuauserv
wuauclt /resetauthorization /detectnow

 

I’ve never been a fan of (nor seen much reason in) splitting VMDKs into 2GB chunks… though that is often the default setting when creating a virtual machine. However, the other day I found a pretty good reason. When you split your VMDK, VMware creates a single VDisk.VMDK meta file, and several VDisk-s001.VMDK files (which actually contain the data). The meta file is a pretty simple text file with contents that look something like this: [more]

# Disk DescriptorFile
version=1
encoding="windows-1252"
CID=9fb33447
parentCID=ffffffff
isNativeSnapshot="no"
createType="twoGbMaxExtentSparse"

# Extent description
RW 4192256 SPARSE "vdisk-s001.vmdk"
RW 4192256 SPARSE "vdisk-s002.vmdk"
RW 4192256 SPARSE "vdisk-s003.vmdk"
RW 4192256 SPARSE "vdisk-s004.vmdk"
RW 4192256 SPARSE "vdisk-s005.vmdk"
RW 4192256 SPARSE "vdisk-s006.vmdk"
RW 4192256 SPARSE "vdisk-s007.vmdk"
RW 4192256 SPARSE "vdisk-s008.vmdk"
RW 4192256 SPARSE "vdisk-s009.vmdk"
RW 4192256 SPARSE "vdisk-s010.vmdk"
RW 4192256 SPARSE "vdisk-s011.vmdk"
RW 4192256 SPARSE "vdisk-s012.vmdk"
RW 2121728 SPARSE "vdisk-s013.vmdk"

# The Disk Data Base
#DDB

ddb.deletable = "true"
ddb.virtualHWVersion = "7"
ddb.toolsVersion = "8259"
ddb.longContentID = "0bdf39e8f7c80d6f09a431949fb33447"
ddb.uuid = "60 00 C2 9e da ee dc 72-7f ba f5 58 c8 a7 75 58"
ddb.geometry.cylinders = "3263"
ddb.geometry.heads = "255"
ddb.geometry.sectors = "63"
ddb.adapterType = "lsilogic"

The nice thing about this is you can edit the paths to the SPARSE files. This can allow you to put the SPARSE files in a “template” directory for VM clones (preferably read only), then just edit the meta file to point to your template directory. Whenever you want to create a clone, just copy the meta file VMDK to the new VM directory, edit the paths (can be relative or full), and then snapshot your new clone (to make sure it doesn’t change the template files… which would break all your linked clones!).


Here's how you can convert from a VMWare virtual machine to a VPC (Microsoft) virtual machine:

  1. Microsoft’s System Center Virtual Machine Manager will perform V2V conversions.  It converts to Virtual Server 2005 and Hyper-V.
  2. The other way is as follows: [more]
    1. Back up/clone the virtual machine.
    2. Remove VMWare tools from the virtual machine.  (VMWare tools are incompatible with VPCs.)
    3. Run sysprep on the virtual machine.  (This removes hardware-specific information.  Supposedly, the newer Windows OS’s are hardware-independent, and do not require this step, but I could not find an references to people who did it successfully without running Sysprep.)
    4. Copy the virtual disks (VMDKs).
    5. Convert the VMDKs to VHD files.  There are a number of tools which claim to be able to do this.  The one I found that actually completed the process is the StarWind converter.
    6. Create a new VPC and use the VHD files.

 On another note, the Windows 7 virtual PC requires a certain level of processor.


Here is a case where I wish I would have read the instructions better. I attempted to install the VMware view connection broker on a Windows 2008 R2 machine. I had read enough of the release notes to find out that the 2008 AD was supported… so I thought that meant that a 2008 version of Windows was an acceptable o/s to install the connection broker. However, if I had read the full instructions, I would have found out that the only o/s supported were 2003 based operating systems.


The setup documentation, on the CD that is in the box and the website, for the Linksys SRW2024 switch instructs users to use a baud rate of 19,200 to connect to the console. Upon connecting at the rate everything in the console looks like gibberish. Connecting at 38,400 opens the telnet session properly and allows access to the configuration. I verified in the settings that the baud rate is set to 38,400. Luckily I did not follow my initial thought that the firmware was corrupt.


If you need to make modifications to a drive mapping in a logon script that uses the “Net Use <drive> \\computername\sharename” command, be sure to add a line above to delete the previous map using “Net Use <drive> /delete”.  If the previous drive mapping isn’t deleted and recreated, it can continue to use the old drive mapping location.


I have been working on a proof of concept install of VMware View v4 at a customer location. One of the challenges that we ran up against was trying to get the USB redirection to work with HP USB printers. Technically, all that is necessary is to have the printer plugged in USB and have a driver loaded on the virtual machine that you are connecting to using the VMware View client. However, in practice what we found...

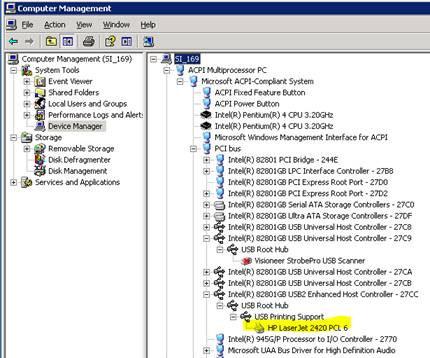
HP printers are usually installed using a DOT4 USB port driver. DOT4 port types have been around a while and basically provide a bi-direction information flow between multiple devices on a single physical channel. Its most commonly seen for devices that support multiple functionality like scanning and printing, but can be used for any USB connected printer. There is an option to NOT use the DOT4 port types and in our situation it was essential because….well, the VMware View USB redirection just simply didn’t work with the DOT4 ports. The problem is that once the printer was installed it was IMPOSSIBLE to change the port type from DOT4 to USB…the printer would stop working. After about 2 days of struggling with this and not being able to remove the DOT4 port type, I finally found that the port type could be altered after the printer was installed. Heres how: [more]

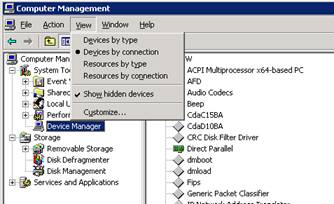
  1. Open device manager on the PC and change the view to by connection and show hidden devices
  2. Search through the USB host controllers and USB Root Hubs until you find the hub with the printer installed…It will look like the following:
  3. Next, right-click on the USB Printing Support and select properties.
  4. Select the drivers tab and select upgrade driver
  5. Choose to “Install from a specific location” and then choose “Don’t search. I will choose the driver”
  6. Then you will be give the option to choose the driver used for the USB printer support. Choose USB Printer support.
  7. Click Next and it will install new drivers and change the port type of the printer from DOT4 to USB

It is yet to be tested if this USB printer support method works with multifunction printers, but the change worked on every LaserJet USB printer that we set up. Obviously, if you have a choice, just set up all the printers as network printers and avoid the problem altogether.


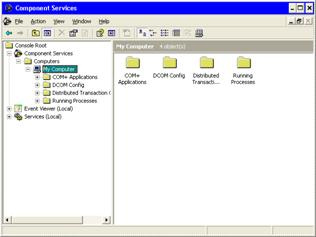
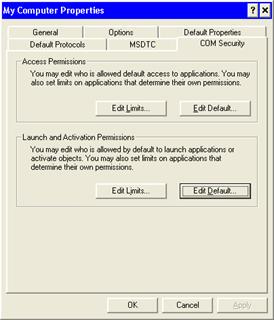
After installing ARTA Deposit on a virtual Windows XP system running user could connect and access all the data. The problem was the bank employees could not preview or print any forms. After a little investigation I called ARTA support. I went through all the normal steps of checking folder permissions and basic troubleshooting before being handed to a 2nd tier support tech. The tech asked me to check the permissions of the Component Services. I navigated to [Control Panel\Administrative Tools\Component Services]. I then went to “My Computer”, in the Microsoft Management Console, right clicked and selected “Properties”.  [more]

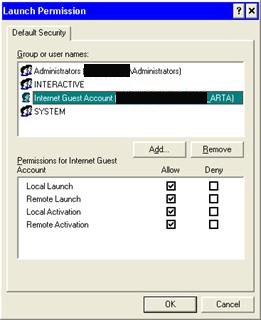
Then I select the COM Security tab and under “Launch and Activation Permissions” select “Edit Default”.  I added the local “Internet Guest Account”  with Local Launch, Remote Launch, Local Activation and Remote Activation permissions and was then able to preview and print forms in ARTA Deposit.

This is not documented as needing to be done anywhere that I could find and the tech said it was a common problem. The level 1 support did not know about these permissions either.


Email usability: Best Practices for Microsoft Outlook 2007.  Here are three things that I would like to mention to help manage email.

1)  Set up a search folder and include many folders – inbox, rss feeds, mailing lists, Communicator conversations, etc.  This will put all items you need to consider in one place.

2)  Set up a rule to flag for follow up for all items.  Use the 4 D's for handling email: Delete it, Do it (respond, take action, file), Delegate it (forward it), or Defer it.  Once the email it taken care of, mark it complete.

3)  Use sorting and searching to find items.  You can click on the column headers to sort, then start typing the contents of the field and it will jump to those items.  An even better way (but requiring more typing) is searching.  Since our Exchange server indexes these items, searching is really fast.  You can enter search terms in the format keyword:value to find items.  For example, subject:"sql account" from:john, will find that email from John about that sql account.  To find the available keywords, search for help on “narrow your search” to find the topic “Learn to narrow your search criteria for better searches in Outlook”.  You can also search contacts and calendars. [more]

These ideas came from an article by Melissa MacBeth called Best Practices for Microsoft Outlook 2007, available at http://office.microsoft.com/en-us/outlook/HA103715211033.aspx.  This is a long article, but it has many good ideas.


For those that are currently or working on or considering acquiring their CCNP - On July 31, 2010 the CCNP certification will be changing. After this date you will no longer be able to take the current BSCI, BCMSN, ONT or ISCW exams. These exams will be replaced with a ROUTE, SWITCH and TSHOOT exam. If you have completed the BSCI or BCMSN prior to this date then it will still transfer over and count toward your ROUTE or SWITCH exam respectively. If you have already taken the ONT or ISCW exam these will not carry over after the new date. This information has not been officially declared by Cisco so there is still a possibility of changes being made but its good to have an idea of what is to come at least since it looks like it will be happening very soon.