Blog: IIS

I came across a problem with OWA where it kept redirecting the external server address to the internal server address (Ex.  Mail.public.com -> servername.domain.dom).
 
After doing some thorough research, I discovered that there is a property in the IIS Metabase file that controls whether or not the server name is always used.  Microsoft KB article 834141 says that “The UseHostName property will instruct IIS to always replace the SERVER_NAME variable with the fully qualified machine name.”  This property is a Boolean value.  Setting this property to false stopped the automatic redirects and kept the external server name in the web browser. [more]
 
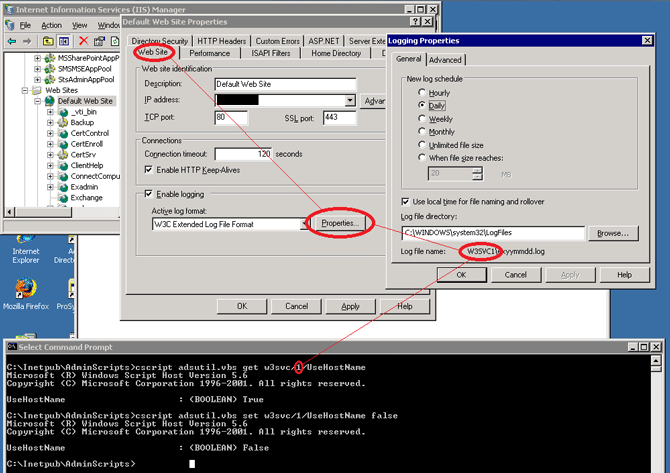
In order to edit the metabase, you must use commands with adsutil.vbs.  You must have the site ID of the website you want to edit the value for.  I show in the screen shot below how you can view the log file name in order to determine the site ID number.  I then show the commands used to get and set the UseHostName property for the website.


Log Parser 2.2 is a free command line tool available from Microsoft.  It provides universal query access to text-based data such as log files, XML files, and CSV files.  It also can query Windows system data sources such as the Event Log, the Registry, the file system, Active Directory, and NetMon captures.  You can pick the information you want returned in the results and those results can be sent to a text file, SQL Server, or SYSLOG.  This tool basically reads your log files and lets you query them as if they were in a SQL Server database.  It is also light weight at only 1.4 MB download.

The possible uses for the Log Parser are endless, but I use is specifically for querying IIS logs when trouble shooting problems.  For example, using this tool makes it easy to find all the requests made by a specific signed in user.  Since this application is ran at the command like it can take a little time to get your query right, but after you get it working you can add the commands to a .bat file for future reference or scheduled tasks.  Here are some examples: [more]

Search IIS Logs for User Requests
Here is an example batch file that when run searches a directory of IIS log files for all requests made by users signed in with a username ending in “@example.com” and saves the results to a text file:
cd "C:\Program Files\Log Parser 2.2\"
logparser.exe "select logrow, date, time, c-ip, cs-username, cs-method, cs-uri-stem, cs-uri-query from ‘< your log directory path>\*.*’ where cs-username like '%%@example.com%%' order by date, time, logrow" -i:IISW3C -rtp:-1 > c:\temp\example-requests.txt

Search IIS Logs for Most Download Files
cd "C:\Program Files\Log Parser 2.2\"
logparser.exe " SELECT TOP 10 cs-uri-stem, count(*) as Downloads FROM ' from <your log directory path>\*.*' GROUP BY cs-uri-stem ORDER BY Downloads DESC" -i:IISW3C > c:\temp\most-downloaded.txt

Find 10 Largest Files in a Directory or Subdirectory
cd "C:\Program Files\Log Parser 2.2\"
logparser.exe " SELECT TOP 10 Path, Name, Size, Attributes FROM 'C:\Program Files\*.*' ORDER BY Size DESC"  -i:FS –Recurse:-1 > c:\temp\10-largest-program-files.txt

Get Number of Outbound Emails from Exchange
logparser.exe "SELECT connector-id, client-hostname, COUNT(*) AS Total INTO c:\temp\outbound-email-totals.csv FROM '<log file directory>\MSG*.log,<another log file directory>\MSG*.log' WHERE connector-id LIKE '%outbound' OR connector-id LIKE '%to Internet' GROUP BY client-hostname,connector-id WITH Rollup"  -i:CSV -nSkipLines:4 -o:csv

This is a very flexible tool.  There are tons of parameters that control how the application functions and the number of different queries you could write is only limited by your imagination.  I’ve found the best way to get started using it is to look at examples and there is a “Samples” folder included in the install directory that is helpful.

Related Links
Home Page (http://www.iis.net/community/default.aspx?tabid=34&g=6&i=1976)
Log Parser 2.2 Documentation (http://www.iis.net/community/default.aspx?tabid=34&g=6&i=1976)
Download (http://www.microsoft.com/downloads/en/details.aspx?FamilyID=890cd06b-abf8-4c25-91b2-f8d975cf8c07&displaylang=en)
TechNet Article (http://technet.microsoft.com/en-us/library/ee692937.aspx)
Other examples of IIS log queries (http://blogs.iis.net/carlosag/archive/2010/03/25/analyze-your-iis-log-files-favorite-log-parser-queries.aspx)
Log Parser Forums (http://forums.iis.net/default.aspx?GroupID=51)
Graphing Ping Results (http://www.adopenstatic.com/cs/blogs/ken/archive/2005/05/30/22.aspx)
Query Windows Event Log (http://oreilly.com/pub/a/windows/2005/07/12/logparser.html)


Windows 2008 and IIS 7.0 installs with Secure Sockets Layer (SSL) version 2 and “weak” cryptography ciphers turned on by default.  Having that turned on will likely turn up some problems in a penetration test.  Here are some common vulnerabilities names that might be identified in your penetration test results:

  • SSL Server Supports Weak Encryption
  • SSL Server Allows Cleartext Encryption
  • SSL Server May Be Forced to Use Weak Encryption
  • SSL Server Allows Anonymous Authentication [more]

Disabling 

Unfortunately, there is not currently an intuitive way to enable/disable the protocols and ciphers built into the Windows GUI.  You must edit your systems registry to get the job done.  Some of the registry keys and DWORDs will likely not be in the registry, so you will need to add them. It’s always a good idea to back up your registry before making changes just in case something goes wrong.  Click Start, click Run, Type regedit32 or type regedit, click OK, and then add/modify the keys listed below.

Here are the registry keys to turn off PCT 1.0 and SSL 2.0 and leave SSL 3.0 and TLS 1.0 turned on:

  • HKEY_LOCAL_MACHINE\SYSTEM\CurrentControlSet\Control\SecurityProviders\SCHANNEL\Protocols\PCT 1.0\Server
    • DWORD = 0
  • HKEY_LOCAL_MACHINE\SYSTEM\CurrentControlSet\Control\SecurityProviders\SCHANNEL\Protocols\SSL 2.0\Server
    • DWORD = 0
  • HKEY_LOCAL_MACHINE\SYSTEM\CurrentControlSet\Control\SecurityProviders\SCHANNEL\Protocols\SSL 3.0\Server
    • DWORD = 1
  • HKEY_LOCAL_MACHINE\SYSTEM\CurrentControlSet\Control\SecurityProviders\SCHANNEL\Protocols\TLS 1.0\Server
    • DWORD = 1

Here are the keys to turn off “weak” SSL ciphers:

  • HKEY_LOCAL_MACHINE\SYSTEM\CurrentControlSet\Control\SecurityProviders\SCHANNEL\Ciphers\DES 56/56
    • DWORD = 0
  • HKEY_LOCAL_MACHINE\SYSTEM\CurrentControlSet\Control\SecurityProviders\SCHANNEL\Ciphers\NULL
    • DWORD = 0
  • HKEY_LOCAL_MACHINE\SYSTEM\CurrentControlSet\Control\SecurityProviders\SCHANNEL\Ciphers\RC2 40/128
    • DWORD = 0
  • HKEY_LOCAL_MACHINE\SYSTEM\CurrentControlSet\Control\SecurityProviders\SCHANNEL\Ciphers\RC2 56/128
    • DWORD = 0
  • HKEY_LOCAL_MACHINE\SYSTEM\CurrentControlSet\Control\SecurityProviders\SCHANNEL\Ciphers\RC4 40/128
    • DWORD = 0
  • HKEY_LOCAL_MACHINE\SYSTEM\CurrentControlSet\Control\SecurityProviders\SCHANNEL\Ciphers\RC4 56/128
    • DWORD = 0
  • HKEY_LOCAL_MACHINE\SYSTEM\CurrentControlSet\Control\SecurityProviders\SCHANNEL\Ciphers\RC4 64/128
    • DWORD = 0

Testing

The easiest way I’ve found to verify the protocols and ciphers are turned off is to use the free OpenSSL toolkit.  Here are some instructions for installing Cygwin with OpenSSL on Windows 7: https://www.conetrix.com/Blog/post/How-to-Install-OpenSSL-on-Windows-7.aspx.  Here are some instructions for installing OpenSSL on Ubuntu: https://help.ubuntu.com/community/OpenSSL#Practical OpenSSL Usage.  If you are using a Mac OpenSSL should already be installed.  Once you get it installed you can verify your registry changes worked.

Once you get it installed here is the commands you can use to verify that SSLv2 is turned off:

# openssl s_client –ssl2 –connect YOURSERVERNAME:443

If server does not support SSLv2 then you should see an error like the following two examples:

CONNECTED<00000003>
Write:errno=113

Or

CONNECTED<00000003>
1324:error:1407F0E5:SSL routines:SSL2_WRITE:ssl handshake failure:s2_pkt.c:428:

Here is the command to test for weak ciphers:

# openssl s_client -connect SERVERNAME:443 -cipher LOW:EXP

If the server does not support weak ciphers then an error will be displayed similar to the error examples given above.


For a little added security you can move your inetpub directory to a seperate partition from your operating system files.  By default the IIS7 Inetpub directory is created on the same partition as the Window Server 2008 install.  There is no way to specify a different location during the setup process.  You can create a new inetpub directory on a different partition, set the correct permissions, and change all the IIS settings to point to the new directory.  However, a program manager on the IIS team wrote a great script that will do all that for you.  Here are the steps to move inetpub using his batch file: [more]

  • First download the batch file from his blog post.
  • Unzip the batch file
  • Open a command prompt
  • Browse to the directory where you unzipped the batch file
  • Type "moveiis7root.bat" <the drive letter of the partition you would like to move it to> and press enter

Example: "moveiisroot.bat w"

If the batch file runs successfully you'll have a new inetpub directory on the partition you specified with the correct access permissions set and IIS will be configured to use the new folder.  You can then delete the old c:\inetpub directory.


A customer’s Outlook Active Sync stopped working for their phones. I connected to their 64-Bit Exchange 2007 server and found that nothing in IIS was working.

Looking at the event logs found where .NET 1.1 had been installed right before IIS stopped working.

IIS 6.0 supports both 32-bit and 64-bit. However IIS 6.0 does not support running both at the same time. ASP.NET 1.1 runs only in 32-bit mode. ASP.NET 2.0 runs in 32-bit mode or in 64-bit mode. Therefore, if you want to run ASP.NET 1.1 and ASP.NET 2.0 at the same time, you must run IIS in 32-bit mode. However Microsoft Exchange Server 2007 only supports Microsoft.NET 2.0, 64-bit version.

The problem was that Microsoft .NET Framework 1.1 was installed on the Exchange server and broke IIS since it is running in 64-bit mode for use with Exchange 2007.

  • I uninstalled .NET 1.1
  • Went to a command prompt
  • Used the following command to disable the 32-bit mode:
    cscript %SYSTEMDRIVE%\inetpub\adminscripts\adsutil.vbs SET W3SVC/AppPools/Enable32bitAppOnWin64 0
  • Then used the following command to install the version of ASP.NET 2.0 and to install the script maps at the IIS root and under:
    %SYSTEMROOT%\Microsoft.NET\Framework64\v2.0.50727\aspnet_regiis.exe -i
  • Restarted IIS, World Wide Web Publishing Service, and HTTP SSL

[more]After completing the steps above everything began functioning as it should.

I found that the reason .NET 1.1 was installed, was because all the management server sessions were being used and access to the VM host was needed. An installation of Virtual Infrastructure  Client 2.0 was started but canceled on the Exchange server. VI Client 2.0 requires .NET 1.1 which was automatically installed before the VI installation was canceled.


I had a problem using selfssl.exe (part of the IIS 6 resource kit) to generate more than one self-signed certificate on a specific server. The issue came up after I created a second self-signed certificate with a different CN. The certificate was installed on a separate site (same IP different port) than the first one I generated. The behavior was very strange. As soon as I generated the second certificate, the site with the first certificate would not load at all. If the certificate was removed, it worked fine. So, I regenerated the first certificate with selfssl.exe and the second stopped working. After some searching, I found that some others have had this problem as well: http://blogs.msdn.com/david.wang/archive/2005/04/20/SelfSSL-Bug-with-websites.aspx. These certs have always worked fine, but I think it may be best to limit use to one self-signed certificate per server. [more]Oh, and the blogs post mentions a new version…it doesn’t work either. The only way to get it to work is with ssldiag, but it is not a trivial process.


I recently ran into a problem on one of our websites where users’ authentication was timing out before the amount of time I had set in the configuration.  I was using ASP.NET forms authentication with the timeout set to 30 minutes and sliding expiration set to true.  After some investigation this turned out to be a two part problem.

This first cause I found was that the sliding expiration functionality for forms authentication isn’t exactly intuitive.  When sliding expiration is turned on, each time a web page is requested, the user’s authentication cookie timeout is supposed to be updated to the expire in X minutes from the time of the page request.  However, even though you set a timeout of X minutes it is perfectly normal for a users authentication ticket to expire before that time limit due to the sliding expiration is implemented in the .NET framework.  From the MSDN .NET Framework Reference:

“If the SlidingExpiration attribute is true, the timeout attribute is a sliding value, expiring at the specified number of minutes after the time the last request was received. To prevent compromised performance, and to avoid multiple browser warnings for users that have cookie warnings turned on, the cookie is updated when more than half the specified time has elapsed. This might result in a loss of precision.”

Basically, if the timeout is set to 30 minutes then the expiration time of the authentication cookie is only updated if 15 minutes have passed when a request is made. [more] If a user signed in at 8:00 and requested a page at 8:14 you would think that their authentication would timeout 30 minutes after their last request at 8:44, but instead it would actually timeout at 8:30.  So if you want the timeout to for sure be at least a certain number of minutes you can increase the timeout to twice the desired time, or write your own code to refresh the cookie after each page request.

The second cause of the problem that I found was that the settings on the Application Pool in IIS was causing the ASP.NET worker process to be recycled after a number of minutes and shutdown after 20 of being idle.  I changed the worker process to recycle at a set time during off peak hours instead of after a number of minutes had passed. I also increased the number of idle minutes before the worker process would shutdown.  I included screen shots of the settings below.