Blog

I was trying to connect a VPN from Terminal Server that was recently upgraded to Windows 2008 and when I would connect, I would lose my terminal server connection completely.  I would then have to log my session from a different server using Terminal Services Manager.  I tested the same VPN connection on a local Windows 7 machine and experienced similar issues where all of my network connections were dropped upon connection. 

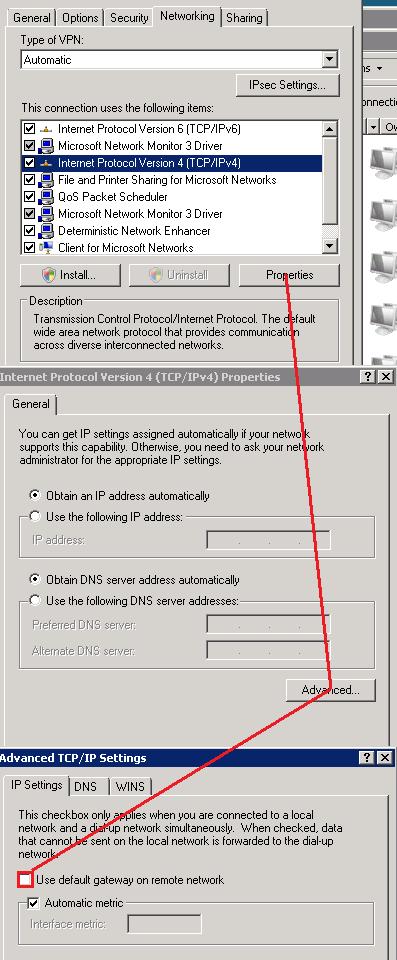
Upon examining the properties of the VPN connection entry, there was a checked setting to use the default gateway on the remote network.  Unchecking this box through the IPv4 properties stopped the disconnects from happening.  I also recommend unchecking the use of IPv6; it also has the same options to use the remote network’s gateway.  [more]


Here's a helpful hint that will save you some time trying to figure out why your additional paper tray won't work after moving your HP printer.  I recently encountered this problem after moving an HP printer to a different spot in the same office.  After I plugged it back in the add on paper tray wouldn't work.  Turns out, the paper tray had to have power before the printer was turned on, or the printer would not recognize it.  Power applied simultaneously did not work.


We are continuing to work through issues with a new VMware View v4 deployment and we had another weird problem come up the other day. I had created a new linked clone desktop pool and View Manager had completed the automatic deployment of several desktops. However, when we would try to connect to the newly created desktops with the View client via PCoIP, we would get a very small (400x600) resolution window as the display instead of the full screen that we had requested. When we requested that PCoIP use multi-monitor display, this small display window would show up in the middle spanned across both monitors in the same small window. Right off I remembered one of a coworker's former gotchas about adjusting the resolution via the .vmx file and that seemed to fix it…however, it kept happening every time a new VM was created by the linked clone pool. I finally found after a VM is created, it must be restarted via the View Manager using the VM reset feature in order for the display settings in the VM to display correctly in PCoIP. Here is another article regarding this issue -> http://www.thatsmyview.net/2009/12/18/how-to-get-pcoip-with-view-4-to-work-every-time/


We had an issue where one of our customers could not synchronize any of his files on his laptop (the last time he tried was over three months ago). He continued to get an error saying “Access Denied” for each of the offline files he was trying to synchronize. After some troubleshooting I found that the error went away if the offline file encryption was turned off. Why was this causing the errors? Well after doing some more research I checked the group policy setting located under “Computer Configuration\Windows Settings\Security Settings\Public Key Policies\Encrypting File System” and sure enough, the certificate there had expired around 3 months ago. [more]

I had to generate a new certificate using the command “cipher /r:file_name” from the windows command prompt and then use the generated certificate to replace the expired one in the group policy. During the process of making some of these changes his offline file settings could not be changed, several of the buttons were grayed out and you could not select additional files to be used offline.

In order to fix this I had to clear the offline file cache. In order to do this in Windows Vista you have to create a new dword in HKEY_LOCAL_MACHINE\SYSTEM\CurrentControlSet\Services\CSC\Parameters called FormatDatabase and set the value to 1, then reboot the computer. Afterward all of the offline file cache will be removed. This also fixed the problem with not being able to add new offline file items.


The RSA iPhone app displays a PIN to use for logging into a protected server.  The displayed PIN consists of two 4-digit codes separated by a space.   When you enter the code, do not enter the space.   The RSA software wants the numbers in one continuous block.


CoNetrix is pleased to announce the release of Tandem, new security and compliance software. Tandem was developed to help financial institutions complete and maintain an Information Security Program (per GLBA and the Interagency Guidelines Establishing Information Security Standards).  While Tandem was designed as a complete solution from the ground up, it was fashioned into modules which allow for versatility.  The modules include risk assessment, policies, vendor management, and business continuity planning.  Each module was released as it was completed.

To read the full press release, visit http://news.yahoo.com/s/prweb/20100216/bs_prweb/prweb3598024_2


Two quick Windows 7 tricks that I ran across a short while back.

  • Shift+Maximize will span across two monitors. Don’t know about three or more.
  • Shift+Minimize will apply a window shade effect on the title bar instead of minimizing it to the task bar.


Imaged clients with a duplicate WSUS Client ID will only appear once in the WSUS Admin Console. Each auto update client must have a unique id which is created for each individual install. The WSUS admin console will only display one client for each unique ID. If you have multiple clients created from one image which are sharing the same ID, only one will appear in the WSUS admin console. All clients will check in and download updates, but only one will appear and display status in the WSUS admin console. Even if it the machine were imaged the proper way with SYSPREP, with a new Name and SID, the WSUS Client ID is not being stripped. In cases where clients are not checking in, and they were created from images, the following steps will reset the existing duplicative client IDs. [more] 

  1. Run regedit and go to HKEY_LOCAL_MACHINE\SOFTWARE\Microsoft\Windows\CurrentVersion\WindowsUpdate
  2. Delete the PingID, SUSClientID and the AccountDomainSID values
  3. Stop and start the Wuauserv Service
  4. From the command prompt run: wuauclt /resetauthorization /detectnow

Or you can create a batch file using the sample below:

rem Fixes problem with client machines not showing up on the server due to imaging method

reg delete HKLM\SOFTWARE\Microsoft\Windows\CurrentVersion\WindowsUpdate /v AccountDomainSid /f
reg delete HKLM\SOFTWARE\Microsoft\Windows\CurrentVersion\WindowsUpdate /v PingID /f
reg delete HKLM\SOFTWARE\Microsoft\Windows\CurrentVersion\WindowsUpdate /v SusClientId /f
cls
@echo Triggering detection after resetting WSUS client identity
net stop wuauserv
net start wuauserv
wuauclt /resetauthorization /detectnow


I’ve never been a fan of (nor seen much reason in) splitting VMDKs into 2GB chunks… though that is often the default setting when creating a virtual machine. However, the other day I found a pretty good reason. When you split your VMDK, VMware creates a single VDisk.VMDK meta file, and several VDisk-s001.VMDK files (which actually contain the data). The meta file is a pretty simple text file with contents that look something like this: [more]

# Disk DescriptorFile
version=1
encoding="windows-1252"
CID=9fb33447
parentCID=ffffffff
isNativeSnapshot="no"
createType="twoGbMaxExtentSparse"

# Extent description
RW 4192256 SPARSE "vdisk-s001.vmdk"
RW 4192256 SPARSE "vdisk-s002.vmdk"
RW 4192256 SPARSE "vdisk-s003.vmdk"
RW 4192256 SPARSE "vdisk-s004.vmdk"
RW 4192256 SPARSE "vdisk-s005.vmdk"
RW 4192256 SPARSE "vdisk-s006.vmdk"
RW 4192256 SPARSE "vdisk-s007.vmdk"
RW 4192256 SPARSE "vdisk-s008.vmdk"
RW 4192256 SPARSE "vdisk-s009.vmdk"
RW 4192256 SPARSE "vdisk-s010.vmdk"
RW 4192256 SPARSE "vdisk-s011.vmdk"
RW 4192256 SPARSE "vdisk-s012.vmdk"
RW 2121728 SPARSE "vdisk-s013.vmdk"

# The Disk Data Base
#DDB

ddb.deletable = "true"
ddb.virtualHWVersion = "7"
ddb.toolsVersion = "8259"
ddb.longContentID = "0bdf39e8f7c80d6f09a431949fb33447"
ddb.uuid = "60 00 C2 9e da ee dc 72-7f ba f5 58 c8 a7 75 58"
ddb.geometry.cylinders = "3263"
ddb.geometry.heads = "255"
ddb.geometry.sectors = "63"
ddb.adapterType = "lsilogic"

The nice thing about this is you can edit the paths to the SPARSE files. This can allow you to put the SPARSE files in a “template” directory for VM clones (preferably read only), then just edit the meta file to point to your template directory. Whenever you want to create a clone, just copy the meta file VMDK to the new VM directory, edit the paths (can be relative or full), and then snapshot your new clone (to make sure it doesn’t change the template files… which would break all your linked clones!).


Here's how you can convert from a VMWare virtual machine to a VPC (Microsoft) virtual machine:

  1. Microsoft’s System Center Virtual Machine Manager will perform V2V conversions.  It converts to Virtual Server 2005 and Hyper-V.
  2. The other way is as follows: [more]
    1. Back up/clone the virtual machine.
    2. Remove VMWare tools from the virtual machine.  (VMWare tools are incompatible with VPCs.)
    3. Run sysprep on the virtual machine.  (This removes hardware-specific information.  Supposedly, the newer Windows OS’s are hardware-independent, and do not require this step, but I could not find an references to people who did it successfully without running Sysprep.)
    4. Copy the virtual disks (VMDKs).
    5. Convert the VMDKs to VHD files.  There are a number of tools which claim to be able to do this.  The one I found that actually completed the process is the StarWind converter.
    6. Create a new VPC and use the VHD files.

 On another note, the Windows 7 virtual PC requires a certain level of processor.