Many organizations are adopting Microsoft 365 (formerly Office 365) and businesses nationwide are seeing the benefits of improved productivity through its email and collaboration solution. Organizations of all sizes can benefit from a seamless user experience between mobile and on-premise environments.
While Microsoft 365 offers great flexibility, it mostly focuses on infrastructure management rather than data management. Meaning: You are responsible for your data.
Some businesses who have migrated their workloads to Microsoft 365 do not realize that the same reasons they had for backing up and protecting that data on-premises applies even in the cloud.
If you are still considering Microsoft 365 for office productivity and collaboration, this article may be for you: Microsoft 365: Is it the right choice for your business?
Without proper backup and recovery, your data is at risk, because Microsoft isn't providing complete protection. It's important to create a backup and recovery strategy to ensure you avoid permanently losing your critical data.
It's important to understand the difference in responsibilities of Microsoft and Microsoft 365 user organizations. Microsoft hosts the infrastructure, but you are responsible for your data.
What is Microsoft's Responsibility?
Cloud Infrastructure Uptime — Microsoft focuses on the infrastructure management rather than data management. By focusing on infrastructure, Microsoft ensures its cloud service is online and operational. Guaranteed uptime is based on your agreement level and outlined in the availability SLA (Service Level Agreement).
Basic Data Replication — Microsoft provides basic data replication with datacenter-to-datacenter geo redundancy, and limited retention for short-time data recovery.
Data Processing Compliance — Compliance and controls for data processing are limited to the processor, not the data itself. Microsoft ensures data privacy, regulatory controls, and industry certifications for compliance are in place and maintained for the infrastructure of its cloud service.
Physical Infrastructure Security — Security functions for Microsoft 365 are limited to physical infrastructure, not data. It includes app-level security, logical security, and access controls for users and administrators.
What is the Customer's Responsibility?
Business Data in Microsoft 365 — The customer is the owner of the data that resides in the Microsoft 365 data centers. As the owner, the customer controls the data and who can access the data. All responsibility of the data is on the user to ensure data security, privacy, and retention.
Enterprise-grade Backup and Long-Term Data Retention — Implementing an enterprise-grade backup solution for Microsoft 365 can give businesses confidence to recover from security breaches, compliance exposure, and data loss. With enterprise-grade backup, a copy of the data is stored outside the environment. In the event of an incident, it provides granular and point-in-time recovery options.
Data Owner Compliance — As the data owner, the customer has the ultimate responsibility of data for internal legal and compliance teams. The customer answers to the demands from corporate and industry regulations.
Security Functions to Protect Data — Protection of data is the responsibility of the user, not Microsoft. Security controls must be implemented to protect the data from internal threats, such as accidental deletion, insider threat, and disgruntled employees, and external threats, such as malware, ransomware, and rogue applications.
What happens when Microsoft 365 is used without backup?
Microsoft only provides basic and limited retention. If you don't implement a backup strategy outside of Microsoft's native capabilities, you are opening up your business for unnecessary risk. Lack of a Microsoft 365 backup plan is a risky data strategy.
Without proper backup and recovery, your organization can expose itself to the following risks:
- Data loss from accidental deletions
- Ransomware attacks and security breaches
- Insufficient retention time for regulatory compliance policies
- Lack of data control due to potential SaaS lock-in
Organizations investing in productivity and collaboration tools should also consider their backup and retention needs as a factor in efficiency and productivity. Considering a third-party backup solution is critical for data loss avoidance.
What is the best strategy for Microsoft 365 backup?
Your data is your business. By taking a data-driven approach to your backup strategy, you recognize the critical importance of your data for your business stability.
Make Microsoft 365 Backup a Key Priority
Backup for cloud services (SaaS), such as Microsoft 365, is imperative for security and data control. Full oversight and control of data is a boardroom priority. Without backup, organizations do not have an exit strategy or freedom from SaaS lock-in because they are not in complete control of their data. Backup should be part of the conversation when buying SaaS and not an afterthought.
Consider Enterprise-grade Data Protection
When investing in backup solutions, consider integration between the Microsoft 365 environment and your existing data protection environment. Evaluate automation, security, and integration between systems when comparing enterprise-grade data protection and recovery features. Integrating SaaS into enterprise data protection can help unify data management.
What to look for in a Microsoft 365 backup solution
1) Freedom to use existing on-premise capacity for Microsoft 365 backup, or the ability to leverage another cloud for cloud backup.
2) Basic features provided, such as incremental backups, granular recovery, automation, and policy-based retention capabilities.
3) A solution capable of managing and protecting hybrid deployments and the ability to ease the full adoption of SaaS.
4) Integration between Microsoft 365 and the customer's existing data protection environment.
5) Advanced security features such as access control, SaaS usage metrics, and multifactor authentication for additional security.
6) Ability to scale up or down as business and data demand changes and as SaaS is rolled out more widely within the company.
Investing in productivity tools and the corresponding backup is an exciting adventure. When you are ready for a guide, we are here to help. We can advise on and implement a solution that fits your business needs. Contact us today to schedule a consultation.
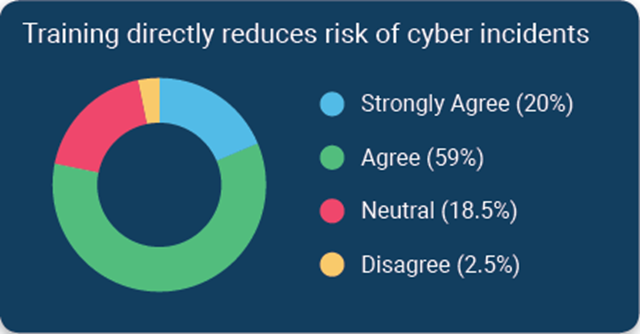 According to a survey of financial institutions conducted by Tandem, a CoNetrix Security partner, 79% of respondents stated they believe cybersecurity awareness training directly reduces the risk of security incidents. Download the 2020 State of Cybersecurity Report for additional trends and insights.