Blog: Networking

Those of us that use Vista have learned to use VPNs sparingly due to the new TCP/IP stack.  In Vista, shortly after establishing a VPN using the Windows client (not the Cisco VPN client), you will lose authentication to your local domain resources, particularly file shares (including the DFS).  The only consistent workaround I’ve been able to find for this problem is to delete my VPN credentials right after I bring up the VPN (before my local authentication goes away).  Just open a command prompt once your VPN is established and type:

cmdkey /delete /ras

This will remove your VPN authentication and preserve access to local shared resources.  If you need to browse to something over the VPN, you will be prompted for credentials on the remote system.


We had a customer that was seeing logon failures on their domain  controller (Event ID 680) generated from their Exchange server.  The usernames requested were completely outlandish, and were determined to be simply coming from a dictionary attack.  The only service the bank had exposed was its SMTP service (Exchange server exposed directly to Internet via SMTP PAT).  We did some research and found that the failures were related to the SMTP "Auth Login" command.  The SMTP service was configured to allow Basic and Integrated authentication.  It appears that someone was using some type of dictionary attack from the Internet to try to guess valid user accounts and passwords via the SMTP service.  We disabled authentication support for the SMTP service so “Auth Login” is not available. [more]


One of our customers is running Symantec Mail Security for Microsoft Exchange 5.0.  We were having trouble with the service hanging up in a "Starting" state when the server started up.  [more]See below the picture below.


I wanted to delay this service from starting up until the server boot process was further along.  Using the command “sc query”, I was able to see the Service Name: SMSMSE that matched up with the Display name in the services list.

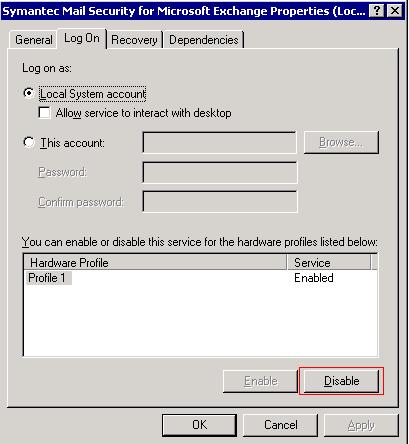
Since the service was hung up, I could not set the service startup type to disabled or manual.  In the service properties, Log On tab, click the disable button to disable the service from starting up for the hardware profile, and reboot the server.  After the server has rebooted, make sure to go back and “Enable” the hardware profile.

While the server was booting up, I connected to the services list of the server from another PC.  This way, I could see which services were starting up towards the end of booting.  One of the last services to start was “Microsoft Exchange Information Store”.  Knowing that, I needed to find the Service Name to match the Display Name.  Using “sc query” again, I found the service name to be MSExchangeIS.

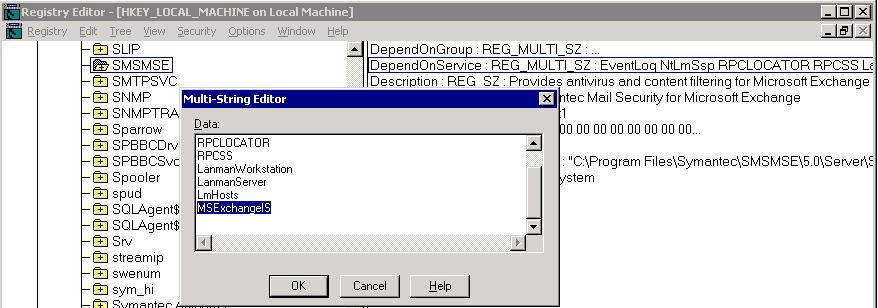
In order to get the SMSMSE service to startup AFTER the MSExchangeIS service started, you have to specify that SMSMSE depends on MSExchangeIS to be started before it can start.  To do this, open regedt32.  Regedit will not work in this case because we have to edit a REG_MULTI_SZ key.  Go to the following location in the registry: HKEY_LOCAL_MACHINE\SYSTEM\CurrentControlSet\Services\<Service name>.   The key to edit or add is “DependOnService”.  In this case, I added “MSExchangeIS” to this list so the service would not try to start until this service was started.


After this change was made, the SMSMSE service was delayed long enough for it to be able to startup automatically.


In the past, we had removed the Firewall Client Management Tool (fwcmgmt.exe) from the Startup folder for All Users during Terminal Server setup. This was done to prevent the icon from showing up in the system tray for all users.

It appears that this tool must be running in order for firewall configurations to be pushed out from ISA. Recently we configured the firewall client to disable web proxy in order to force all applications (IE, etc) to use the firewall client. However, these settings were not pushed out for users because the Firewall Client Management Tool was not running. [more]

Adding this tool back to the All users Startup folder enables this process to run for all users. In addition, you can modified an ini file (Documents and Settings\All Users\Application Data\Microsoft\Firewall Client 2004\management.ini) on a server so that the system tray icon will be hidden for all users.


When creating or using a custom ADM file in group policies, some options may not be visible.  This is because the setting is considered a "preference" and the settings will not revert if the group policy is removed.  You must uncheck "Only show policy settings that can be fully managed" under the group policy editor's context menu.  (View->Filters).


The VMware Virtual Disk Manager (vdiskmanager) is a handy command line tool that will allow you to expand the size of a vmware virtual disk, and many other things. For more information about using the vdiskmanager command visit the VMware Server Online Library. [more]

VMware Virtual Disk Manager - build 59824.
Usage: vmware-vdiskmanager.exe OPTIONS <disk-name> | <mount-point>
Offline disk manipulation utility
  Options:
     -c                   : create disk; need to specify other create options
     -d                   : defragment the specified virtual disk
     -k                   : shrink the specified virtual disk
     -n <source-disk>     : rename the specified virtual disk; need to
                            specify destination disk-name
     -p                   : prepare the mounted virtual disk specified by
                            the drive-letter for shrinking
     -q                   : do not log messages
     -r <source-disk>     : convert the specified disk; need to specify
                            destination disk-type
     -x <new-capacity>    : expand the disk to the specified capacity

     Additional options for create and convert:
        -a <adapter>      : (for use with -c only) adapter type (ide, buslogic or lsilogic)
        -s <size>         : capacity of the virtual disk
        -t <disk-type>    : disk type id

     Disk types:
        0                 : single growable virtual disk
        1                 : growable virtual disk split in 2Gb files
        2                 : preallocated virtual disk
        3                 : preallocated virtual disk split in 2Gb files

     The capacity can be specified in sectors, Kb, Mb or Gb.
     The acceptable ranges:
                           ide adapter : [100.0Mb, 950.0Gb]
                           scsi adapter: [100.0Mb, 950.0Gb]
        ex 1: vmware-vdiskmanager.exe -c -s 850Mb -a ide -t 0 myIdeDisk.vmdk
        ex 2: vmware-vdiskmanager.exe -d myDisk.vmdk
        ex 3: vmware-vdiskmanager.exe -r sourceDisk.vmdk -t 0 destinationDisk.vmdk
        ex 4: vmware-vdiskmanager.exe -x 36Gb myDisk.vmdk
        ex 5: vmware-vdiskmanager.exe -n sourceName.vmdk destinationName.vmdk
        ex 6: vmware-vdiskmanager.exe -k myDisk.vmdk
        ex 7: vmware-vdiskmanager.exe -p <mount-point>
              (A virtual disk first needs to be mounted at <mount-point>)


While onsite for an IT audit this week, I had to connect to a bank's network from three separate locations. 

At the first location, I got a couple of DHCP addresses (one for my host and one for VMWare workstation) and had no trouble getting connected to the Internet (via browser, RDP, etc.).

When I connected at the second site, I was able to get Internet connectivity from my host but not from within VMWare.  I fiddled with it for a while and finally made do.

When I connected at the third site, they told me they needed to give me static IPs since they had IP tables in their Checkpoint firewall to define what systems had Internet access.

That got me to ask why I had no problems at the first site and half a problem at the second site.  The root cause of all this was their lack of reviewing the IP table in their Checkpoint firewall.  The whole bank subnet at the first site was allowed access to the Internet (this was leftover from a merger about six months ago).  The IP address DHCP gave my host at the second site just happened to be in their list on the firewall (nobody could remember why that random address was in the table).  It's good to review your configurations or have someone else look over them, because mistakes won't necessarily be obvious.


Make sure that you plug the printer in while the thin client is turned off. After plugging it in boot up the thin client. Log in and go to install a printer like normal. You should see a printer port named LPT2, this is the one that you want to select since it is what was mapped to that USB port. If you plugged in the printer while the thin client was turned on you have to turn it off and switch the printer to another USB port.


If you want to restore a SBS 2003 box that was upgraded from SBS 2000 using tape backups from Backup Exec, here is the process…and believe me this is abbreviated. [more]

  1. Install SBS 2000 so that you can get the system path to be c:\winnt and some necessary dlls that will break the kernel if you try to go directly to SBS 2003. It is temping to use an unattended install and skip directly to SBS 2003 with a  custom install point, but I speak from experience…it doesn’t work. No need to install and configure DNS…I know it sounds like it will break, but it won’t. The only component that should be installed is SBS. Don’t install Exchange, ISA, SQL or the optional components….JUST SBS. Trust me. Be sure to name the domain the same as it was before during setup.
  2. Your goal is to get to SBS 2003, but before you upgrade your SBS 2000 install, you must install Windows 2000 SP3, then SBS SP 1a, then Windows 2000 SP4. Having fun yet?
  3. Upgrade to SBS 2003 and then fix what didn’t work when you upgraded it….just kidding this actually works pretty well considering.
  4. Your next step is to get Backup Exec up and running. So either reinstall Backup Exec on the SBS 2003 box and inventory your recovery tape or install the tape drive and Backup Exec to another server and do it there. Really doesn’t matter where you do it from. Make sure your backup exec service account has access to your restored server if you moved it to a different server.
  5. Reboot your restored SBS 2003 server into AD recovery mode by pressing F8 at boot time. It’s like booting to safe mode, but it’s a different option on the same screen.
  6. Do the authoritative restore, but DON’T restore anything that has anything to do with SQL, Exchange. That includes program files directories, databases, all the other items that are included in the doc link below. Yeah, this seems strange, but bare with me. Oh, and if ISA was originally installed, you can restore it, BUT if it was set up to log to a local SQL MSDE database (which most are because it is an SBS install and I think that is the default behavior), it won’t work. Exactly how ISA will act once restored is somewhat of a mystery so best of luck to you. IMO, just remove it and deal with it after all this mess is done.
  7. Reinstall SQL Server and Exchange Server from media. I know, I know….you have a backup of it so why do you have to reinstall it from the CD that you don’t have. Because…
  8. Using single user mode, restore the master SQL Server database first then restore all the other databases.
  9. Reinstall Exchange with the /disasterrecovery option. Follow the instructions in the doc…just follow the doc. Just get ready to run eseutil on your databases because they will need it, especially if circular logging was turned on at the message store level (and if you are the one that turned circular logging on…shame on you!). Mount your databases after all the consistency checking is complete.
  10. Now, take a breath, go get a burger from Whataburger because by now it is 2:00 in the morning and that is the only place open.
  11. Address the literally hundreds of issues that will arise after you have done this procedure.

Here is a link to the unabridged version:  http://seer.support.veritas.com/docs/243037.htm 

Oh, and in all this you better hope you are restoring to similar if not the same hardware. The support on this process from Backup Exec goes right out the window if you aren’t restoring to the same/similar hardware. And you MUST have the media to reinstall all this stuff. Gathering this type of stuff seems trivial, but it is actually one of the MOST difficult parts of this process, especially if the customer is not a volume license holder.