Blog

When you enable SSLVPN or HTTP/HTTPS for Management on your WAN interface on a Fortigate, the Fortigate creates global system Local-In policies. These are built-in policies that allow all traffic to the ports and services for SSLVPN and management on the WAN interface by default.

When you put in a Geoblocking rule to block traffic to or from certain countries on your Fortigate under IPv4 Policies, that will not affect these system Local-In policies, even if you put in an IPv4 policy to block all inbound traffic from certain countries. There are a couple of ways to fix this.

The first option is the most restrictive and would probably be the best. This option is to specify only the addresses you want to have access to these services when setting them up, which will prevent a global system Local-In policy from being created. When setting up SSLVPN, instead of allowing access to all hosts, you can specify only the IPs or countries you want to have access to the SSLVPN ports from the outside. (You need to have already setup the address objects for the IPs or countries you want to have access).

To restrict management from the outside, under the WAN interface, simply don't enable HTTP or HTTPS. That will prevent the default Local-In policy from being created.

If you do need external management access, you'll then need to create a custom Local-In policy to allow access on those ports from the network from which you'd like to access it. We typically add the entire company external subnet. Just be sure that this network is also added as a trusted host under your system administrator's account (System -> Administrators)
Custom Local-In polices can only be created via CLI. The following CLI commands will create this custom Local-In policy. These commands assume that you've already created address objects for your WAN IP named Wan1_IP and the public subnet named "External", a service object for your web management port named MGMT, and assume that your WAN interface is wan1.

config firewall local-in-policy
edit 1
set intf "wan1"
set srcaddr "External"
set dstaddr "Wan1_IP"
set action accept
set service "MGMT"
set schedule "always"
next
end

The second option is to just leave those default system Local-In policies in place, but then to create custom Local-In polices to block access to SSLVPN and management services from IP addresses or countries that you don't want to have access
Again, since this is a cusom Local-In policy it has to be added via CLI. The following CLI commands also assume that the address and service objects have already been created for your WAN IP, for the countries you want to block, for your SSLVPN and management services, and that the WAN interface is wan1.

config firewall local-in-policy
edit 1
set intf "wan1"
set srcaddr "Blocked Countries"
set dstaddr "Wan1_IP"
set action deny
set service "SSLVPN"
set schedule "always"
next
edit 2
set intf "wan1"
set srcaddr "Blocked Countries"
set dstaddr "Wan1_IP"
set action deny
set service "MGMT"
set schedule "always"
next
end


Windows released a tool called Windows Configuration Designer.  This allows you to automate new PC deployments. It can automatically uninstall all of the bloatware installed on the PC, skip the setup screen at the start, join the domain, and install programs. It will also allow you to place the PC in the correct AD organizational unit, allowing GPO's to apply instantly to the PC. After you configure a USB drive, all you have to do is plug in the USB to the new PC, and turn the pc on. WCD will do the rest for you.

https://docs.microsoft.com/en-us/windows/configuration/provisioning-packages/provisioning-install-icd  


By:

CoNetrix recently assisted two customers with targeted phishing attacks in which the attackers attempted to redirect wire transfers. This activity is not new, however, some of the tactics utilized in the attack are noteworthy and provide insight into how organizations can better protect themselves.

How did the attackers gain entry into corporate accounts? 

The entry point for the attackers was corporate email accounts that were exposed to the Internet and accessed using a web browser. The email accounts of the victims were compromised by guessing passwords or reusing previously-compromised passwords. Once access was gained to the email accounts, mailbox rules were configured to direct emails about wire transfers to the "RSS Feeds" folder. This effectively hid the email messages from the victim, while allowing the attacker access to them.

Next, the attacker sent email messages from a domain name similar to the domain name of the compromised email account. The fake messages said the previous email messages concerning money transfers were in error and provided different destination bank routing and account numbers where the money would be accessible by the attackers.

Take steps to mitigate the risks of phishing attacks 

In these cases, the fraudulent email messages were noticed by the recipients and the attacks failed. However, these attacks are routinely successful, and it is necessary to take steps to mitigate the risk, especially when corporate email accounts are accessible using a web browser (e.g. Office 365, Outlook Web Access (OWA), cloud-hosted email, any email account that can be logged into using a web browser and public Internet access).

  • Review your organization's email services to see if Internet-facing email access is enabled. One way to do this is to ask the question, "can we log in to our email accounts using a web browser from any Internet connection (e.g. a coffee shop, at home, at a hotel)?"
  • If Internet-facing email access is enabled disable access for employees who do not need it.
  • For employees who need Internet-facing email access, enable dual-factor authentication.
  • Look for inbox forwarding or redirect rule changes. Logging for these changes can be enabled in the email system's administrative console.
  • On firewall or intrusion prevention devices, enable rules to block traffic that is sourced from countries where known malicious traffic originates.
  • Utilize security event monitoring technologies to monitor web server logs for abnormal login activity.
  • Do not rely solely on email or other electronic communications for initiating or modifying financial transactions. Implement out-of-band approval procedures such that financial transactions and changes to financial processes must be verified using a different form of communication. For example, if a request to change a receiving bank account number is initiated via email, it must be verified via a phone call to a number that is already on file.


CoNetrix strongly recommends all organizations implement the appropriate updates or mitigation measures for this confirmed vulnerability. CoNetrix has installed updates or implemented the mitigation steps for all affected CoNetrix Technology and Aspire customers.

On December 17, 2019, Citrix announced a directory traversal vulnerability in the Citrix Application Delivery Controller (formerly NetScaler ADC) and Citrix Gateway (formerly NetScaler Gateway) products. If exploited, this vulnerability could allow an unauthenticated attacker to perform arbitrary code execution. This is similar to the Fortigate vulnerability in 2019.

Citrix Security Bulletin: https://support.citrix.com/article/CTX267027, including information about updates to address this vulnerability.

If you cannot install the updates, Citrix has provided some configuration changes that mitigate the issue: https://support.citrix.com/article/CTX267679

How to Quickly Check for this Vulnerability

CoNetrix Security penetration testers were able to confirm the vulnerability by checking the response when browsing to a specific URL (https:// <IP address> /vpn/../vpns/cfg/smb.conf). If you perform the same action and are able to read the smb.conf file, this is confirmation that your system is vulnerable. If the mitigation is in place you will receive a 403 Forbidden error (or potentially some other error message). Also, CoNetrix Technology engineers discovered IDS/IPS signatures for this exploit, but they were not set to 'block' by default by the IDS/IPS vendor.

How to Mitigate this Vulnerability

This is being actively exploited in the wild, so we encourage you to install the fixed versions or apply the recommended mitigation steps as quickly as possible.

Steps to Take Post-Mitigation

Remember, it is important to validate the mitigation is working as expected after applying the configuration.

Citrix and FireEye have developed a scanner to detect if your NetScaler installation has been compromised: https://www.citrix.com/blogs/2020/01/22/citrix-and-fireeye-mandiant-share-forensic-tool-for-cve-2019-19781/

Once the mitigation steps have been implemented, here are a few addtional action items: 

  1. Review the systems active processes and connections to the Internet.
  2. Work with Citrix to review system logs for any potentially suspicious connections attempts.
  3. Work with your IDS and/or firewall vendor to review any potentially suspicious connections attempts.
  4. Check for newly created XML files in the /netscaler/portal/ /var/tmp/netscaler/portal/ directories and sub-directories.
  5. Search for and review any newly created files or scripts. Some exploit intel has indicated Perl scripts being added to the /netscaler/portal/scripts/ directory.
  6. Look for any CRON jobs that have been added to provide an attacker persistence even after the vulnerability is patched.

CoNetrix has installed the update for all CoNetrix Technology and Aspire customers. CoNetrix Security has reviewed data collected during penetration tests from the previous year and notified customers that had this vulnerability. If you are not a CoNetrix customer and would like additional information or assistance with implementing these mitigation steps, we encourage you to contact us.


Recently, we had received reports from several external parties that they were unable to send email to conetrix.com addresses. The NDR message reported "MX record not found for conetrix.com".
 
Simple solution, right? Not our problem. I checked several external and global DNS caches including OpenDNS, CloudFlare, and Google, and all successfully resolved records without issue. One aspect that all parties had in common was they were sending email via Gmail, specifically Google Apps accounts. I've got a Google Apps account on a personal domain, so I sent a test email that was delivered without any issues. At this point, we figured it was a transient issue and moved on.
 
Except it wasn't. Over a period of time, it became apparent that this issue was still occurring with fair regularity and that there was something still going on. So what if this actually is our problem? What could any possible solution be?
 
I had taken vacation during the troubleshooting period and came back to the office following my PTO with a mini-epiphany. We host our own DNS records. Could it be possible that these Google Apps customers couldn't connect to our nameservers to resolve the MX records correctly?
 
On a whim, we updated the geoblocking rules on our external firewall cluster to allow inbound DNS requests from any country (not any traffic, only DNS requests). After reaching out to the external parties to send us new email, those messages were successfully delivered and we have not seemed to have had any issues since then.

I don't know why unencrypted Google Apps DNS requests were routed through foreign countries – especially countries that were added to our geoblocking list as housing potentially malicious traffic – but it seems pretty likely that this was the case.


I came across a GPO that had a few proxy server related settings configured in "Extra Registry Settings" which I needed to remove.  The "Extra Registry Settings" configuration does not show up in GPMC for later OS versions to edit these settings.
 
Powershell can be used to remove "Extra Registry Settings" with the "Remove-GPRegistryValue" command to specify the GPO name, the registry key, and the value. 


We had a customer with multiple FortiGates that were reporting they could not get the Internet at multiple sites. In investigating, I found that the FortiGates at these sites did not have a connection to FortiGuard and were therefore unable to assess web traffic. Running the command get webfilter status from the CLI of the FortiGates that were having problems showed that they were unable to connect to the FortiGuard. You can also it in the screenshot below on the System > FortiGuard page:
 
 
The solution in this instance was to change the connection of how they FortiGate connects to FortiGuard from HTTPS to UDP. This setting can be found under System > FortiGuard. It can also be set via the CLI commands below:
        config system fortiguard
                set protocol udp
                set port 8888
                 set update-server-location usa
end
 
It is important to note that all of the Fortinet products connect to FortiGuard to download definitions for licensing, web filtering, anti-spam, etc. If the connection to FortiGuard is down, there may be issues.


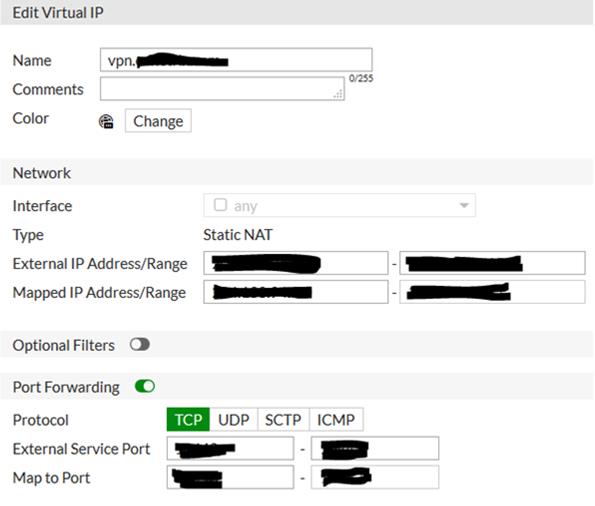
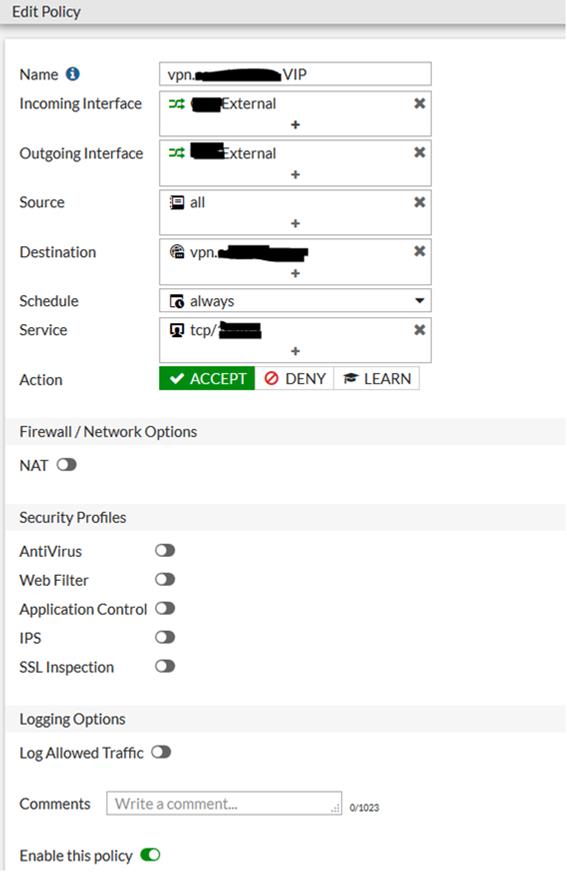
When a secondary public IP address is utilized for VPN connections, the configuration of an IPSEC VPN versus an SSL VPN is quite different.  For an IPSEC VPN, it's as easy as turning flipping a switch and selecting the IP address:  

For SSL VPN it takes a couple of steps: First a Virtual IP (VIP) has to be created that points the primary IP at the secondary IP.  Additionally include port forwarding for the SSL port to be utilized:  

Second, an IPv4 policy needs to be created using the WAN interface for both incoming and outgoing, with the destination being the VIP:


When doing maintenance on an Exchange server environment configured with a DAG, one of the things that you have to be aware of is how to temporarily remove one of the servers from the DAG before you disrupt any of the Exchange services (i.e. reboot) so that it doesn't inadvertently cause a failover of your databases or make some databases unavailable. Microsoft wrote a blog post a while back talking about the proper way to place an Exchange server into maintenance mode and it's a bit clunky - https://blogs.technet.microsoft.com/nawar/2014/03/30/exchange-2013-maintenance-mode/ 

Fortunately, there's a script readily available that takes care of most of this for you, including failing over the database to another Exchange server if needed. Located in 'Program Files\Microsoft\Exchange\V15\Scripts', take a look at the StartDagServerMaintenance.ps1 and StopDagServerMaintenance.ps1 scripts (and the RedistributeActiveDatabases.ps1 script. Running the script is simple, just pass the server name that you're starting or stopping maintenance on to their respective scripts and let PowerShell take care of the rest! Easy, no? 

Well, sorta. You see, for a few versions now (including Exchange 2013 and Exchange 2016), the StartDagServerMaintenance.ps1 script has a typo in it – specifically the part of the script that actually pauses the node in the cluster. In the parameters, Microsoft has set "$pauseClusterNode" equal to "$false" instead of "$true".   

Left alone like this, the cluster node will never be paused and potentially could cause issues when you reboot, not to mention that when you run the StopDagServerMaintenance.ps1 script, you'll receive a warning that "Call-ClusterExe: cluster.exe did not succeed" meaning it didn't do anything. Just change that parameter to "$true" and you're good to go.