Blog

By: (CISA, CISSP, Security+)

Well, maybe it used to be the question, but it is no longer a question to be asked. Scanning your network is an essential part of your security protocol to ensure that customer information is secured. So, since I need to scan my systems for vulnerabilities, where do I start?

Determine the Best Product to Scan Your System

There are many good products on the market to test for system vulnerabilities. The best method is to review different products and decide which product will take care of your needs. Not only does the product need to give you information on what vulnerabilities exist on your network, but it also needs to provide you with reporting that is easy for you to read and understand. A report is only good if you can take the information and make decisions on how to remediate the findings that it observes.

Rely on Network Vendors to Conduct Your Scanning

You may be thinking, I do not have the expertise to conduct these scans and read the reports, so what do I do now? This is where you will have to rely on a network vendor or third-party to conduct your scanning. You also need to ensure you have a contract and have conducted your due diligence with this vendor because they will need an administrative account on your network to perform an administrative vulnerability scan. User accounts can be used to scan the systems but will not give you a full representation of all your vulnerabilities. The goal is to mitigate as many vulnerabilities as possible, and a good administrative scan will help you reach this goal.

Remediate Vulnerabilities on the Network

Now that I have all this information, what do I do? REMEDIATE and DOCUMENT. Yes, those two words you always love to hear that strike fear in the hearts of man. Most, if not all, scanning software will rate the criticality of each vulnerability that is found on the network. Always start with the most critical and work your way down the list. Findings will require a knowledge of the systems you are running and an understanding of how to remediate the vulnerability. If you do not have the expertise to take care of these issues, a network vendor will need to be used at this point. Some findings require changes in Active Directory, registry settings or Group Policy. When changing these settings, making the wrong move can cause tremendous damage to your network. If one of these settings need to be changed, it is always a good practice to change the setting for one computer and test the change to ensure it does not cause issues with existing applications.

Sometimes settings cannot be changed due to the harm it causes in the system. If this is the case, document, document, document. Documentation needs to be completed that reveals the issue when you will resolve the issue, how the issue was resolved, and then verify that the issue was resolved.

Verification of the resolution is a critical part of the process. If a change is made in Active Directory, how do I know that the change has happened? If there is a change in Group Policy, how do I know if it has propagated to all the systems with the vulnerability? There are multiple ways to verify different vulnerabilities have been remediated, but the best way is to rerun a scan against the system.

Continue to Scan Your System

So how often do I need to run this scan? The frequency of the scan will be determined by your risk assessment and the size and complexity of your system. Sound familiar? Sounds like a statement that may come from your regulator or through guidance, doesn't it? If my system is not that complex, I would not have to scan frequently, but if it is complex, open to the outside world, and includes multiple users, I would need to scan more frequently.

Keep Up to Date with New Vulnerabilities

New vulnerabilities are being developed all the time, and a system that is scanned and is secure one day may be the target of a new vulnerability the next day. When you are between scans, be sure and keep yourself aware of any new vulnerabilities that may arise, especially those vulnerabilities that target your systems. Keep up to date by receiving emails from publications, vendors and regulators, and attending webinars and seminars that deal with information technology. Sound like a full-time job? It is!

So, to scan or not to scan can never be the question again.


Proof-of-concept (PoC) exploitation code is now in circulation for a critical privilege elevation vulnerability (CVE-2020-1472) in the Microsoft Netlogon Remote Protocol (MS-NRPC). This vulnerability, also known as "Zerologon," occurs when establishing a secure channel connection to a Windows domain controller. 
 
Exploitation could allow an unauthenticated remote attacker on the local network to gain domain administrator privileges on vulnerable systems. The first phase to mitigate this vulnerability is to install the August 11th, 2020 update patch to all domain controllers. The second phase is scheduled to be released in early 2021.
 
The mitigation update for this vulnerability was installed before the end of August for all Aspire cloud hosting systems and CoNetrix Technology customers with a patch management service agreement. All other CoNetrix Technology and CoNetrix Security customers should install this update as soon as possible.
 
For CoNetrix Technology Cybersecurity Monitoring customers, we are working with our SIEM provider to identify and send alerts when this exploit is attempted on domain controllers. However, the August 11th update is required to be installed before the security log entries will be created. We will post an update when these new alerts are operational.
 
 
Please contact CoNetrix Customer Service at support@conetrix.com or 806-698-9600 if you have any questions or need assistance with installing the August 11th update.


For most customer networks, file servers turn into a mess over the years. This is usually due to a few things. First, users have access to make folders at high levels and then place data in those folders that should have access restricted. Second, users try to solve the first problem by securing those folders, but end up breaking access to administrator accounts. Third, most lack a logical structure or any guidance as to where certain documents should be stored, so documents end up in multiple folders.

I have been working with a customer who had all of these issues, along with the need to merge two file structures into a single structure after the merger of their two companies. My suggestion to the customer was to come up with a structure for five to ten top level folders that would be the shared folders. Their primary focus for the top level folders was by department (HR, Finance, Legal, etc.) We then tightly controlled the second to fifth levels, depending on the granularity needed of the specific folder. At the controlled levels, we did not allow users to make new folders or files and also prevented them from changing the permissions for these folders. We used a combination of list, read, and read/write access to all of these folders. We created an Active Directory group for each folder and the level(s) of access necessary for that folder. We then created additional groups in Active Directory based on job role and made these groups members of the Active Directory groups used for setting permissions on each folder.

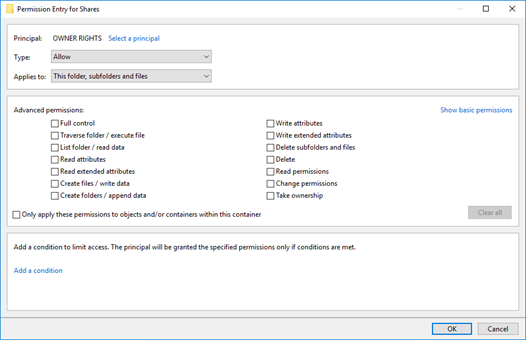
After setting all of the folder permissions, I found that the Owner of the file or folder had Full Control even if they should not have this level of control based on the NTFS permissions. This can be fixed by setting OWNER RIGHTS to none, which will cause the permissions explicitly defined to be enforce and not be circumvented by OWNER RIGHTS.

The partial folder tree shown in the screenshots below is as follows:

  • Shares – OWNER RIGHTS permissions set
    • (Other folders not shown)
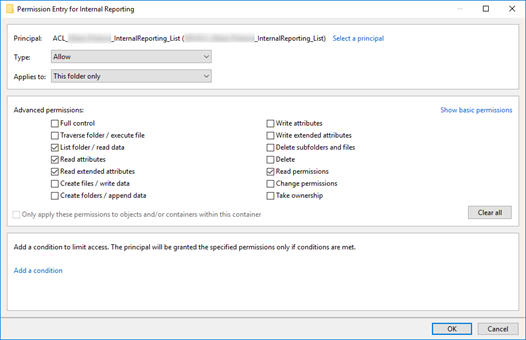
      • Internal Reports – List permissions
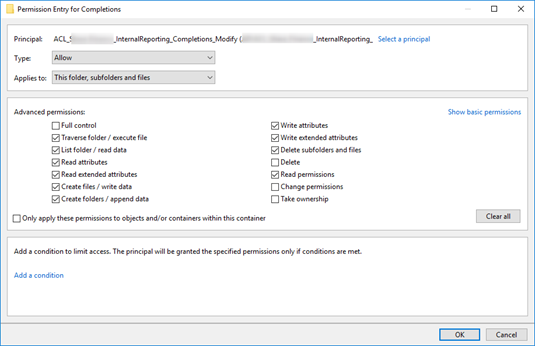
        • Containment – Read only and Modify permissions set

Example of OWNER RIGHTS permissions. Notice no boxes are selected, which causes the owner to have no rights and the other defined permissions to be used:

Example of the Internal Reporting folder with list permissions:

Example of the Internal Reporting\Completions folder with read only access:

Example of the Internal Reporting\Completions folder with modify access. Notice "Delete" is not selected, but "Delete Subfolder and files is". Delete is the value in the "Modify" permission set, so this change makes this not truly "Modify", but rather "Special":


I recently worked with an admin user from one of our clients. Her account kept locking out each Friday @ 6 PM. I checked Netwrix and found the server that was locking the account. This was also in the event viewer on the domain controller. I checked the credential manager on that server for any cached accounts and found none. I checked the task scheduler and there were no scheduled tasks. I checked the event viewer to verify the lock out, and found the account was trying to connect to a CIFS share.

The fix was to run this command as an administrator on that server: 'rundll32 keymgr.dll,KRShowKeyMgr'.

This will open a "Store User Names and Passwords" window. In that window, I found the user ID that was locking and removed it.


I had a customer who had several users who could not do any searching in Outlook. The error was, "Something went wrong and your search couldn't be completed." along with a mention of the appearance of there being no network connection.

Another engineer had been talking with one of the customer's IT people about a different issue and apparently they may have accidently turned off EWS (Exchange Web Services) globally while investigating/troubleshooting another problem. I compared the broken mailbox to a known working mailbox and the working mailbox had EWS enabled, so I re-enabled it using some Powershell commands and the user was now able to search. 

To check if EWS is enabled/disabled - get-casmailbox someMailbox@domain.com | fl *ews*

To turn on EWS on for Outlook - Set-CASMailbox someMailbox@domain.com -EWSEnabled $true -EWSAllowOutlook $true

https://docs.microsoft.com/en-us/powershell/module/exchange/client-access/set-casmailbox?view=exchange-ps

Exchange Web Services is typically on by default for Outlook as it is used for a variety of functions including searching, calendar shares, permissions and availability, shared mailbox permissions, and out of office settings.


After changing my domain password, the Microsoft Teams app on my iPhone signed me out, and I was unable to sign back in. When I would enter my username & password, it would go to a white screen with a spinning circle for several minutes and eventually time out. After trying several things I finally wondered if some of my content/privacy restrictions might be causing the problem & sure enough that was the case.

When I disabled the web content filter it worked. To configure this setting on an iPhone with iOS 13.x, go to Settings > Screen Time > Content & Privacy Restrictions > Content Restrictions > Web Content and set it to "Unrestricted Access"


I've run into this issue a few times over the past few months and the fix has been roughly the same each time. Typically, what will happen is that a user account is created in Azure AD with a specific username/UPN. Later on, an account will be synced from the on-premise Active Directory environment with the same username/UPN. Azure tries to automatically reconcile this during the sync by renaming the synced account and appending numbers to the end.

Naturally, this is a problem if you need the on-premise AD account to be the authoritative copy. The first thing to be resolved is whatever is causing the conflict in the first place. Once that is resolved, Azure won't automatically rename everything back. Not to mention that once the account is already synced, it won't auto update the account as the source has not been changed since the original sync.

Since deleting and re-creating the on-premise account isn't always the best option, your solution is fairly simple – update the attribute on the source side to some bogus value, force a delta sync, update the attribute back, and force a delta sync again.

For example, if the email address of your on-premise user is tuser@domain.com and the Azure AD account shows the SMTP attribute is listed as tuser5589@domain.com, update the primary SMTP value in the proxyAddresses attribute to tuser1@domain.com and force a delta sync. Azure AD should then show tuser1 as the primary SMTP value with tuser5589 no longer listed. Once you see that, change it back to tuser@domain.com and force another delta sync.

I've had to run through similar steps with the proxyAddresses and the UPN attributes for the conflicting objects.


We have a customer that I'm working with to rebuild their RDS farm from 2008R2 servers to 2016. Once I finished the initial deployment, I began testing the builds and realized pretty quickly that I couldn't open the start menu or use even use the search feature in the taskbar no matter what I tried.

I was using the same group policies that were currently applied on their existing farm thinking it should transition pretty smoothly, but that turned out not to be the case. I was eventually able to narrow it down to a single policy, but I also made the mistake of using Group Policy Management from their current 2008R2 management server, which I discovered later on complicated the troubleshooting since the setting causing the issue isn't visible from the 2008R2 console.

It ultimately turned out to be due to Applocker's Packaged App Rules. Since this had never been configured previously, there was no default rule to allow signed packaged apps that had been introduced in Server 2012 and later, and is what was ultimately breaking the Start button/Search feature.


My home Surface Mini running Windows 10 would default to Pacific time zone instead of Central. I would change the time zone, but when the system was rebooted it would default back to Pacific. One place where you change the time zone we would get an "Unable to continue" error. After trying a few things, I attempted using the command prompt to change the time zone & it worked. Here are the time zone commands you can use:

  • "tzutil /g" will show you the current time zone.
  • "tzutil /l" will give you a list of possible time zones.
  • "tzutil /s "name of time zone"" will allow you to set a time zone, (i.e. tzutil /s "Central Standard Time"}


I wanted to be able to install some software on a personal Microsoft Surface, but when I went to switch Windows out of S mode, the "Get" button was grayed out.

This can happen if you are not an Administrator on the machine or if the machine is associated with a domain; however, neither of these were the case. The issue for this device was it had an associated school account. To fix the problem and allow you to get out of S mode, follow these steps:

  1. Open Windows settings.
  2. Select Accounts.
  3. Click on the Access work or School tab on the left-hand side.
  4. Click on the businesses account (school or work), then click on Disconnect or Remove. Removing these accounts will not actually remove your organization email from individual apps, but these kinds of accounts can have automatic restrictions associated with them which would limit things like switching out of S mode.
  5. Reopen the Microsoft Store and you should now be able to Get out of S mode.
  6. Re-add the associated accounts if needed.