Blog: vSphere

In older versions of vCenter (and associated VMware products), installing corporate certificates was a pain. It was an extremely manual process to update each component. Just take a look at https://kb.vmware.com/s/article/2034833 to get an idea. 

With vSphere 6.x, certificate replacement is considerably simpler. You still need to have a certificate for each of the components, but VMware has automated a lot of the pain points into a simple certificate wizard. In addition, instead of creating individual certificates for each piece, you simply sign a certificate (created with a special template model), replace the root VMCA certificate with your custom signed one, and regenerate all the subordinate certificates signed by your custom signed root VMCA certificate. 

It's only slightly more complex when you have a separate PSC and vCenter appliance setup, but only in that you need to update all the PSCs before updating vCenter so that the connectivity between the two appliances remains secure. Check out https://kb.vmware.com/s/article/2147542 for all the details. 


I was recently working on a project to migrate a customer from a physical server to new virtual servers on a new ESX host. I installed ESXi 6.0 Update 2 on the new physical server and delivered to the customer site. After the server was onsite, I began building my first virtual machine. Since it was the first virtual machines and vCenter was not installed yet, I downloaded the VI client and connected to the host.

While creating the first VM, I received the following warning:

"If you use this client to create a VM with this version, the VM will not have the new features and controllers in this hardware version. If you want this VM to have the full hardware features of this verison, use the vSphere Web Client to create it."

According to the warning message, I needed to use the vSphere Web Client to create a VM with the latest full hardware feature set. The vSphere Web Client is part of vCenter, so I didn’t see how this was possible because vCenter was not installed yet. VMware has been planning to obsolet the VI client and moving to the web client, so I figured this was just a push in that direction. Obviously, this doesn’t work well for customers who are just building their first virtual servers. I didn’t need the new hardware features, so I just picked Virtual Machine Version: 11 and continued building the VM.

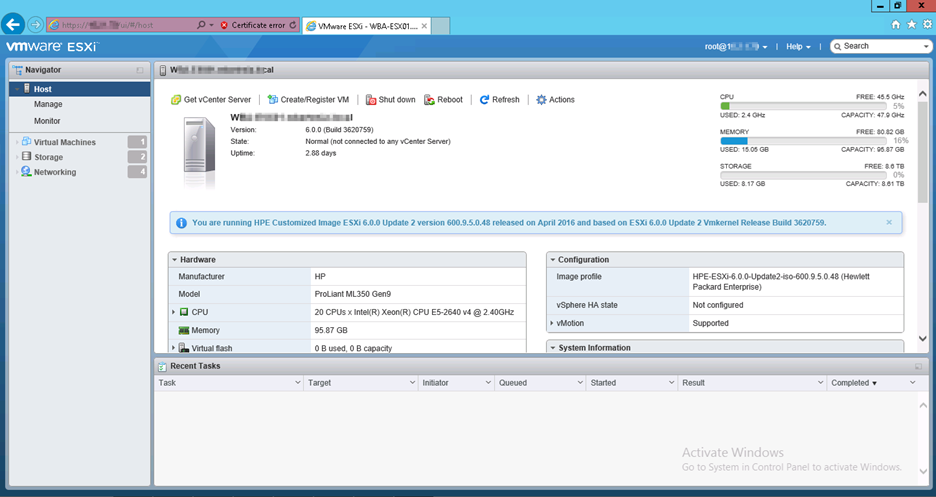
A few days later I was curious as to what the warning message meant and decided to do some more investigation. It turns out that with ESXi 6.0 Update 2, VMware started embedding a new VMWare Embedded Host Client (EHC) in ESXi. This new Embedded Host Client is a HTML5-based tool to directly manage the ESXi host and is a replacement for the VI client. This is nice because nothing needs to be downloaded or installed to manage the ESXi host using the EHC.

Here's a screenshot of the new EHC:

Knowing that the EHC exists, I now understand what the warning message I received when using the VI client was saying. They were not necessarily saying I had to use the vSphere Web Client that uses vCenter, but rather that I could connect directly to the ESXi host using the Embedded Host Client.

The VMware Embedded Host Client can be access by going to http://IPAddressOfESXiHost/ui. More information on the VMWare Embedded Host Client can be found here: http://blogs.vmware.com/vsphere/2016/04/vsphere-6-0-update-2-whats-new.html


Last month, I was working a maintenance window for a customer that has VMware View 4 installed. During the window, I would install all the updates on the master image, snapshot it, and recompose the pool using the updated image. During the recompose, View would shutdown all the machines needing the update, delete them from the inventory, copy out a new replica disk, recreate all the VMs, attach them to the replica disk, and complete the setup process. This particular recompose could not delete one of the machines. The other machines finished the process normally and were ready to go, but this one machine simply timed out during the recompose process.

During my troubleshooting, I ended up killing the task and trying to delete the machine through the View console. No luck. I could delete the machine from the vSphere client, but then how would I clean it up from inside View? [more]

http://kb.vmware.com/kb/1008658

This article provides the steps to manually remove a linked clone entry from VMWare View. The basic steps include:

  1. Remove the VM from the ADAM database
  2. Remove the linked clone reference from the View Composer database
  3. Delete the machine from vCenter

At that point, you can re-enable provisioning and everything should start working as normal once again.


I run a Windows 7 virtual machine when I need to connect to customer sites.  From this VM I frequently create an RDP session on a customer server then run the vSphere client to connect to the console of multiple VM's.  I ran into a problem where the vSphere client would "capture" my mouse/keyboard in the console session.  Normally you would press Ctrl-Alt to release the mouse, but unfortunately when running from a desktop VM, this releases for the VM and not the connected RDP session.  The only way to get out of this is to force logoff of your RDP session from different session.

My workaround was to create a new key combination through VMware Fusion to send Ctrl-Alt to the VM.  I believe this same technique will work for VMware Workstation also.


One of our new customers using VMware has not been happy with the performance of some of their virtual machines that had been setup before they were our client. Specifically, a couple of their Citrix VMs and a SQL Server 2005 VM have been “sluggish since they were built” according to the IT staff. I did some basic diagnostics on the SQL Server VM and it did seem to have some performance problems. However, since they had already bought a new physical server and started moving the databases to the new install we didn’t spend much time trying to make the VM run well. We decided to upgrade to VMware vSphere v4.1 upgrade before attempting to address any of the performance issues, since less than stellar performance on virtual terminal servers was normal on VMware v3.5.

During the upgrade, I needed to vMotion some of the VMs around to take down one of the ESX hosts. I kept getting a very generic error on several of the VMs and the migration would fail. I lmust have ooked at every setting a dozen times until I finally just shut the VM down and opened up the VMX file to see what might be causing the issue. The problem was that the person who had built the VMs originally had included processor affinity settings in the VMX file. This binds a VM to a specific subset of the physical processors/cores on the ESX hosts. For example, on the SQL Server VM, it was bound to cores 0 & 1. With this setting, ESX was forced to schedule core 0 & core 1 for all operations even though the server had 8 cores. Additionally, on ESX, the service console has processor affinity on cores 0 & 1, but it holds the highest priority. So basically the SQL Server VM (and the other VM I found that was co-scheduled on cores 0 & 1) were fighting with the service console for processor cycles. After removing the processor affinity, the CPU wait time counter in vCenter for that VM dropped 6x. I ended up finding 10-12 VMs with processor affinity set, so that explained why the performance was terrible. 

The moral of this story is to not manually schedule the processors when you configure ESX or Virtual Machines.  Chances are the ESX schedule will be much better than any manual configuration you could put together.


Here are some items to consider when upgrading to vSphere/vCenter 4.1:

  1. vCenter 4.1 requires a 64-bit OS.
  2. Windows 2008 R2 is now officially supported with vSphere 4.1.
  3. When asked what account to use for the service, the local system option was greyed out.  I had to enter my current credentials, then go back after the installation completed and change the service account to local system.
  4. The Update Manager can upgrade VM hosts.  I had to get the hosts up to version 4.0 before it would work, though.


One of our customers uses VMware VCB backups integrated with CommVault Simpana. The CommVault job simply calls a pre-backup script to snapshot the VM and copy all the VM files to the VCB proxy, backs up the files from the proxy to the CommVault media server, then a post-backup script commits the snapshot and purges the VM files from the VCB proxy.

Recently, we upgraded this customer from VMware VI3.5 to VMware vSphere v4 Update 2. For most of the VMs that are backed up with VCB, we had no issues at all. The backups ran the weekend following the upgrade with no issues. However, all of the VMs that had been secured with the Windows Security Configuration Wizard would not back up. These VMs are in the DMZ and are locked down very tight because they host externally available web applications. The issue is that each time a backup was initiated from CommVault, the VCB script would return a non-zero error due to a snapshot failure in VMware. VMware’s error was “Cannot create a quiesced snapshot because the create snapshot operation exceeded the time limit for holding off I/O in the frozen virtual machine.” This would happen when using VCB scripts, but I could create a snapshot without error from the VI client. [more]

After much research and testing, I determined that the problem was hold-over from the VMTools upgrade. In the new version of VMTools, a new service is installed called VMware Snapshot Provider is installed. This service gets installed when VMTools is upgraded. Its purpose is to help facilitate application consistent snapshots through the VMTools. On the servers that were getting the “quiesced snapshot error”, this service was not present at all, but VMTools had already been updated…very strange. Here is where the Security Configuration Wizard comes in. Part of our lockdown policy is to disable a service called COM+ System Application. This service manages the configuration and tracking of COM+ based components. Apparently, without this service enabled, VMTools upgrade will NOT install the VMware Snapshot Provider service. Without the service, no quiesced snapshots and you get errors when creating snapshots via the VCB integration modules.

So why could I create a snapshot from the Vi client? Well, VMware knows that you are using VCB to create snapshots for the purpose of backup. What good would the backup be if it wasn’t app consistent? The VI client, on the other hand, will first try to create an app consistent snapshot, but if it fails or times out, it will go ahead and create the snapshot “crash consistent” without error. VCB is not as forgiving. If the guest quiesce fails, the snapshot fails…end of story. The solution was to uninstall the VMTools, reboot, temporarily enable and start the COM+ System Application service, install VMTools, then disable the COM+ System Application service. After I did that, backups have been running fine since.


I have been working on VMware vSphere v4 for the last few days and have found that enabling jumbo frames support is not as intuitive as the admin guide makes it sound. The process goes something like this.

  1. Enable jumbo frame support on iSCSI SAN (MSA 2012i)
  2. Enable jumbo frame support on switch (a Linksys business class in this case)

Both of these are very straight forward and simple to do, but here is where it gets a little tricky. vSphere v4 jumbo frame support for the iSCSI network must be enabled with the CLI. Two things must be done. You must enable jumbo frames on the vSwitch and then able it on the VMkernel port/ports. The command to enable JF enable on the vSwitch looks like this: [more]

esxcfg-vswitch -m <MTU> <vSwitch>

In my case, I wanted a 9000 MTU (9KB) for vSwitch1, so it was ‘esxcfg-vswitch -m 9000 vSwitch1’ . All good so far. Now, I needed to JF enable the VMkernel port. Admin guide says this is the command

esxcfg-vmknic -a -I <ip address> -n <netmask> -m <MTU> <port group name>

So my command looked something like this esxcfg-vmknic -a -I 192.168.155.21 -n 255.255.255.0 -m 9000 “iSCSI VMkernel”

When I ran this command, it said that this port group didn’t exist. Exactly…that is why I am running this command…to create the VMkernel port and associated port group. After MUCH troubleshooting, I finally found that the following sequence WILL work. It must have something to do with the way the port groups and their associated identifiers are created.

  1. Create the VMkernel port in the vi client (GUI)
  2. Remove the VMkernel port from the CLI with this command esxcfg-vmknic –d “iSCSI VMkernl”
  3. Recreate the same VMkernel you just deleted with JF enabled esxcfg-vmknic -a -I 192.168.155.21 -n 255.255.255.0 -m 9000 “iSCSI VMkernel”


Today VMware released the much anticipated vSphere.  vSphere 4 is the upgrade to VI3.5 and will replace the VI name.  VMware has also restructured their licensing [more]to the following:

Small Business:

  1. Essentials
  2. Essentials Plus

Mid-Size & Enterprise Business:

  1. Standard
  2. Advanced
  3. Enterprise
  4. Enterprise Plus

To learn more about vSphere, or to download a free trial, visit http://www.vmware.com/products/vsphere/